

Build a streaming ETL pipeline with Flink
Overview
This section shows how to build a streaming ETL pipeline using the Flink service (ADH) and other Arenadata products. At the heart of the demo pipeline is a Flink application that analyzes a data stream (Kafka) in real time, extracts specific messages, and forwards them to another data stream based on a condition.
The pipeline flow is visualized in the following diagram.


The major steps are highlighted below:
-
A PostgreSQL (ADPG) server stores the
transactionstable like the one below:txn_id | acc_id | txn_value | txn_date | txn_type --------+--------+-----------+---------------------+------------ 1 | 1001 | 130.00 | 2025-07-01 10:15:00 | spb 2 | 1002 | -50.00 | 2025-07-02 09:45:00 | withdrawal 3 | 1002 | -50.25 | 2025-07-01 11:00:00 | withdrawal ...| ... | ... | ... | ...The table continuously receives
INSERT/UPDATE/DELETEcommands from external clients. -
An ADS cluster is hosting a Kafka server. The ADS cluster also has a CDC plugin (Debezium) configured to monitor the changes made to the
transactionstable. The plugin polls the ADPG’s write-ahead log (WAL) for new entries and submits each change to the Kafka queue as a separate message. -
In the ADH cluster, a Flink application subscribes to the Kafka topic using the Flink connector for Kafka. Flink analyzes each message from the topic, and if a specific condition is met (
txn_type=withdrawal), sends the message to a special Kafka queue.NOTEIn the example pipeline described in this article, Flink performs a basic check by looking for a specific substring in the message body. In real-life pipelines, Flink can be used for much deeper analysis of the data streams and is capable of revealing non-obvious patterns using stateful processing.
The pipeline demonstrated in this article is built using the following Arenadata software stack.
| Product | Version |
|---|---|
Arenadata Postgres (ADPG) |
|
Arenadata Streaming (ADS) |
|
Arenadata Streaming Control (ADS Control) |
|
Arenadata Hyperwave (ADH) |
Prepare Arenadata products
The sections below show how to install and configure the Arenadata products involved in the pipeline flow from scratch:
ADPG
-
Install an ADPG cluster according to the Online installation guide.
-
Ensure the ADPG service uses the default port number (
5432) for incoming connections. -
Create the
demo_userrole. For this, runpsqlon the host with the ADPG service:$ sudo su - postgres $ psqlAnd execute the command:
CREATE ROLE demo_user WITH LOGIN SUPERUSER PASSWORD 'password'; -
In the installed ADPG cluster, create the
demo_dbdatabase. For this, run inpsql:CREATE DATABASE demo_db OWNER demo_user; -
In the
demo_dbdatabase, create thetransactionstable in thepublicschema:\c demo_dbCREATE TABLE transactions ( txn_id BIGINT, acc_id INTEGER, txn_value DOUBLE PRECISION, txn_date TIMESTAMP, txn_type TEXT ); -
Modify the pg_hba.conf configuration to allow the access to ADPG. For this, add the following line to the PG_HBA field on the configuration page of the ADPG service:
host demo_db demo_user all trustNOTEThis line allows TCP/IP connections to ADPG from any IP address, which is insecure for a production environment. For better security, specify explicit IP addresses of hosts that will connect to the ADPG server. -
Set the
wal_level=logicalconfiguration parameter. This adds information required to support logical decoding to the log, which is required by Debezium. To set the parameter, add an entry in the postgresql.conf custom section field on the configuration parameters page of the ADPG service.
ADS and ADS Control
-
Install an ADS cluster according to the Online installation guide. The cluster must include the ZooKeeper, Kafka, and Kafka Connect services.
-
Enable the auto.create.topics.enable Kafka configuration parameter in the server.properties group. This is required to allow Debezium to create Kafka topics automatically.
-
Install an ADS Control cluster according to the instructions.
-
Integrate ADS Control with the ADS cluster according to the instructions.
-
In the ADS Control web UI, create a Debezium connector for the ADPG server according to the instructions. The Debezium connector used in this scenario has the following JSON configuration:
{
  "connector.class": "io.debezium.connector.postgresql.PostgresConnector",
  "publication.autocreate.mode": "filtered",
  "database.user": "demo_user", (1)
  "database.dbname": "demo_db", (2)
  "tasks.max": 1,
  "database.port": 5432,
  "plugin.name": "pgoutput",
  "topic.prefix": "postgres",
  "database.hostname": "10.92.43.174", (3)
  "database.password": "password", (4)
  "name": "PostgresConnector",
  "value.converter": "org.apache.kafka.connect.storage.StringConverter",
  "key.converter": "org.apache.kafka.connect.storage.StringConverter"
}
1 The PostgreSQL role for Debezium to connect to ADPG. 2 The ADPG database to monitor for changes. 3 The address of the ADPG server. Replace with your ADPG server IP address. 4 The password to access the ADPG server.
As a result, Debezium reads the ADPG WAL file and produces messages to the postgres.public.transactions Kafka topic.
An example message is below:
Struct{after=Struct{txn_id=1,acc_id=1001,txn_value=250.0,txn_date=1751364900000000,txn_type=deposit},source=Struct{version=2.7.0.Final,connector=postgresql,name=postgres,ts_ms=1752485024943,snapshot=first,db=demo_db,sequence=[null,"29241720"],ts_us=1752485024943896,ts_ns=1752485024943896000,schema=public,table=transactions,txId=758,lsn=29241720},op=r,ts_ms=1752485025133,ts_us=1752485025133518,ts_ns=1752485025133518357}
ADH
Install an ADH cluster according to the Online installation guide. The ADH cluster must include the following services:
-
Core configuration
-
HDFS
-
YARN
-
ZooKeeper
-
Flink
Create a Flink application
The following steps show how to build a Flink application in Java using Maven.
|
NOTE
For more information on running Flink applications in Python, refer to the PyFlink usage examples article.
|
Install Maven (if not yet installed):
-
Download Maven:
$ wget https://dlcdn.apache.org/maven/maven-3/3.9.10/binaries/apache-maven-3.9.10-bin.tar.gz -P /tmp -
Unpack the archive:
$ sudo tar -zxf /tmp/apache-maven-3.9.10-bin.tar.gz -C /opt -
Check the Maven version:
$ /opt/apache-maven-3.9.10/bin/mvn -versionThe output:
Apache Maven 3.9.10 (5f519b97e944483d878815739f519b2eade0a91d)
Maven home: /opt/apache-maven-3.9.10
Java version: 1.8.0_412, vendor: Red Hat, Inc., runtime: /usr/lib/jvm/java-1.8.0-openjdk-1.8.0.412.b08-1.el7_9.x86_64/jre
Default locale: en_US, platform encoding: UTF-8
OS name: "linux", version: "3.10.0-1160.59.1.el7.x86_64", arch: "amd64", family: "unix"
Once Maven is installed, create the project:
-
Create a new Maven project with the following structure:
flink-app-demo
│   pom.xml
└───src
    └───main
        └───java
            └───io
                └───arenadata
                       └─KafkaFlinkApp.java
The example pom.xml is presented below.
pom.xml<project xmlns="http://maven.apache.org/POM/4.0.0" xmlns:xsi="http://www.w3.org/2001/XMLSchema-instance" xsi:schemaLocation="http://maven.apache.org/POM/4.0.0 http://maven.apache.org/maven-v4_0_0.xsd"> <modelVersion>4.0.0</modelVersion> <groupId>io.arenadata</groupId> <artifactId>flink-app-demo</artifactId> <version>1.0-SNAPSHOT</version> <packaging>jar</packaging> <name>Flink-app-demo</name> <properties> <flink.version>1.20.1</flink.version> <kafka.connector.version>3.3.0-1.20</kafka.connector.version> <java.version>1.8</java.version> <maven.compiler.source>8</maven.compiler.source> <maven.compiler.target>8</maven.compiler.target> </properties> <dependencies> <dependency> <groupId>org.apache.flink</groupId> <artifactId>flink-streaming-java</artifactId> <version>${flink.version}</version> </dependency> <dependency> <groupId>org.apache.flink</groupId> <artifactId>flink-connector-base</artifactId> <version>${flink.version}</version> </dependency> <dependency> <groupId>org.apache.flink</groupId> <artifactId>flink-connector-kafka</artifactId> <version>${kafka.connector.version}</version> </dependency> <dependency> <groupId>com.fasterxml.jackson.core</groupId> <artifactId>jackson-databind</artifactId> <version>2.17.1</version> </dependency> </dependencies> </project>NOTEThis scenario shows how to build and run a Flink JAR in the ADH cluster, which provides core libraries, mandatory for Flink operation. Depending on the Flink version, running the project in an IDE (outside of ADH cluster) may result in
java.lang.NoClassDefFoundErrorexceptions due to lack of dependencies. To test your Flink application in IDE outside the ADH cluster, be sure to include core Flink dependencies in your pom.xml. An example of such "fat" pom.xml is below.pom.xml for running in IDE<project xmlns="http://maven.apache.org/POM/4.0.0" xmlns:xsi="http://www.w3.org/2001/XMLSchema-instance" xsi:schemaLocation="http://maven.apache.org/POM/4.0.0 http://maven.apache.org/maven-v4_0_0.xsd"> <modelVersion>4.0.0</modelVersion> <groupId>io.arenadata</groupId> <artifactId>flink-app-demo</artifactId> <version>1.0-SNAPSHOT</version> <packaging>jar</packaging> <name>Flink-app-demo</name> <properties> <flink.version>1.20.1</flink.version> <kafka.connector.version>3.3.0-1.20</kafka.connector.version> <java.version>1.8</java.version> <maven.compiler.source>8</maven.compiler.source> <maven.compiler.target>8</maven.compiler.target> </properties> <!-- This dependency is provided, because it should not be packaged into the JAR file. --> <dependencies> <!-- Flink Streaming API --> <dependency> <groupId>org.apache.flink</groupId> <artifactId>flink-streaming-java</artifactId> <version>${flink.version}</version> </dependency> <dependency> <groupId>org.apache.flink</groupId> <artifactId>flink-connector-base</artifactId> <version>${flink.version}</version> </dependency> <!-- Flink Kafka Connector --> <dependency> <groupId>org.apache.flink</groupId> <artifactId>flink-connector-kafka</artifactId> <version>${kafka.connector.version}</version> </dependency> <!-- Kafka client (optional, provided by connector) --> <dependency> <groupId>org.apache.kafka</groupId> <artifactId>kafka-clients</artifactId> <version>3.7.2</version> </dependency> <!-- Flink Core (optional) --> <dependency> <groupId>org.apache.flink</groupId> <artifactId>flink-core</artifactId> <version>${flink.version}</version> </dependency> <!-- Logging (required for output visibility) --> <dependency> <groupId>org.slf4j</groupId> <artifactId>slf4j-log4j12</artifactId> <version>1.7.36</version> </dependency> <dependency> <groupId>com.fasterxml.jackson.core</groupId> <artifactId>jackson-databind</artifactId> <version>2.17.1</version> </dependency> <!-- To make it work in IntelliJ IDEA: --> <dependency> <groupId>org.apache.flink</groupId> <artifactId>flink-runtime</artifactId> <version>${flink.version}</version> </dependency> <dependency> <groupId>org.apache.flink</groupId> <artifactId>flink-clients</artifactId> <version>${flink.version}</version> </dependency> <dependency> <groupId>org.apache.flink</groupId> <artifactId>flink-runtime-web</artifactId> <version>${flink.version}</version> <optional>true</optional> </dependency> <dependency> <groupId>org.apache.flink</groupId> <artifactId>flink-test-utils</artifactId> <version>${flink.version}</version> <scope>test</scope> </dependency> </dependencies> </project> -
Paste the following code to KafkaFlinkApp.java:
package io.arenadata;

import org.apache.flink.api.common.eventtime.WatermarkStrategy;
import org.apache.flink.api.common.serialization.SimpleStringSchema;
import org.apache.flink.connector.kafka.sink.KafkaSink;
import org.apache.flink.connector.kafka.sink.KafkaRecordSerializationSchema;
import org.apache.flink.connector.kafka.source.KafkaSource;
import org.apache.flink.connector.kafka.source.enumerator.initializer.OffsetsInitializer;
import org.apache.flink.streaming.api.datastream.DataStream;
import org.apache.flink.streaming.api.environment.StreamExecutionEnvironment;

public class KafkaFlinkApp {

    public static void main(String[] args) throws Exception {
        final StreamExecutionEnvironment env = StreamExecutionEnvironment.getExecutionEnvironment();

        KafkaSource<String> src_kafka_transactions = KafkaSource.<String>builder() (1)
                .setBootstrapServers("ka-ads-1.ru-central1.internal:9092,ka-ads-2.ru-central1.internal:9092,ka-ads-3.ru-central1.internal:9092") (2)
                .setTopics("postgres.public.transactions") (3)
                .setGroupId("flink-consumer-group")
                .setStartingOffsets(OffsetsInitializer.earliest())
                .setValueOnlyDeserializer(new SimpleStringSchema())
                .build();

        DataStream<String> stream = env.fromSource(src_kafka_transactions, (4)
                WatermarkStrategy.noWatermarks(),
                "Kafka Source");


        DataStream<String> filtered = stream.filter(msg -> { (5)
            boolean isWithdrawal = msg.contains("txn_type=withdrawal");
            if (isWithdrawal) {
                System.out.println("Withdrawal detected in message: " + msg);
            }
            return isWithdrawal;
        });

        KafkaSink<String> sink_kafka_withdrawals = KafkaSink.<String>builder() (6)
                .setBootstrapServers("ka-ads-1.ru-central1.internal:9092,ka-ads-2.ru-central1.internal:9092,ka-ads-3.ru-central1.internal:9092")
                .setRecordSerializer(
                        KafkaRecordSerializationSchema.<String>builder()
                                .setTopic("postgres.public.transactions.withdrawals")
                                .setValueSerializationSchema(new SimpleStringSchema())
                                .build())
                .build();

        filtered.sinkTo(sink_kafka_withdrawals); (7)

        env.execute("My Flink demo app"); (8)
    }
}
1 Specifies a Kafka server as a source of input data. 2 A list of Kafka broker addresses to connect to the ADS cluster. The up-to-date connection string can be found in ADCM (Clusters → <ADS_cluster> → Services → Kafka → Info). 3 A Kafka topic to subscribe to. Debezium automatically creates this topic and pushes messages with information about the changes in the ADPG table. 4 Creates a Flink DataStreamobject based on the Kafka source.5 Creates another DataStream that includes only the messages containing txn_type=withdrawal. In real-life pipelines, Flink can perform more complicated analysis of a DataStream using advanced Flink API tools (for example, detecting X subsequent transactions committed by the same account within a specific time window).6 Specifies a Kafka sink to send the filtered stream. 7 Directs the filtered stream to ADS. 8 Runs the application. -
Compile the application:
$ cd flink-app-demo
$ /opt/apache-maven-3.9.10/bin/mvn clean package
Run the pipeline
-
Restart the ADPG, ADS, ADS Control, and ADH clusters.
-
On an ADH host with the Flink client component, run the Flink application:
$ flink run flink-app-demo/target/flink-app-demo-1.0-SNAPSHOT.jarThis submits the JAR to the Flink JobManager and further execution is performed by TaskManagers. The sample output:
Setting HBASE_CONF_DIR=/etc/hbase/conf because no HBASE_CONF_DIR was set.
SLF4J: Class path contains multiple SLF4J bindings.
SLF4J: Found binding in [jar:file:/usr/lib/flink/lib/log4j-slf4j-impl-2.17.1.jar!/org/slf4j/impl/StaticLoggerBinder.class]
SLF4J: Found binding in [jar:file:/usr/lib/hadoop/lib/slf4j-reload4j-1.7.36.jar!/org/slf4j/impl/StaticLoggerBinder.class]
SLF4J: See http://www.slf4j.org/codes.html#multiple_bindings for an explanation.
SLF4J: Actual binding is of type [org.apache.logging.slf4j.Log4jLoggerFactory]
Job has been submitted with JobID c917cc83500f4866e3aeb67d1d17dbf7
-
Verify that the application has started successfully by running
flink listor by using Flink web UI.Sample output:
[konstantin@ka-adh-2 ~]$ flink list
------------------ Running/Restarting Jobs -------------------
14.07.2025 12:36:13 : 57ff8e66a5a76cf80da5b760b44ac0ad : My Flink demo app (RUNNING)
--------------------------------------------------------------
No scheduled jobs.
-
Write some data to the test ADPG table. For this, run
psqlon the ADPG server host:$ sudo su - postgres $ psqlConnect to the test database and insert some records:
\c demo_dbINSERT INTO public.transactions VALUES (1, 1002, 130.00, '2025-07-14 14:21:00', 'withdrawal'); (2, 1001, 50.00, '2025-07-14 14:22:00', 'deposit'); (3, 1002, 50.25, '2025-07-14 14:23:00', 'spb'); (4, 1003, 75.15, '2025-07-14 14:24:00', 'withdrawal'); -
In the ADS Control web UI, go to Clusters → <ADS_cluster> → Topics → postgres.public.transactions.withdrawals → Messages as shown below.
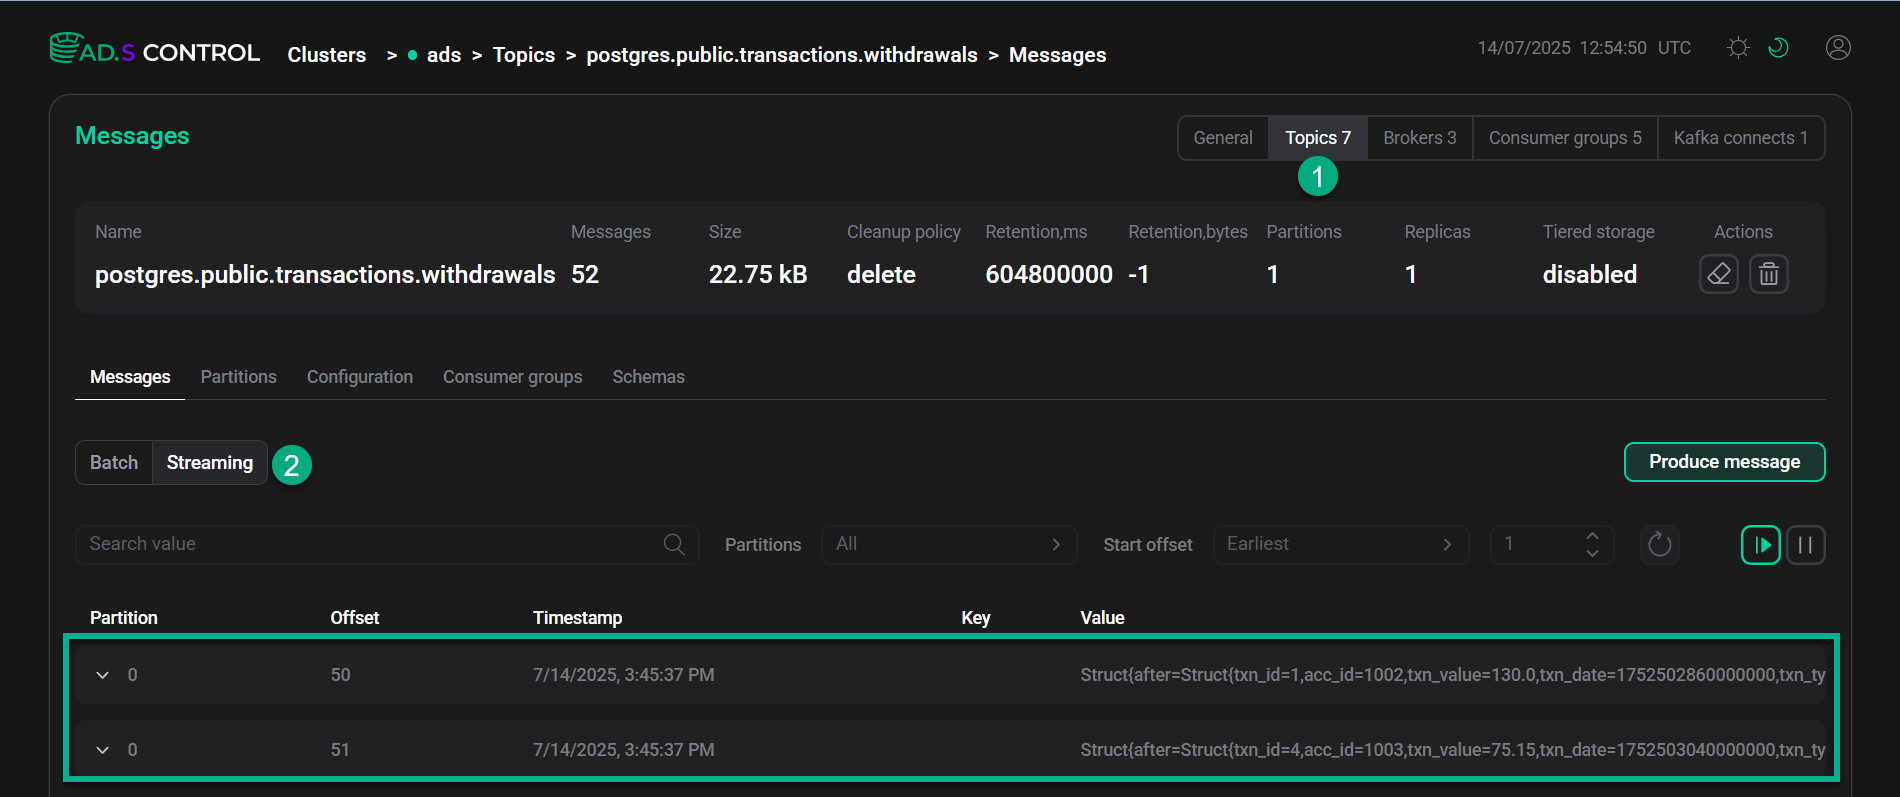 ADS Control web UI
ADS Control web UI
ADS Control web UIAfter a short delay, two new messages filtered by Flink (
txn_type=withdrawal) appear in thepostgres.public.transactions.withdrawalstopic. Verify the messages' content. -
Stop the Flink application manually. For this, run the following commands on any ADH host with the Flink client component.
Get the Flink application ID:
$ flink listCancel the application:
$ flink cancel <application_id>Sample output:
Cancelling job c917cc83500f4866e3aeb67d1d17dbf7.
Cancelled job c917cc83500f4866e3aeb67d1d17dbf7.