

Create a simple DAG
This article explains how to create and run your first DAG to process CSV files. This DAG will simulate an ETL process and include the following tasks:
-
Extract. This task loads the records from a source CSV file and transfers them to the next task. For this example, the people_ages_titles.csv test file is used, containing a list of 1000 people with their names and ages.
-
Transform. This task selects the records received from the previous task according to the following criterion: the age of the people should be less or equal to 18.
-
Load. This task loads the transformed records received from the previous task to a new CSV file.
|
NOTE
|
Step 1. Prepare a DAG file
Prepare a DAG by following these steps:
-
Add the ETL_test.py file to your DAG folder that is usually located in the home AirFlow folder and called dags. The content of the file is described below:
import pandas as pd (1)
from datetime import timedelta, datetime
from airflow import DAG
from airflow.operators.python_operator import PythonOperator

dag = DAG('ETL_test', (2)
    schedule_interval=timedelta(days=1),
    start_date=datetime(2021, 12, 17, 0))

def extract_people(path: str, **context) -> None: (3)
    extracted_people = pd.read_csv(path,sep=',',header=1)
    context['ti'].xcom_push(key='extracted_people', value=extracted_people)

def transform_people(**context) -> None: (4)
    extracted_people = context['ti'].xcom_pull(key='extracted_people', task_ids=['extract_people'])[0]
    transformed_people = []
    for person in extracted_people.values:
        if int(person[1]) <= 18:
            transformed_people.append({
                'Name': person[0],
                'Age': person[1]
            })
    context['ti'].xcom_push(key='transformed_people', value=transformed_people)

def load_people(path: str, **context) -> None: (5)
    transformed_people = context['ti'].xcom_pull(key='transformed_people', task_ids=['transform_people'])
    loaded_people = pd.DataFrame(transformed_people[0])
    loaded_people.to_csv(path, index=None)

task_extract_people = PythonOperator( (6)
    task_id='extract_people',
    python_callable=extract_people,
    op_kwargs={'path': '/opt/airflow/input/people_ages_titles.csv'},
    dag=dag,
    provide_context=True
)

task_transform_people = PythonOperator( (6)
    task_id='transform_people',
    python_callable=transform_people,
    dag=dag,
    provide_context=True
)

task_load_people = PythonOperator( (6)
    task_id='load_people',
    python_callable=load_people,
    op_kwargs={'path': '/opt/airflow/output/loaded_people.csv'},
    dag=dag,
    provide_context=True
)

task_extract_people >> task_transform_people >> task_load_people (7)
1 Importing. Import pandas to work with CSV files. 2 The DAG definition. Create the ETL_testobject of type DAG and make it run every day since 2021-12-17 00:00:00.3 The first Python function. The first task extract_peoplewill use it. This function gets the CSV file from the definedpathand loads it using thepandasmodule. It uses thecontextobject to transfer the loaded data through the XCOM data transport service to the next tasktransform_people.4 The second Python function. The second task transform_peoplewill use it. This function gets the extracted data from the first taskextract_peopleand finds in it the records with the specified value of the columnAge(less or equal to 18). Then it copies the found data to an array and makes that array available for the next taskload_people.5 The third Python function. The third task load_peoplewill use it. The function gets the transformed data from the second tasktransform_peopleand saves it in a new file located at the specifiedpath. For this purpose, it uses the modulepandas.6 Declaration of tasks. This part defines operators, functions, and input parameters that the tasks will use. It also binds the tasks to the DAG defined earlier. 7 Dependency definition. This code defines dependencies between created tasks. IMPORTANTIf you use AirFlow installed in a Docker container (in ADH, it comes exactly like this), be careful with paths. For example, use /opt/airflow/ instead of /srv/airflow/home/.
-
Make sure that the file is located in the DAG directory by running this command:
$ ls -la /srv/airflow/home/dags/The output looks similar to this:
total 8
drwxr-xr-x. 3 50000 50000   65 Dec 18 13:11 .
drwxr-xr-x. 6 50000 50000  126 Dec 18 11:07 ..
-rw-r--r--. 1 50000 50000  799 Dec 16 07:18 adcm_check.py
-rw-r--r--  1 root  root  1771 Dec 18 13:10 ETL_test.py
drwxr-xr-x. 2 50000 50000   74 Dec 18 13:10 __pycache__
-
Make the input and output folders in the Airflow home directory:
$ sudo mkdir /srv/airflow/home/input
$ sudo mkdir /srv/airflow/home/output
Make sure the folders are created by listing the home directory:
$ ls -la /srv/airflow/home/The output looks similar to this:
total 48
drwxr-xr-x. 6 50000 50000   126 Dec 18 13:58 .
drwxr-xr-x. 4 root  root     35 Dec 16 07:17 ..
-rw-r--r--. 1 root  root  37224 Dec 16 07:18 airflow.cfg
-rw-r--r--  1 50000 50000     3 Dec 18 11:07 airflow-webserver.pid
drwxr-xr-x. 3 50000 50000    65 Dec 18 13:11 dags
drwxr-xr-x  2 root  root      6 Dec 18 13:57 input
drwxr-xr-x. 7 50000 50000   121 Dec 17 15:55 logs
drwxr-xr-x  2 root  root      6 Dec 18 13:58 output
-rw-r--r--. 1 50000 50000  2528 Dec 16 07:19 unittests.cfg
-
Download the source file people_ages_titles.csv to the local file system of the Airflow server. Make sure the file is uploaded successfully using the following command:
$ ls -la ~The result looks similar to this:
total 64
drwx------. 7 dasha dasha   196 Dec 17 15:44 .
drwxr-xr-x. 3 root  root     19 Aug 31 11:55 ..
drwx------. 3 dasha dasha    17 Aug 31 15:29 .ansible
-rw-------. 1 dasha dasha 23583 Dec 17 18:17 .bash_history
-rw-r--r--. 1 dasha dasha    18 Apr  1  2020 .bash_logout
-rw-r--r--. 1 dasha dasha   193 Apr  1  2020 .bash_profile
-rw-r--r--. 1 dasha dasha   231 Apr  1  2020 .bashrc
drwx------. 3 dasha dasha    17 Dec  7 11:46 .cache
-rw-rw-r--. 1 dasha dasha  7217 Nov 25 07:05 dasha
-rw-rw-r--. 1 dasha dasha 17661 Dec 17 15:44 people_ages_titles.csv
drwxrw----. 3 dasha dasha    19 Dec  6 14:06 .pki
drwxrwxr-x. 2 dasha dasha    21 Nov 30 09:25 .sqlline
drwx------. 2 dasha dasha    29 Aug 31 11:55 .ssh
-
Copy the people_ages_titles.csv file to the previously created folder input:
$ sudo cp ~/people_ages_titles.csv /srv/airflow/home/inputMake sure the operation is successful by running the following command:
$ ls -la /srv/airflow/home/inputThe output looks similar to this:
total 20
drwxr-xr-x  2 root  root     36 Dec 18 14:03 .
drwxr-xr-x. 6 50000 50000   126 Dec 18 13:58 ..
-rw-r--r--  1 root  root  17661 Dec 18 14:03 people_ages_titles.csv
-
Change the owner of the created input and output folders and their contents to
airflow. Otherwise, errors may occur when accessing files during the DAG execution. Use the following commands:$ sudo chown -R 50000:50000 /srv/airflow/home/input $ sudo chown -R 50000:50000 /srv/airflow/home/outputTo check the result, run this command:
$ ls -la /srv/airflow/home/The output looks similar to this:
total 48
drwxr-xr-x. 6 50000 50000   126 Dec 18 13:58 .
drwxr-xr-x. 4 root  root     35 Dec 16 07:17 ..
-rw-r--r--. 1 root  root  37224 Dec 16 07:18 airflow.cfg
-rw-r--r--  1 50000 50000     3 Dec 18 11:07 airflow-webserver.pid
drwxr-xr-x. 3 50000 50000    65 Dec 18 13:11 dags
drwxr-xr-x  2 50000 50000    36 Dec 18 14:03 input
drwxr-xr-x. 8 50000 50000   137 Dec 18 14:12 logs
drwxr-xr-x  2 50000 50000     6 Dec 18 13:58 output
-rw-r--r--. 1 50000 50000  2528 Dec 16 07:19 unittests.cfg
Step 2. Run the DAG via Web UI
To run and monitor the DAG created earlier, follow these steps:
-
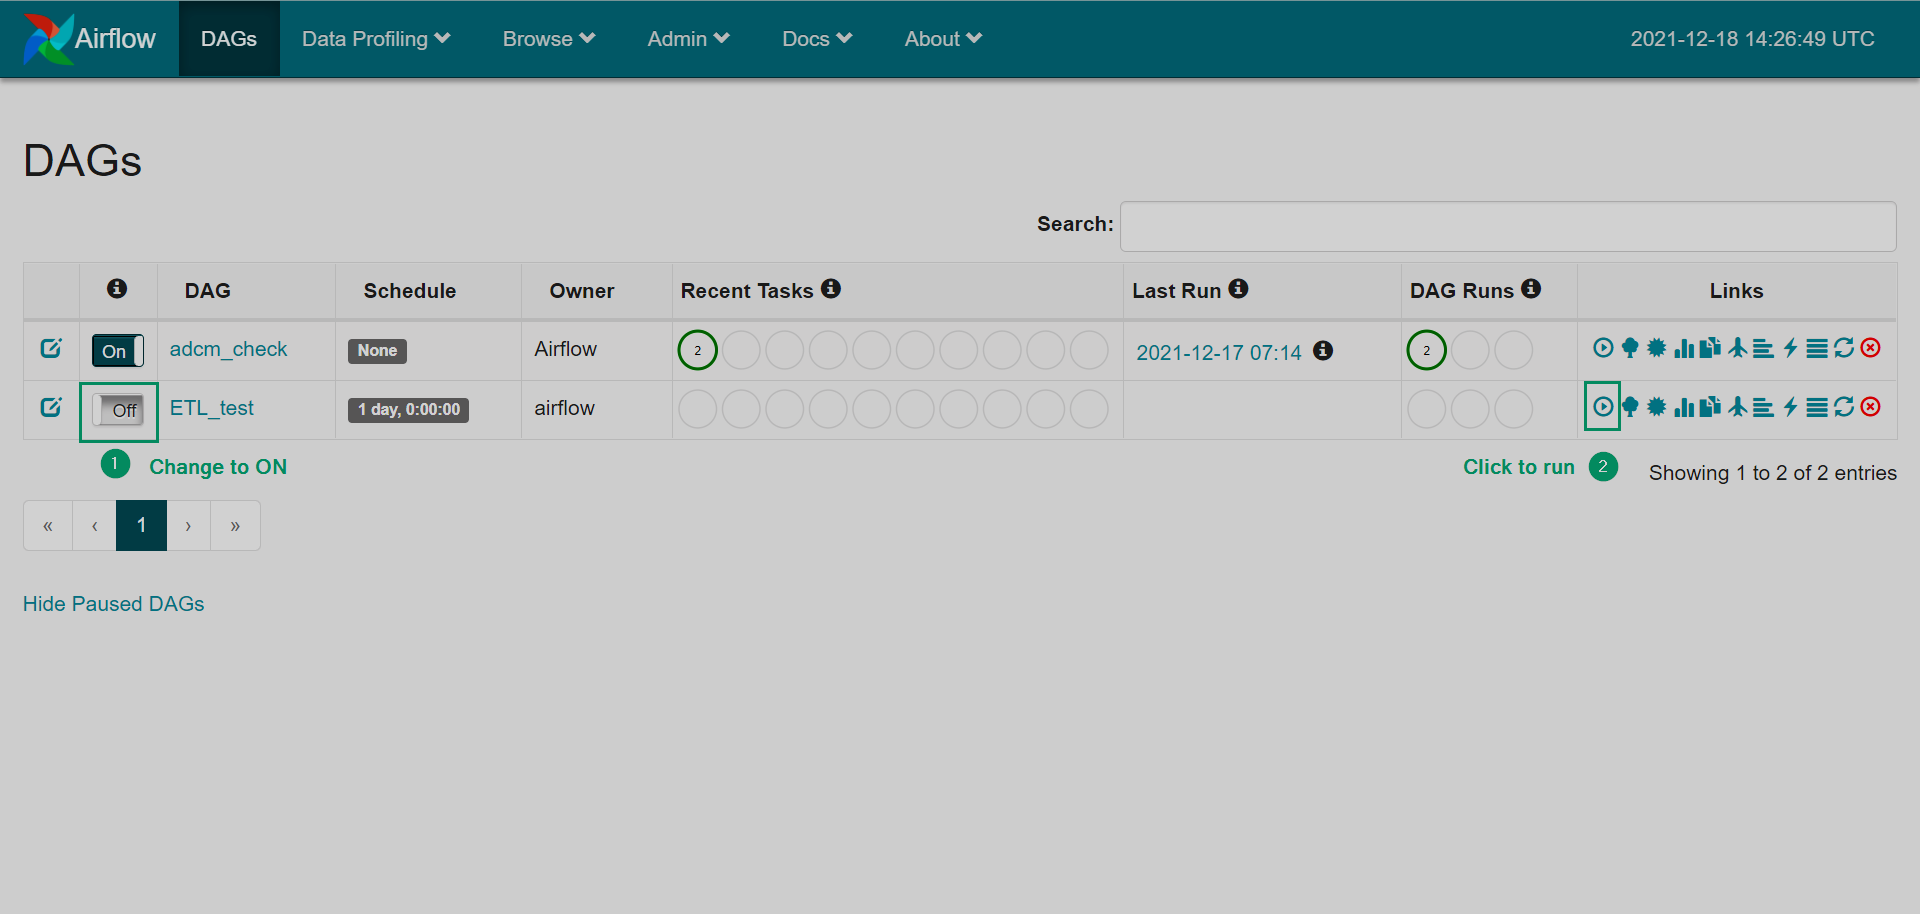
Open the home page of the Airflow Web UI. If everything is configured correctly, you will see the
ETL_testDAG at the DAGs tab. Otherwise, the errors will be displayed. The new DAG is displayed
 The new DAG is displayed
 -
Activate the DAG using one of the following ways:
-
Click the toggle and wait for the next running according to the configured schedule.
-
Open the DAG and click the icon Trigger Dag to run the DAG immediately.
 Activating the DAG
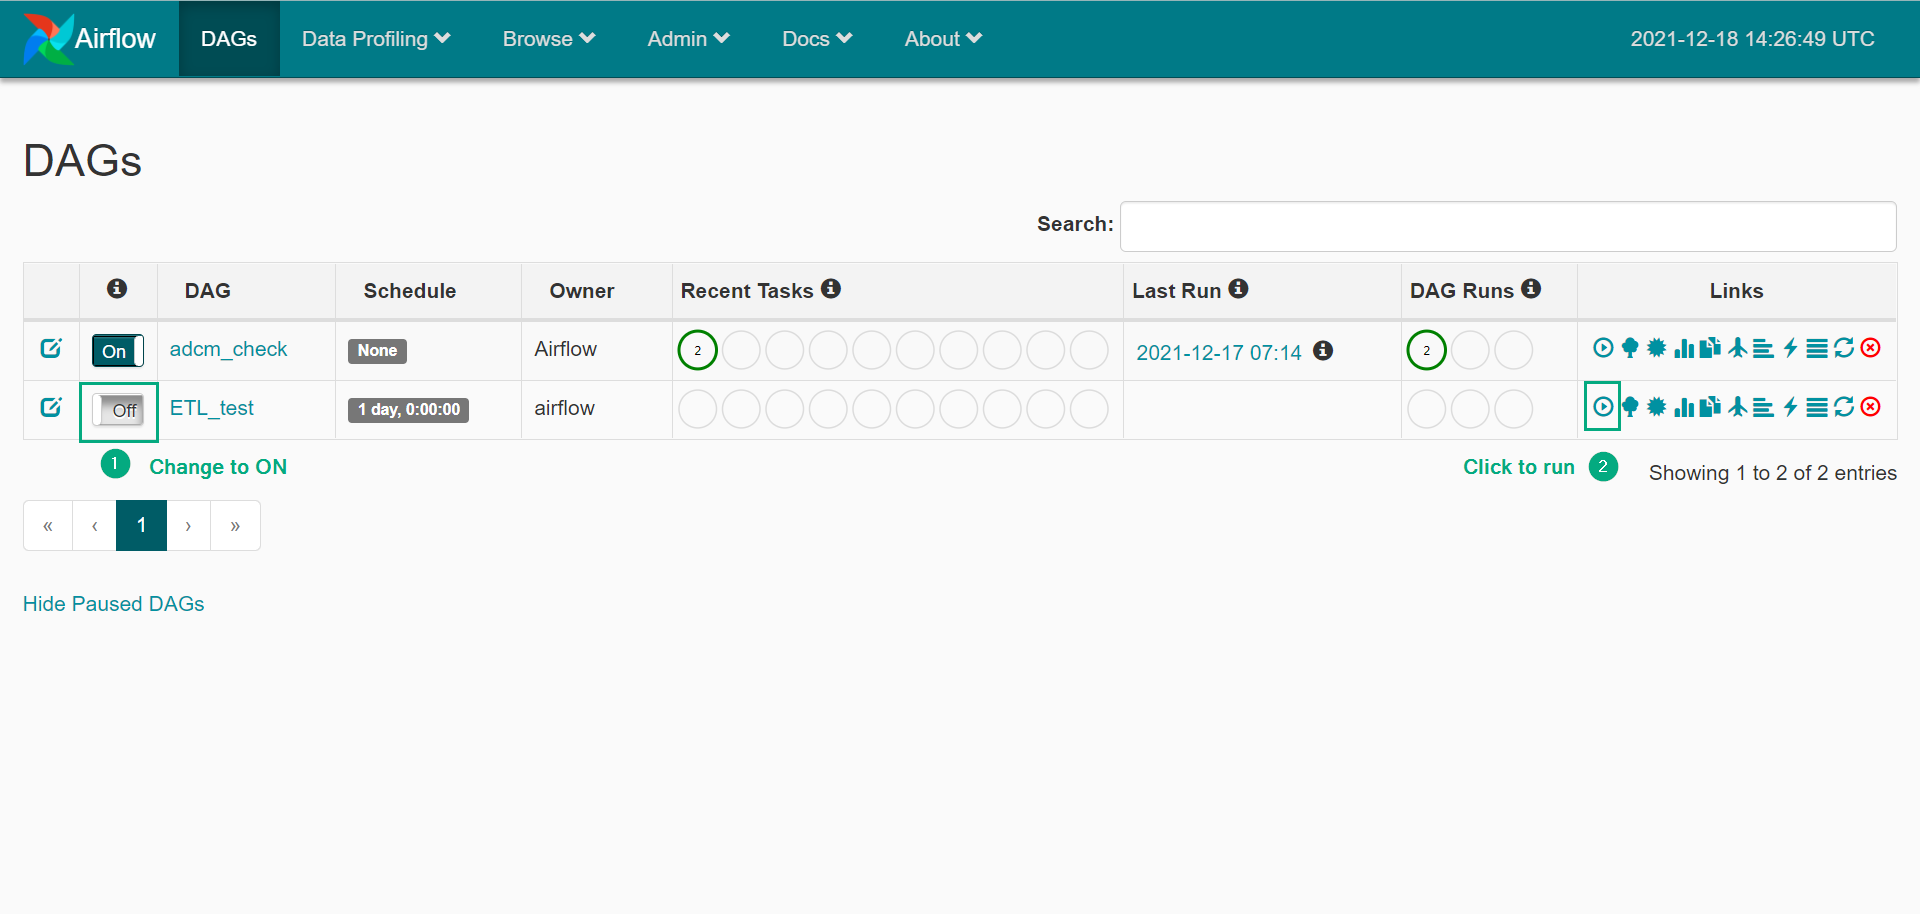 Activating the DAG
-
-
After a DAG run starts, you can see the status information at the home page: the full number of successful, failed, running, and other types of DAG runs and task instances. To view the detailed information about the DAG runs, click the name of the DAG.
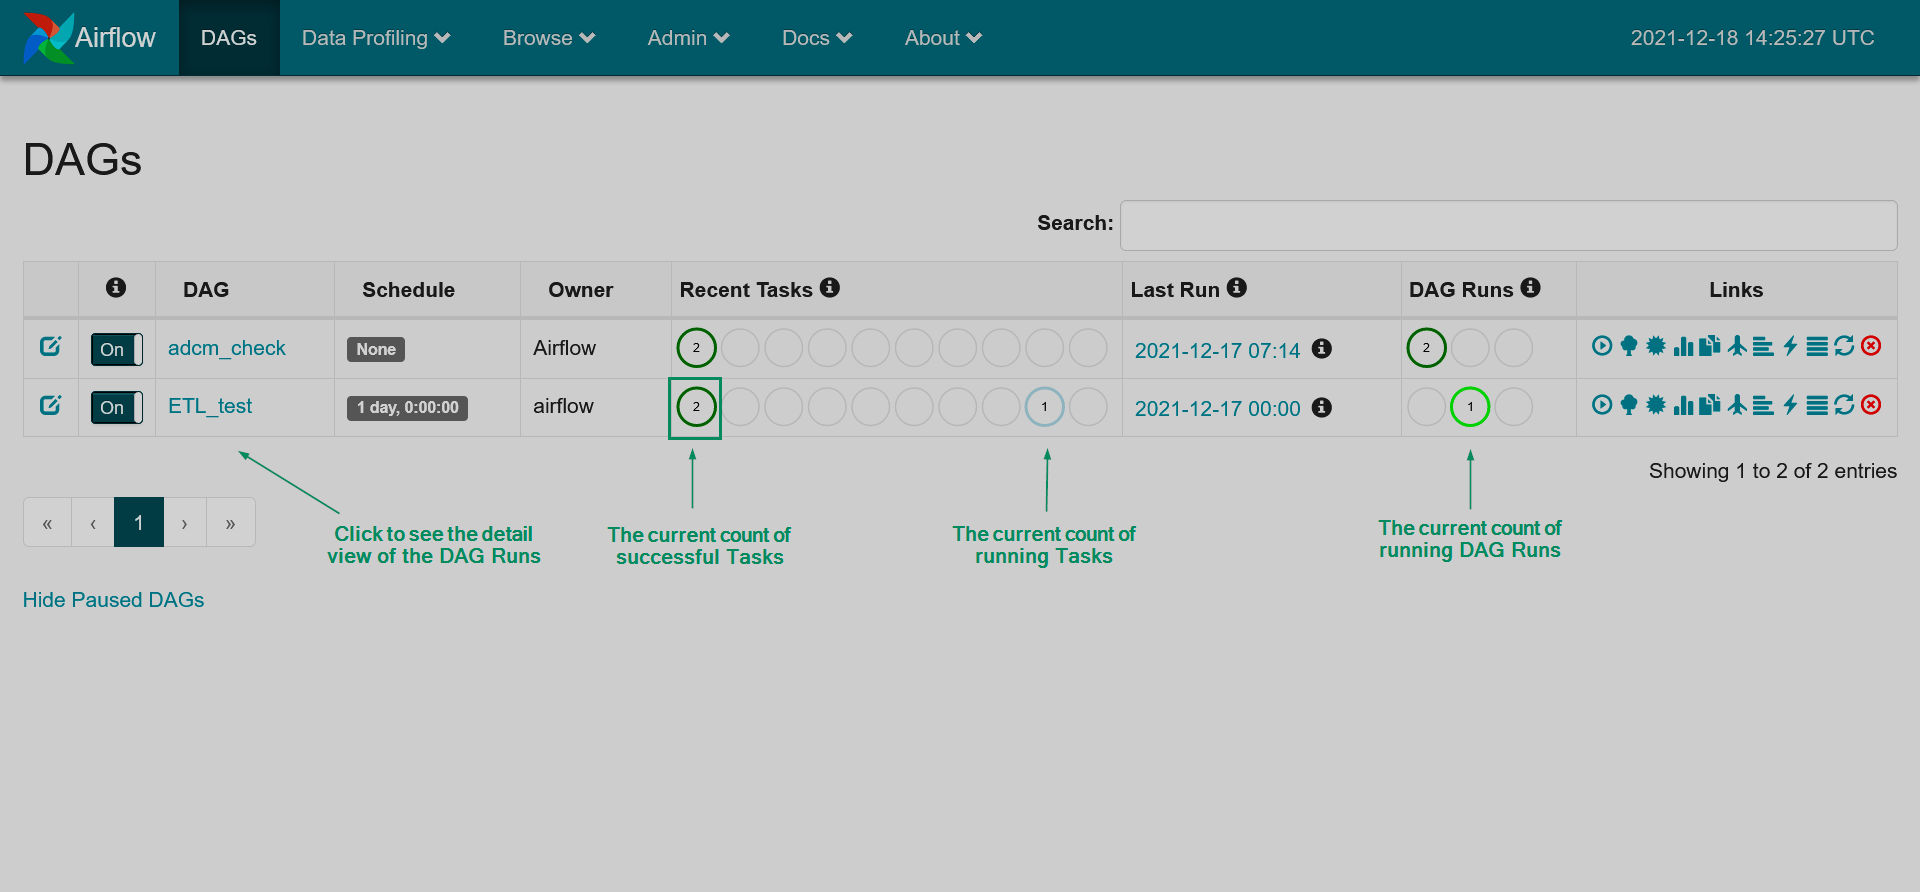 The DAG is running
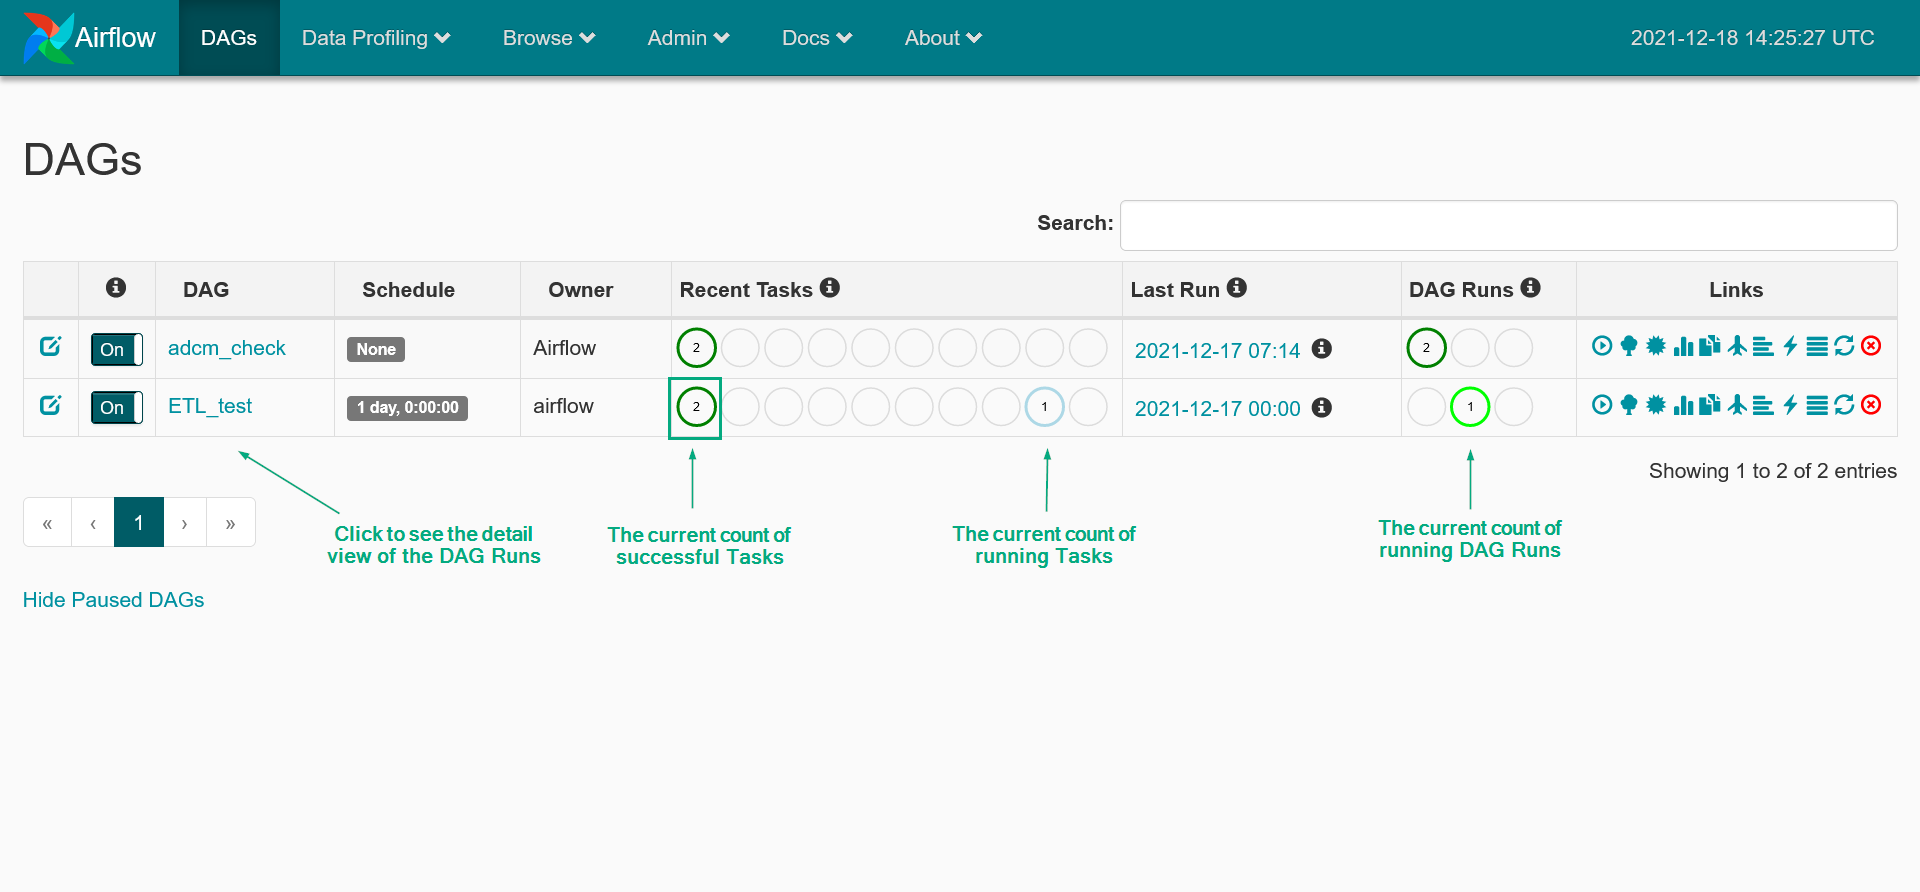 The DAG is running
 -
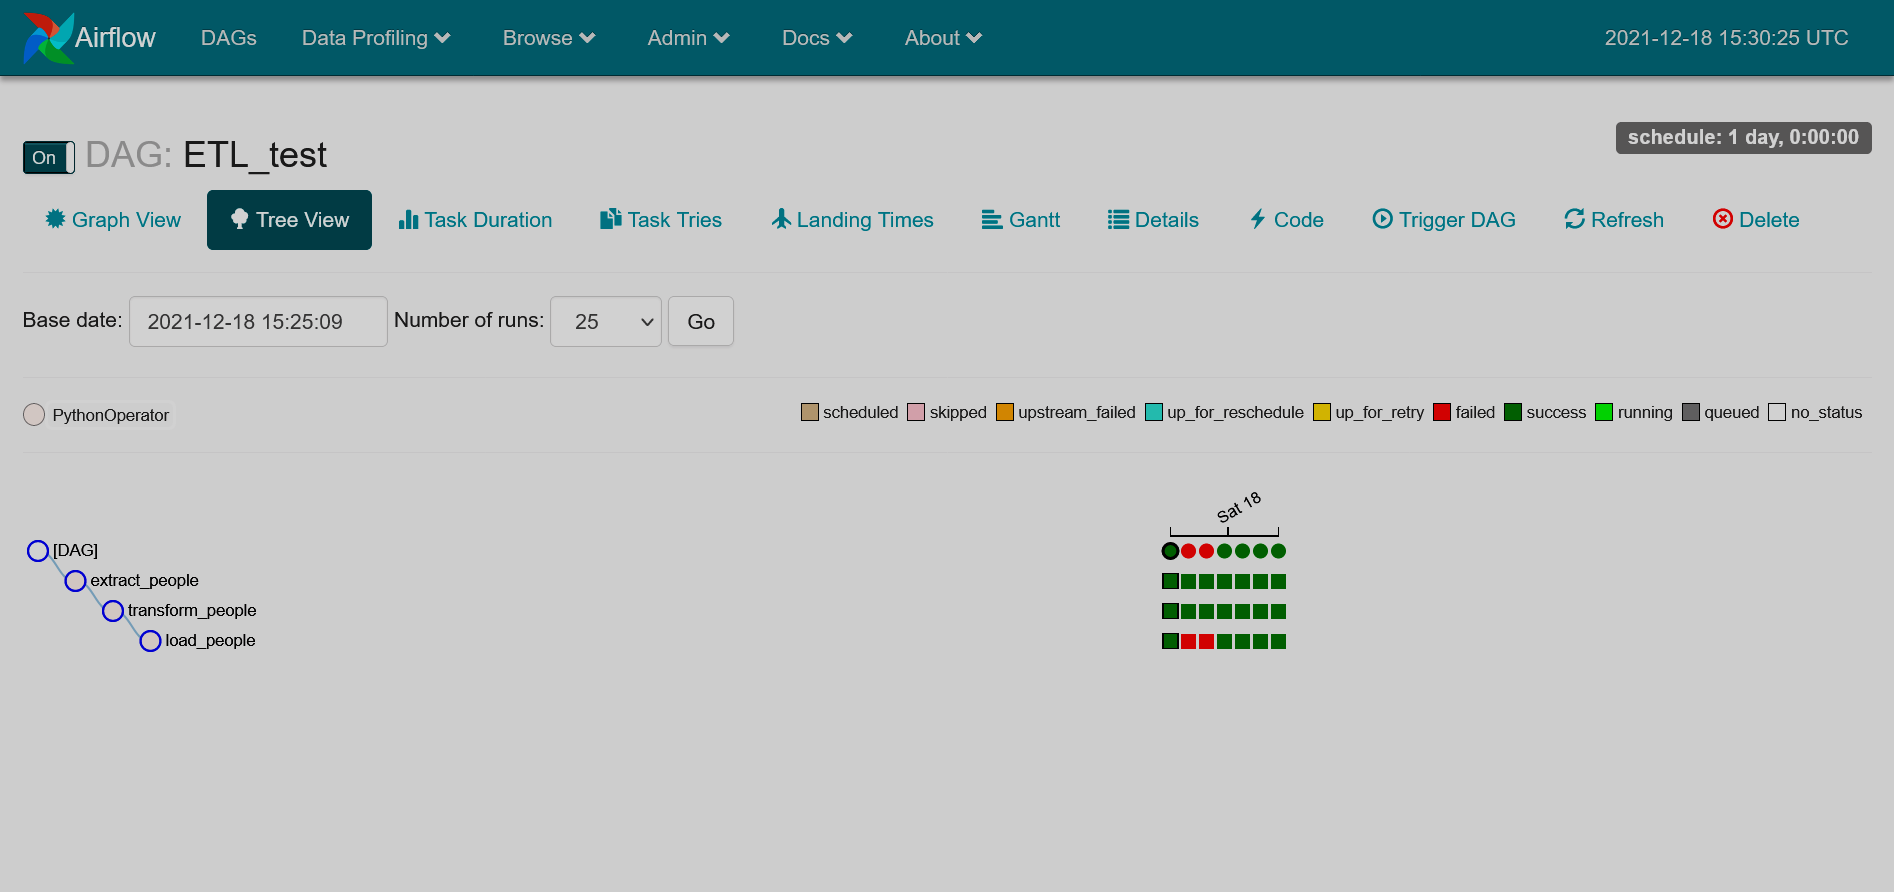
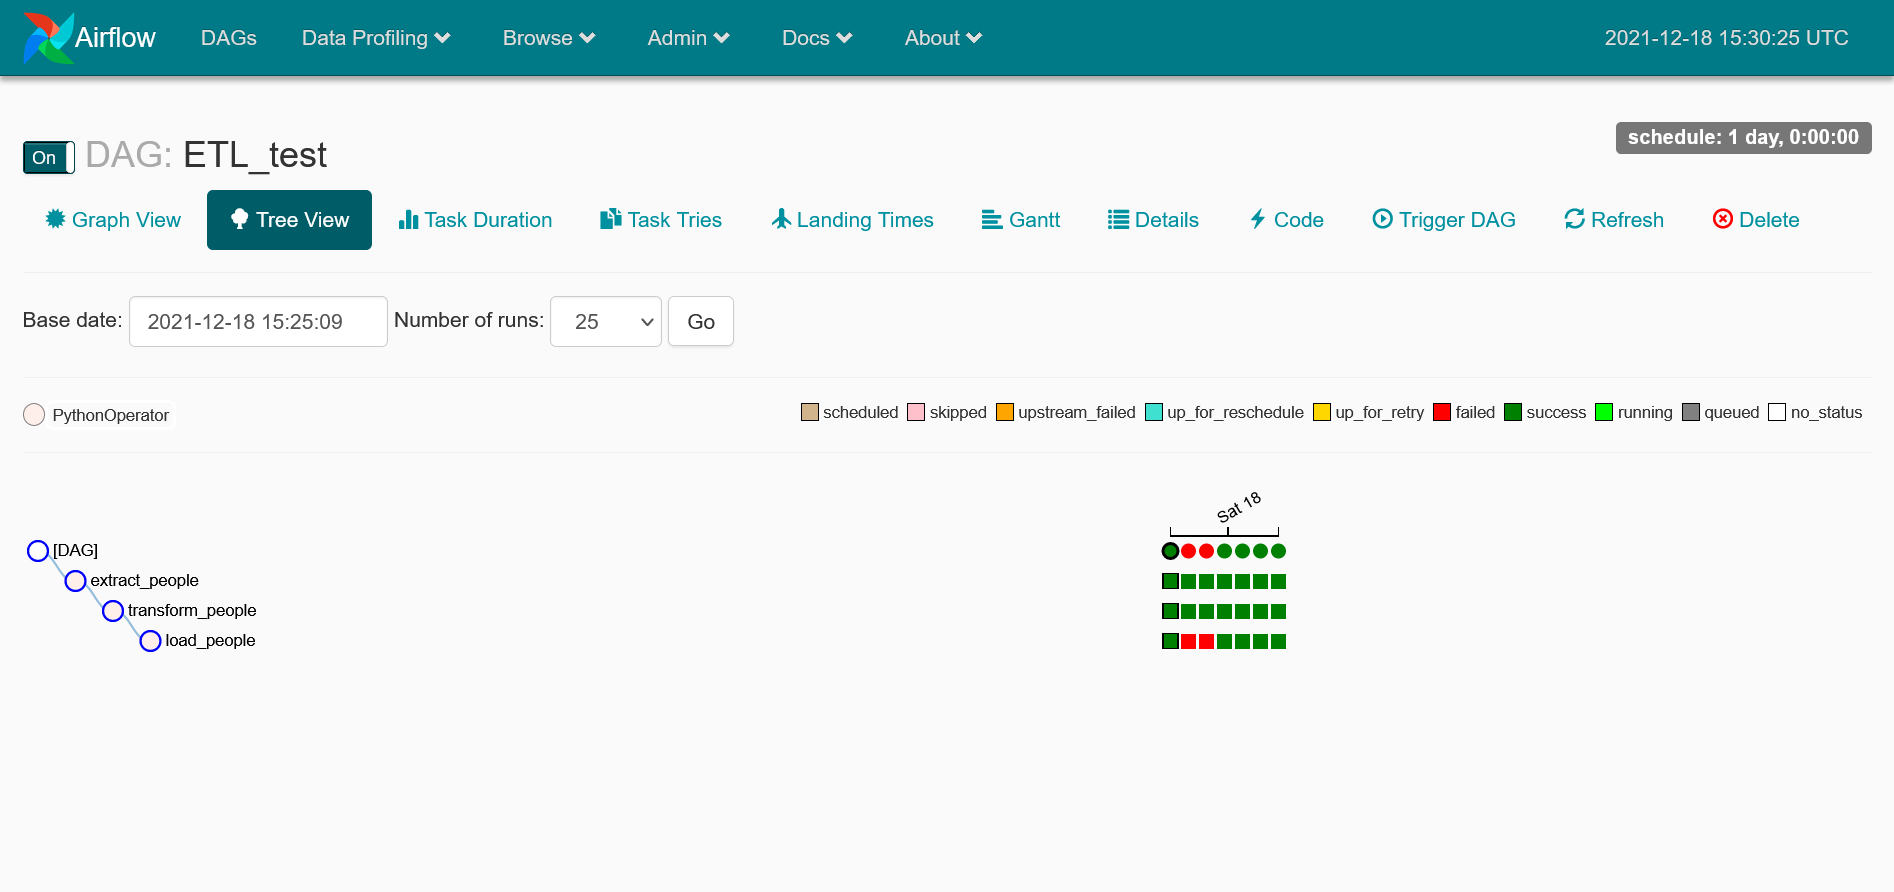
In the detailed information, you can see the statuses of all the DAG runs and task Instances. If necessary, you can change the view mode to Graph View in order to analyze task duration or perform other actions available in the main menu of the current page.
 The detailed view of the DAG Runs
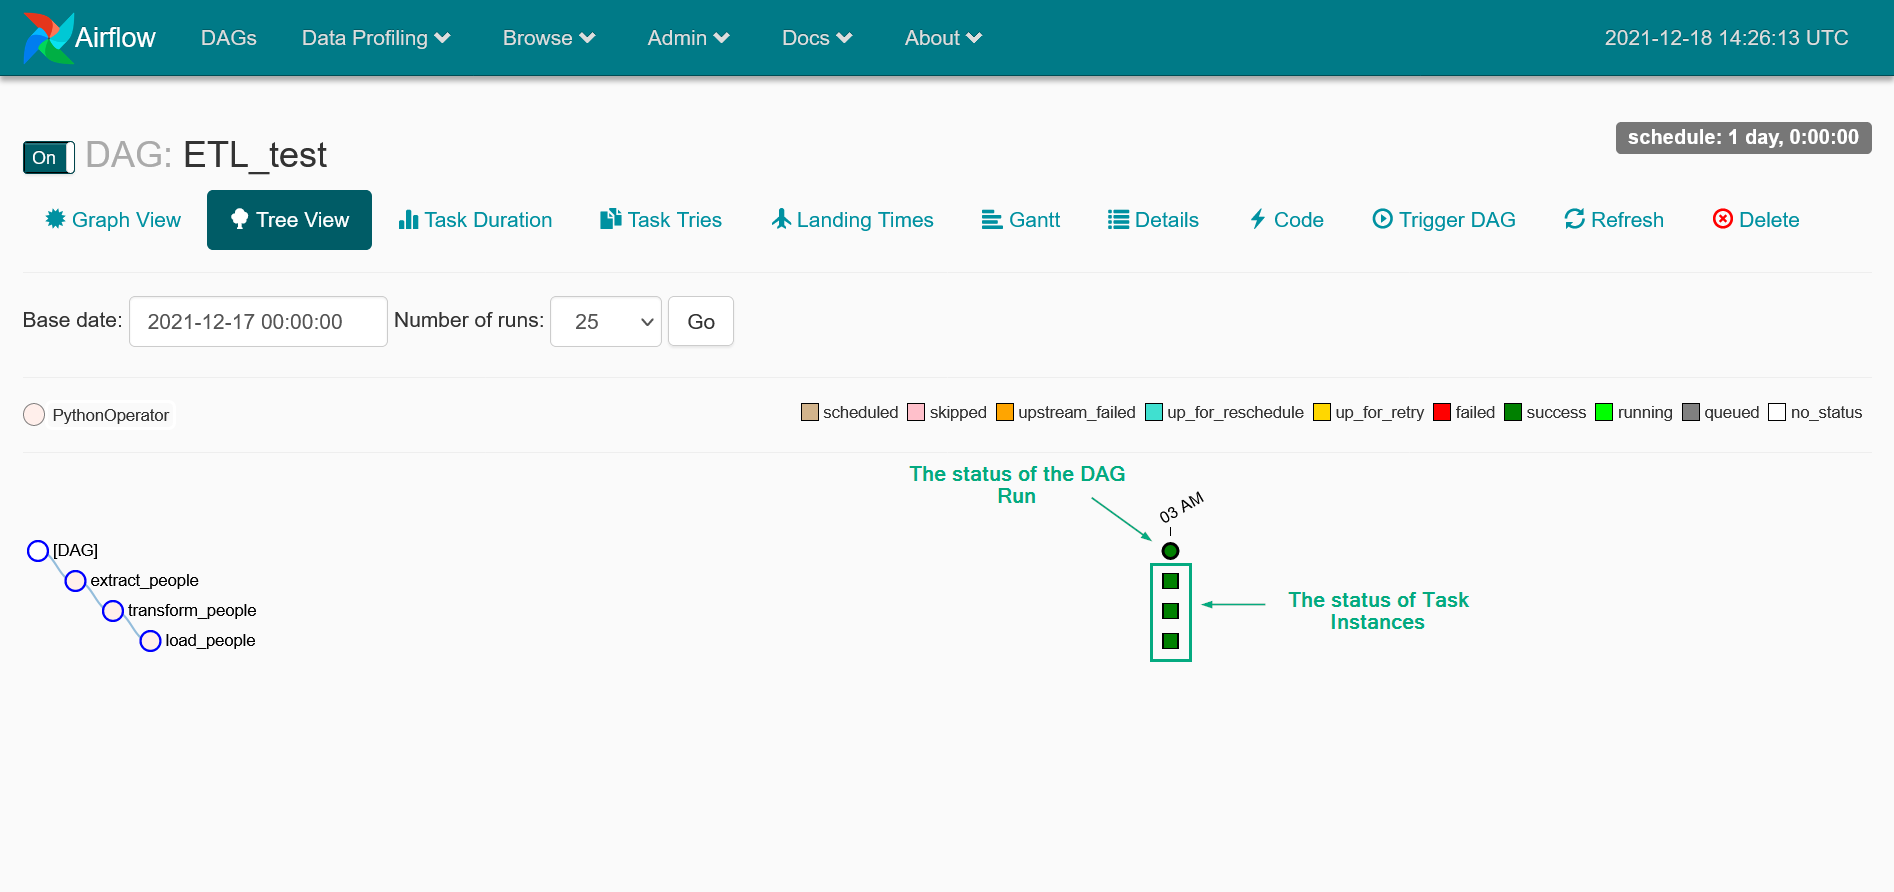 The detailed view of the DAG Runs
If some errors occur while running the DAG, the page looks as presented below.
Step 3. Check the results
In conclusion, let’s check whether the DAG has completed all the tasks correctly. Make sure the output file loaded_people.csv is located in the output folder:
-
Check the contents of the output folder:
$ ls -la /srv/airflow/home/output/The list of files looks similar to this:
total 4
drwxr-xr-x  2 50000 50000  31 Dec 18 14:25 .
drwxr-xr-x. 6 50000 50000 126 Dec 18 13:58 ..
-rw-r--r--  1 50000 50000 832 Dec 18 14:25 loaded_people.csv
-
Get the output data:
$ cat /srv/airflow/home/output/loaded_people.csvThe output looks similar to this:
Name,Age
Arnold Bettie,18
Campbell Todd,18
Thompson Warren,18
Stokes Mittie,18
Davis Alan,18
Vaughn Belle,18
Munoz Ricardo,18
Norton Bertha,18
McGee Isabelle,18
Bailey Cameron,18
James Loretta,18
Myers Ricky,18
Torres Elsie,18
Phelps Rena,18
Hill Katharine,18
Hodges Abbie,18
Fitzgerald Timothy,18
Miller Francis,18
Banks Catherine,18
Casey Louise,18