

Write a new Zeppelin interpreter
This article describes the process of creating a custom Zeppelin interpreter from scratch. For information on how to add a new Zeppelin interpreter to an existing interpreter group, see the Add a custom interpreter to a group article.
Flow overview
In Zeppelin, to create a new interpreter, one has to extend the Interpreter abstract class and put the compiled JAR on the ADH host with the Zeppelin Server component. Developing a full-fledged interpreter capable of processing user code from notes requires writing complex logic and thorough testing, which is beyond the scope of this article. Instead, the scenario below describes a mock interpreter implementation with stub methods, which is still enough to demonstrate the interpreter’s activity. The steps demonstrated in the scenario work for any kind of interpreter and show one of the possible approaches to creating a custom interpreter.
At a high level, the scenario comprises the following steps:
-
Clone the Zeppelin project.
-
Create a new interpreter from an existing one.
-
Implement the
org.apache.zeppelin.interpreter.Interpreterclass and compile the module. -
Put the interpreter JAR on an ADH host.
Step 1. Clone the Zeppelin project
The scenario assumes using the open-source Zeppelin project as a base to create a new interpreter. This approach facilitates dependency and file hierarchy management.
-
Clone the Zeppelin repository.
$ git clone https://github.com/apache/zeppelin/tree/master -
Checkout the branch that corresponds to your Zeppelin Service version. For example:
$ cd zeppelin
$ git checkout 0.11.2
Step 2. Create a new interpreter module
In this scenario, the new interpreter is created by copying an existing interpreter module and modifying its content.
-
Copy an existing interpreter module, for example
file.$ cp -r file ./mycustominterpreter -
In the copied interpreter module, delete all classes and create a new Java class
CustomInterpreterthat extendsorg.apache.zeppelin.interpreter.Interpreter. In this scenario, theCustomInterpreterclass is a mock implementation that does not process user code from notes, but creates log entries when Zeppelin invokes its methods.Click to view sample CustomInterpreter.javapackage io.arenadata.zeppelin.mycustominterpreter; import org.apache.zeppelin.interpreter.Interpreter; import org.apache.zeppelin.interpreter.InterpreterContext; import org.apache.zeppelin.interpreter.InterpreterException; import org.apache.zeppelin.interpreter.InterpreterResult; import org.slf4j.Logger; import org.slf4j.LoggerFactory; import java.util.Properties; public class CustomInterpreter extends Interpreter { public CustomInterpreter(Properties properties) { super(properties); Logger logger = LoggerFactory.getLogger(CustomInterpreter.class); } @Override public void open() throws InterpreterException { logger.info("Stub method called: open()"); } @Override public void close() throws InterpreterException { logger.info("Stub method called: close()"); } @Override public InterpreterResult interpret(String st, InterpreterContext context) throws InterpreterException { logger.info("Stub method called: interpret()"); return null; } @Override public void cancel(InterpreterContext context) throws InterpreterException { logger.info("Stub method called: cancel()"); } @Override public FormType getFormType() throws InterpreterException { logger.info("Stub method called: getFormType()"); return null; } @Override public int getProgress(InterpreterContext context) throws InterpreterException { logger.info("Stub method called: getProgress()"); return 0; } }TIPTo explore interpreter implementations provided with Zeppelin out-of-the box, see the Zeppelin GitHub repository.Your interpreter module directory must have the following structure:
zeppelin/
+---alluxio
+---angular
+---bigquery
+---bin
+---build-tools
+---cassandra
+---conf
+---custominterpreter
|   |   pom.xml
|   |
|   +---src
|   |   +---main
|   |   |   +---java
|   |   |   |   \---io
|   |   |   |       \---arenadata
|   |   |   |           \---zeppelin
|   |   |   |               \---mycustominterpreter
|   |   |   |                       CustomInterpreter.java <-- Interpreter logic here
|   |   |   |
|   |   |   \---resources
|   |   |           interpreter-setting.json
|   |   |
|   |   \---test
|   |
|   \---target
+---flink
+---flink-cmd
+---groovy
...
// other modules
-
Since the interpreter module was copied, it needs a bit of refactoring, namely:
-
Add the new interpreter to the list of modules in the parent POM (zeppelin/pom.xml). For example:
<module>mycustominterpreter</module> -
In the new module’s POM (zeppelin/mycustominterpreter/pom.xml), update the
artifactIdandinterpreter.namevalues to correspond to the name of the interpreter. -
In zeppelin/mycustominterpreter/src/main/resources/interpreter-setting.json, update the
classNamefield to point to the new interpreter class (CustomInterpreter). Also, provide newnameandgroupvalues. These will be used for invoking the interpreter in a note using the%<interpreter.group>.<interpreter.name>notation. Also, using this file, you can define a list of interpreter properties that will be displayed in the Zeppelin UI. For more information about options likeeditOnDblClickandcompletionSupport, see Zeppelin documentation. -
Fix package names.
-
Drop test classes.
-
Step 3. Build the interpreter JAR
Build the Zeppelin project with Maven:
$ mvn clean package -DskipTestsAs a result, the interpreter JAR is available in the module’s target dir. This must be an Uber-JAR, including the dependencies, with the structure as shown below:
mycustominterpreter.jar
|   interpreter-setting.json
|
+---com
|   \---google
|       \--- ...
+---javassist
|   \--- ...
+---javax
|   \--- ...
+---jersey
|   \--- ...
+---META-INF
|   \--- ...
+---io
	+---arenadata
		\---zeppelin
			\---mycustominterpreter
				\---CustomInterpreter.class
    +---aopalliance
    +---apache
    +---slf4j
...
Step 4. Add the interpreter JAR to Zeppelin
-
Copy the new interpreter JAR to the /usr/lib/zeppelin/interpreter/ location on the ADH host with the Zeppelin Server component.
-
Restart the Zeppelin service. After restarting Zeppelin, the newly added interpreter becomes available in the list of Zeppelin interpreters.
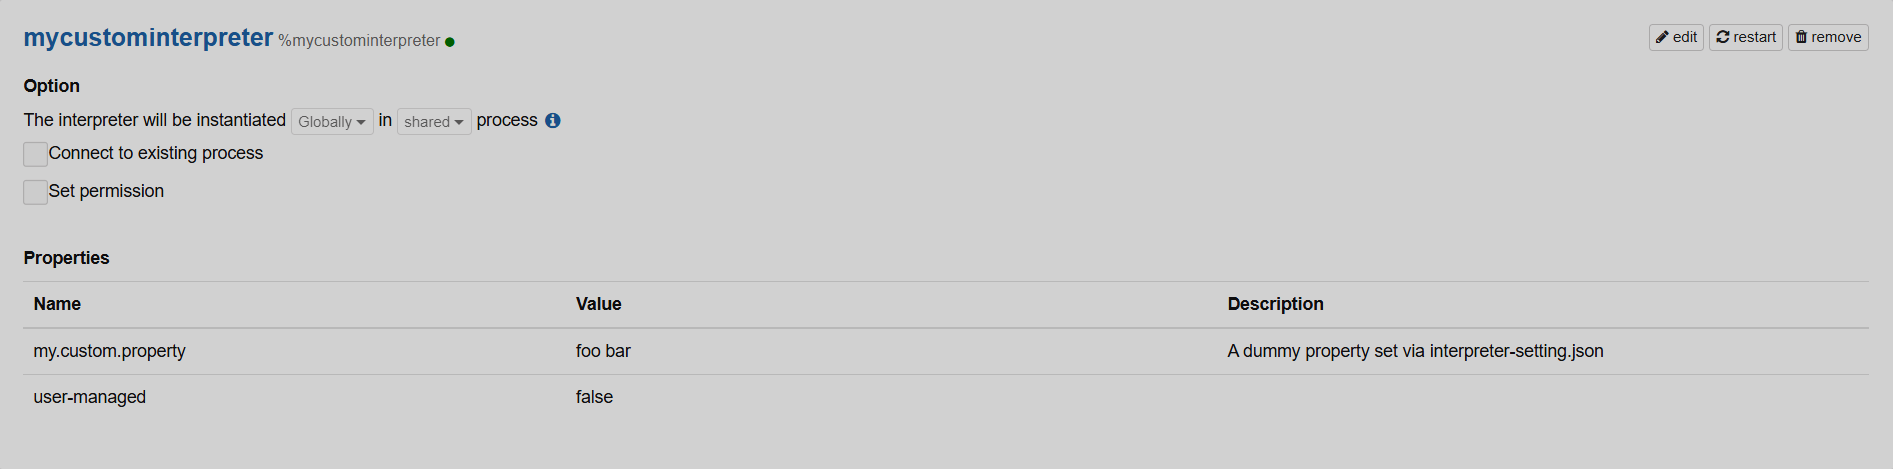 Newly added interpreter
 Newly added interpreter
 -
Create a new note using the interpreter. When creating a note, select the new interpreter as the default one, or use
%mycustominterpreterin each paragraph. In this scenario, submitting any data to the test interpreter returns no results but creates log entries. Check logs under /var/log/zeppelin/ to verify the interpreter’s activity, for example:
$ grep -r "Stub method called:*" /var/log/zeppelin