ADB service actions
This article describes the actions available for the ADB service in the ADCM web interface.
Create database
Creates the default database.
The default name is adb.
This database is required to install most of the ADB extensions. If you installed the cluster using the Install cluster action, the database is created automatically, and the manual action is not required. If you install services one by one, the database is not created automatically, and you should manually run the Create database action.
After the action completes successfully, you can check that the database exists:
-
On the ADB master host, log in as the
gpadminuser:$ sudo su - gpadmin -
List all databases:
$ psql -lThe output should contain the
adbdatabase:List of databases Name | Owner | Encoding | Collate | Ctype | Access privileges -----------+---------+----------+------------+------------+--------------------- adb | gpadmin | UTF8 | en_US.utf8 | en_US.utf8 | =Tc/gpadmin + | | | | | gpadmin=CTc/gpadmin postgres | gpadmin | UTF8 | en_US.utf8 | en_US.utf8 | template0 | gpadmin | UTF8 | en_US.utf8 | en_US.utf8 | =c/gpadmin + | | | | | gpadmin=CTc/gpadmin template1 | gpadmin | UTF8 | en_US.utf8 | en_US.utf8 | =c/gpadmin + | | | | | gpadmin=CTc/gpadmin (5 rows)
Create role
Adds a new role to the database cluster.

On the Configuration tab of the window that opens, configure the following parameters.
| Parameter | Description | Default value |
|---|---|---|
Role name |
A unique name for the new role |
— |
Role password |
The password of the role. Can’t be left empty |
— |
Allow this role to login |
Determines whether a role is allowed to log in.
When set to |
true |
Make role superuser |
Determines whether a role is a superuser |
false |
Allow role to create databases |
Determines whether the role can create new databases |
false |
Allow role to create users/roles |
Determines whether the role can create new roles |
false |
Allow role create external tables |
Determines whether the role can create external tables |
false |
Resource Group |
The name of one of the existing resource groups to which a new role should be assigned. The value cannot be empty since each user should belong to a resource group |
default_group |
Enable auto core dump
Installs the Auto Core Dump service (systemd-coredump) on the master, standby master, and every segment host.
The action uses the following values of the service configuration options:
-
Storage=external— core dumps will be stored in /var/lib/systemd/coredump/. -
MaxUse=1024M— remove old core dumps when their size exceeds 1 GB.
To check that the service was successfully installed and started, run the following command on the master, standby master, or any segment host:
$ systemctl status systemd-coredump.socketThe service should have the active (listening) status:
systemd-coredump.socket - Process Core Dump Socket
     Loaded: loaded (/lib/systemd/system/systemd-coredump.socket; static)
     Active: active (listening) since Thu 2025-09-04 10:24:43 UTC; 21min ago
       Docs: man:systemd-coredump(8)
     Listen: /run/systemd/coredump (SequentialPacket)
   Accepted: 0; Connected: 0;
     CGroup: /system.slice/systemd-coredump.socket
Disable auto core dump
Removes the Auto Core Dump service (systemd-coredump) and its configuration files.
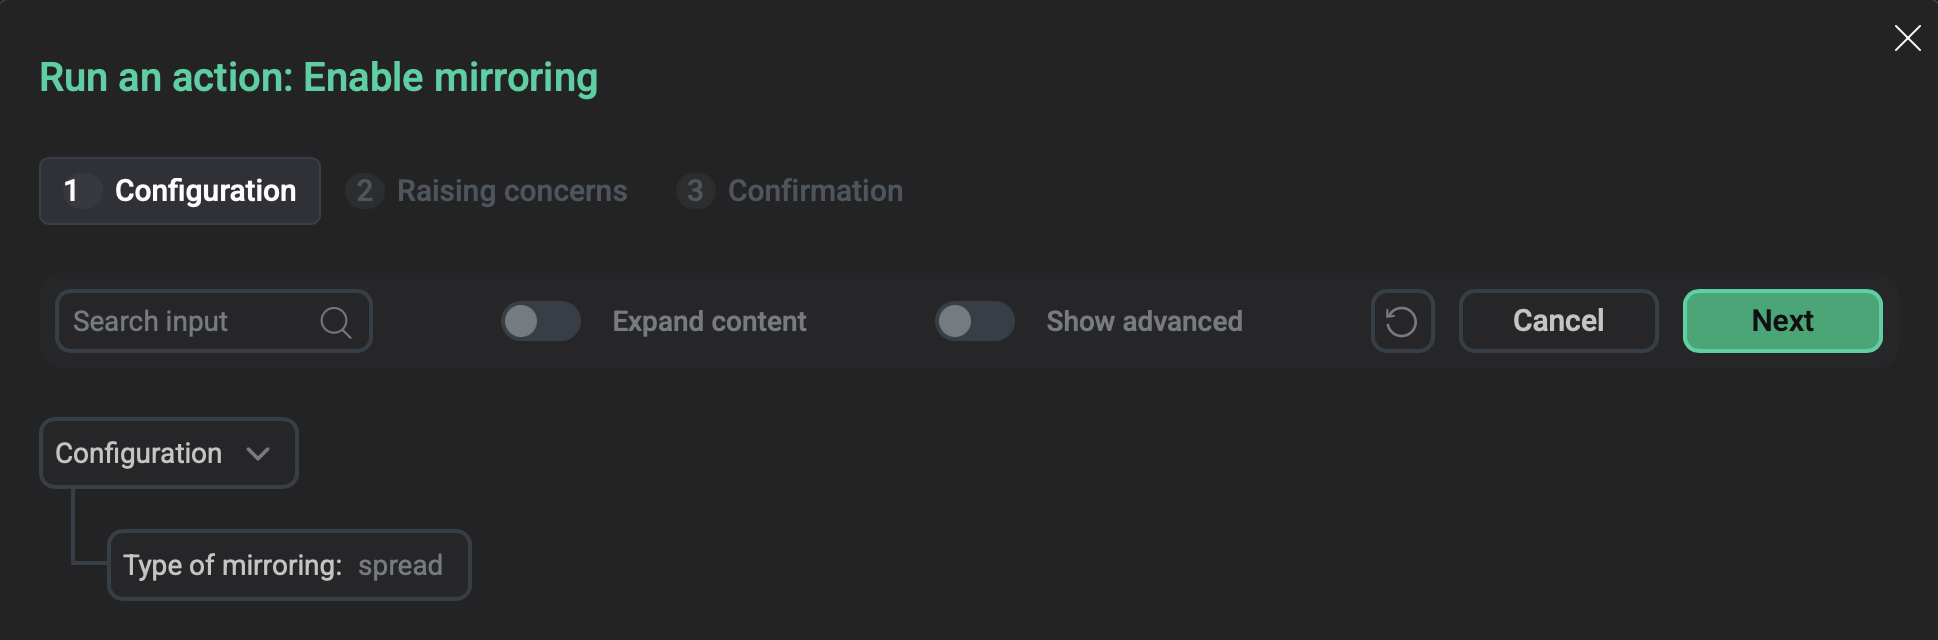
Enable mirroring
Enables synchronous replication for primary data segments by adding mirrors to the cluster.
On the Configuration tab of the window that opens, in the Type of mirroring list, select the mirroring type: spread or group.
Spread mirroring is used by default. If you select spread mirroring, the action verifies that the number of segment hosts in your cluster is greater than the number of segments configured per host and that the number of segments per host can be divided by the number of the data directories on the host without remainder. If these conditions are not met, the action will fail.
Install diskquota
Installs the Diskquota ADB extension. This extension allows users to limit the disk space used by schemas and roles.
The action creates the diskquota database and the diskquota schema and registers diskquota as a database extension.
You can check the diskquota extension by running:
SELECT * FROM pg_extension WHERE extname = 'diskquota';The output should be similar to:
  extname  | extowner | extnamespace | extrelocatable | extversion |   extconfig   | extcondition
-----------+----------+--------------+----------------+------------+---------------+--------------
 diskquota |       10 |         2200 | t              | 2.3        | {48320,48328} | {"",""}
(1 row)
After diskquota is installed, the Uninstall diskquota and Reinstall diskquota actions become available.
Install MADlib
Installs the MADlib library.
The action creates the madlib schema that stores MADlib functions.
Check the installed version by running:
SELECT madlib.version();The output should be similar to:
          version
---------------------------------------------------------------------------------------------------------
 MADlib version: 1.21.0, git revision: 6.27.1_arenadata64-66-gbf5684f4, cmake configuration time: Tue Aug
 19 23:01:09 UTC 2025, build type: RelWithDebInfo, build system: Linux-4.15.0-175-generic, C compiler: gc
c 11, C++ compiler: g++ 11
(1 row)
After MADlib is installed, the Uninstall MADlib and Reinstall MADlib actions become available.
Install PostGIS
Installs the PostGIS extension.
To check the version of installed PostGIS, run the following command in your database:
SELECT PostGIS_Lib_Version();The output should be similar to the following:
 postgis_lib_version
---------------------
 2.5.4
(1 row)
After PostGIS is installed, the Uninstall PostGIS and Reinstall PostGIS actions become available.
Install Plpython3
Installs the plpython3u extension to enable the use of the PL/Python procedural language.
You can check the plpython3u extension in PostgreSQL by running:
SELECT * FROM pg_extension WHERE extname = 'plpython3u';The output should be similar to:
  extname   | extowner | extnamespace | extrelocatable | extversion | extconfig | extcondition
------------+----------+--------------+----------------+------------+-----------+--------------
 plpython3u |       10 |           11 | f              | 1.0        |           |
(1 row)
After Plpython3 is installed, the Uninstall Plpython3 and Reinstall Plpython3 actions become available.
Reconfigure & Restart
Updates the service configuration according to the configuration settings.
The action restarts the cluster (using gpstop -arM fast) if any of the following configuration parameters are changed:
-
ADB GPperfmon Extension
-
Interconnect properties → Interconnect type
-
Any option under SSL
Otherwise, the action reloads the configuration (using gpstop -au).
On the Configuration tab of the window that opens, the Migrate db_files_history table now flag indicates whether to migrate the arenadata_toolkit.db_files_history table during the upgrade process. If this flag is set, the table will be recreated with loading partitions/compression options and all data into the new table. For large tables, this process may take a long time. If the flag is cleared, the migration will be performed later manually or during the next upgrade.
Redistribute
The Redistribute action redistributes tables to balance existing data over the newly expanded ADB cluster. The action uses the gpexpand Greengage DB utility.
Prior to ADB 6.31, this was a cluster action: after an Expand action was performed, all cluster actions were unavailable until the Redistribute action was completed. Starting with ADB 6.31, Redistribute is a service‑level action in the ADB service, and it doesn’t block any cluster action.
It is recommended to rank database tables before starting the action, i.e. specify the order in which tables should be redistributed.
Rank tables for redistribution
The priority of table processing during redistribution is determined by the rank column value in the gpexpand.status_detail table.
Tables with the lowest rank are redistributed first.
To rank tables, follow the steps:
-
Connect to the
postgresdatabase of the ADB cluster under thegpadminuser (e.g. viapsql). -
For all rows of the
gpexpand.status_detailtable, set the initial value for therankcolumn that will be considered as maximum (and will match the lowest processing priority), e.g.100:UPDATE gpexpand.status_detail SET rank = 100; -
Decrease the
rankvalue for those tables that should be redistributed first. For example, as a result of the following queries, the Redistribute action will process thepublic.testtable first, then thepublic.test2table, and then other tables ingpexpand.status_detail:UPDATE gpexpand.status_detail SET rank = 10 WHERE fq_name = 'public.test'; UPDATE gpexpand.status_detail SET rank = 20 WHERE fq_name = 'public.test2';
Use a fully qualified table name (including a schema name) as the fq_name column value.
To exclude any table from the redistribution process, you can remove it from the gpexpand.status_detail table.
|
TIP
|
Run redistribution
To run data redistribution, select the Redistribute service action. It is recommended to perform redistribution during low-use hours when table locks do not have a significant impact on the cluster operations.
|
IMPORTANT
|
After you select the Redistribute action, a dialog box opens in which you can set the following fields:
-
Timeout for expanding — the maximum redistribution duration in hours, minutes, and seconds. If the action fails due to this timeout, the
Redistribution incompletemessage of thewarninglevel is displayed in the job logs (severity levels of failed check results are available in ADCM starting with version 2.12.0). Rerun the action in this case. When you rerun Redistribute, the redistribution process does not start from the beginning but resumes from the state where the process was interrupted by the timeout — only the remaining tables will be redistributed. -
Number of parallel processes — the
-noption value for thegpexpandutility. Defines the number of tables to redistribute simultaneously. Valid values are1—96. Each table redistribution process requires two database connections: one to redistribute the table and another to update the table status in thegpexpandschema. Before increasing Number of parallel processes, check the current value of the server configuration parametermax_connectionsto ensure that the maximum connection limit is not exceeded.
To run the Redistribute action, click Run in the action form.
Then, confirm the action in the standard confirmation dialog.
If redistribution of all tables is completed within the time specified in the Timeout for expanding field, the gpexpand schema is removed from the postgres database, the ADB cluster status is changed to running, and the Redistribute action is no longer available.
Otherwise, the cluster remains in the expanding status, and you can resume redistribution (from the state where the process was interrupted by the timeout) by running the Redistribute action again.
Monitor redistribution
To track the redistribution progress, you can run SQL queries against the following objects of the gpexpand schema in the postgres database:
-
gpexpand.status— the table that stores a history of redistribution status changes.StructureColumn Description status
A status of the ADB redistribution. Possible values:
-
SETUP— preparations for the cluster expansion are started during the Expand action. -
SETUP DONE— preparations for the cluster expansion are completed during the Expand action. -
EXPANSION STARTED— table redistribution is started during the Redistribute action. -
EXPANSION STOPPED— table redistribution is stopped. The additional launch of the Redistribute action is required. -
COMPLETED— redistribution of all tables is successfully completed after one or more launches of the Redistribute action.
updated
A timestamp of the status change
Query exampleSELECT * FROM gpexpand.status;Result:
      status       |          updated
-------------------+----------------------------
 EXPANSION STARTED | 2024-02-28 08:02:31.026412
 SETUP DONE        | 2024-02-27 17:40:55.160054
 SETUP             | 2024-02-27 17:40:50.830922
(3 rows)
-
-
gpexpand.expansion_progress— a view that shows the current redistribution status: how many tables/bytes have been successfully redistributed and how many are left. Also, the view provides calculations of the estimated redistribution rate and estimated time to completion. Calculations restart each time you run the Redistribute action — after the first table redistribution is completed. Statistics on tables/bytes are refreshed as they are redistributed.NOTEIn ADB, the
gpexpandutility is used with the--simple-progressoption to improve performance by reducing the amount of progress information written to thegpexpandtables. Due to this, only theTables ExpandedandTables Leftmetrics have values in thegpexpand.expansion_progresstable.StructureColumn Description name
A metric name:
-
Bytes Left— amount of data that is not yet redistributed (in bytes). -
Bytes Done— amount of data that is successfully redistributed (in bytes). -
Estimated Expansion Rate— the estimated rate of data redistribution (with a measurement unit). -
Estimated Time to Completion— the estimated time required for redistribution completion (in hours, minutes, and seconds). -
Tables Expanded— a number of tables that are successfully redistributed. -
Tables Left— a number of tables that are not yet redistributed.
value
A value of the metric that is specified in the
namecolumnQuery exampleSELECT * FROM gpexpand.expansion_progress;Result:
      name       | value
-----------------+-------
 Tables Expanded | 90
 Tables Left     | 7
(2 rows)
-
-
gpexpand.status_detail— the table that stores the current redistribution status for each table/partition.StructureColumn Description table_oid
A table object identifier (OID)
dbname
A name of the database to which the table belongs
fq_name
A fully qualified name of the table (with a schema name)
root_partition_oid
For a partitioned table, the OID of the root partition. Otherwise,
Nonerank
A rank that determines the priority of table processing during redistribution. Tables with the lowest rank are processed first
external_writable
Indicates whether the table is
EXTERNAL WRITABLE(such tables require a different syntax when usinggpexpand)status
The current status of the table redistribution:
-
NOT STARTED; -
IN PROGRESS; -
COMPLETED; -
NO LONGER EXISTS— the table does not exist anymore.
expansion_started
A timestamp of the table redistribution start. This column is only populated after the table is successfully redistributed
expansion_finished
A timestamp of the table redistribution completion
source_bytes
The disk size associated with the source table (in bytes). Due to the possible data bloat in heap tables and differing numbers of segments after expansion, it is not guaranteed that the final number of bytes will be equal to the source number. Values of the
source_bytescolumn are used to estimate the redistribution duration.In ADB, the
source_bytesvalue is equal to0for all tables due to using the--simple-progressoptionrel_storage
A table storage type. See pg_class.relstorage
Query exampleSELECT dbname, fq_name, status, expansion_started, expansion_finished, source_bytes FROM gpexpand.status_detail;The output fragment:
  dbname   |                        fq_name                        |   status    |     expansion_started      |     expansion_finished     | source_bytes
-----------+-------------------------------------------------------+-------------+----------------------------+----------------------------+--------------
 adb       | kadb.offsets                                          | NOT STARTED |                            |                            |            0
 adb       | arenadata_toolkit.db_files_history_1_prt_p202310      | NOT STARTED |                            |                            |            0
 gpperfmon | public.database_history_1_prt_r1013160842             | NOT STARTED |                            |                            |            0
 gpperfmon | public.log_alert_history_1_prt_r598663655             | NOT STARTED |                            |                            |            0
 gpperfmon | public.log_alert_history_1_prt_r1113542580            | NOT STARTED |                            |                            |            0
 adb       | public.kafka_ssl                                      | NOT STARTED |                            |                            |            0
 adb       | public.adb_to_kafka_table3                            | NOT STARTED |                            |                            |            0
 adb       | arenadata_toolkit.db_files_current                    | NOT STARTED |                            |                            |            0
 adb       | arenadata_toolkit.db_files_history_1_prt_p202312      | NOT STARTED |                            |                            |            0
 gpperfmon | public.database_history_1_prt_r2098142994             | NOT STARTED |                            |                            |            0
 gpperfmon | public.network_interface_history_1_prt_1              | NOT STARTED |                            |                            |            0
 adb       | public.ext_adb_to_kafka_sasl_gssapi                   | NOT STARTED |                            |                            |            0
 adb       | public.adb_to_kafka_table7                            | NOT STARTED |                            |                            |            0
 adb       | arenadata_toolkit.db_files_history_1_prt_default_part | NOT STARTED |                            |                            |            0
 gpperfmon | public.queries_history_1_prt_r81170841                | NOT STARTED |                            |                            |            0
 gpperfmon | public.queries_history_1_prt_r419258856               | NOT STARTED |                            |                            |            0
 gpperfmon | public.diskspace_history_1_prt_r526486693             | NOT STARTED |                            |                            |            0
 adb       | public.test2                                          | COMPLETED   | 2024-02-28 08:02:37.00728  | 2024-02-28 08:02:38.048592 |            0
 gpperfmon | public.system_history_1_prt_r1569528921               | COMPLETED   | 2024-02-28 08:02:41.066986 | 2024-02-28 08:02:44.182122 |            0
 gpperfmon | public.database_history_1_prt_r932188937              | COMPLETED   | 2024-02-28 08:02:44.305985 | 2024-02-28 08:02:44.697928 |            0
 gpperfmon | public.segment_history_1_prt_1                        | COMPLETED   | 2024-02-28 08:02:44.841786 | 2024-02-28 08:02:45.426392 |            0
 diskquota | arenadata_toolkit.db_files_history_1_prt_default_part | COMPLETED   | 2024-02-28 08:02:46.096083 | 2024-02-28 08:02:48.04711  |            0
 adb       | diskquota.target                                      | COMPLETED   | 2024-02-28 08:02:48.166249 | 2024-02-28 08:02:48.602075 |            0
 adb       | arenadata_toolkit.db_files_history_1_prt_p202402      | COMPLETED   | 2024-02-28 08:02:48.73606  | 2024-02-28 08:02:49.505108 |            0
-
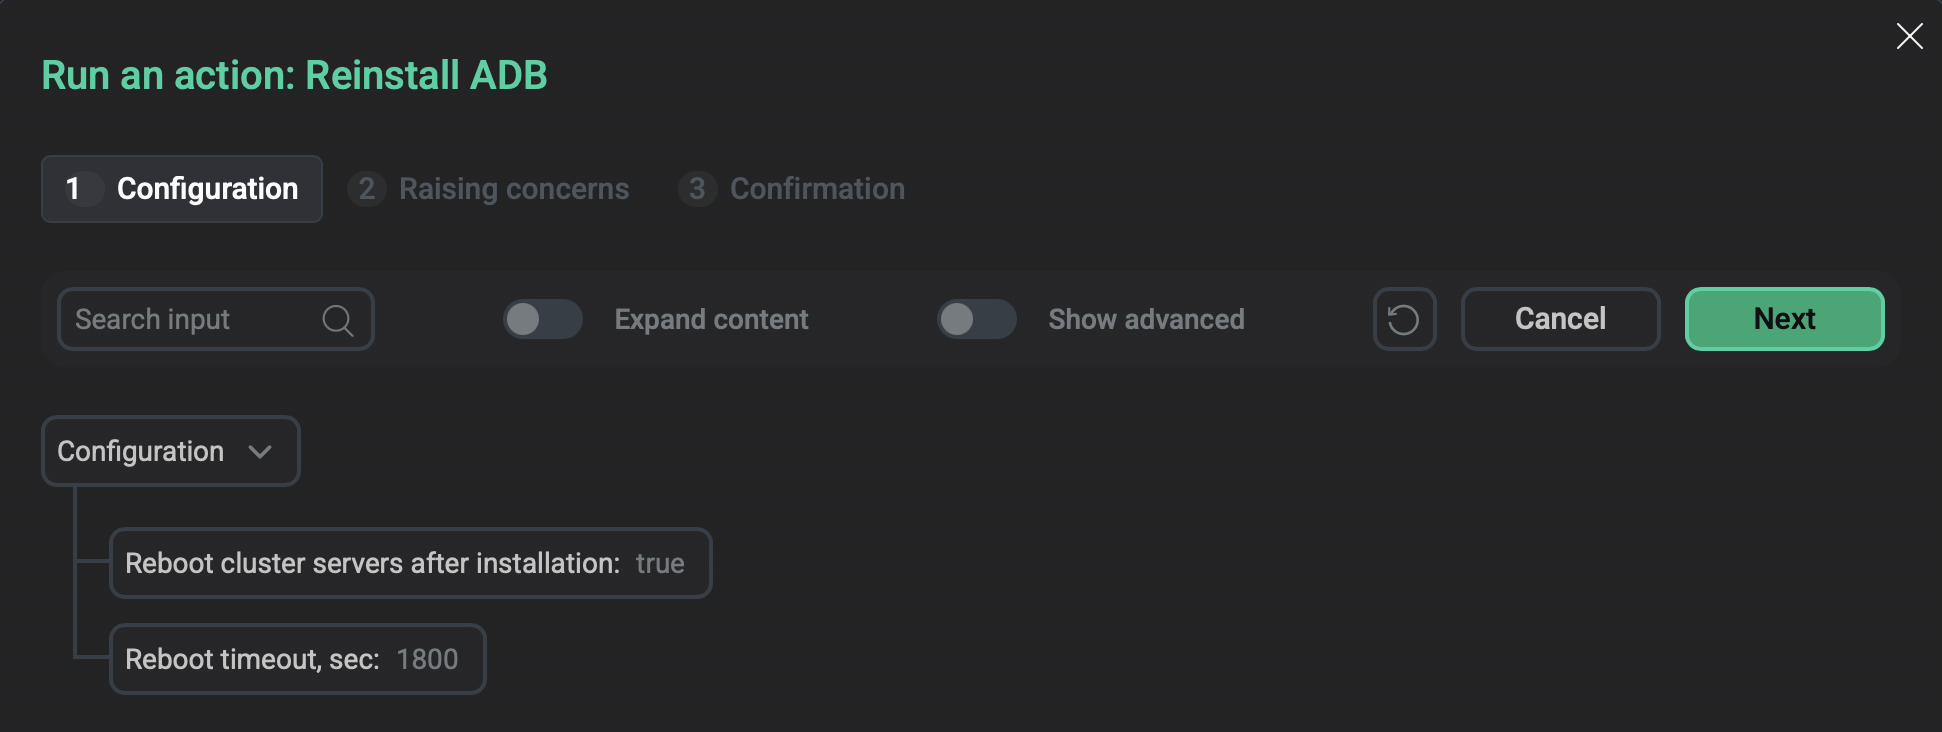
Reinstall ADB
Reinstalls the ADB service.
On the Configuration tab of the window that opens, configure the following parameters:
-
Reboot cluster servers after installation — a flag that indicates whether to reboot ADB hosts automatically after the Reinstall ADB action is completed. The default value is
true. If set tofalse, you need to restart hosts manually. -
Reboot timeout, sec — a timeout that is used to wait for the reboot of ADB hosts (in seconds). The default value is
1800. The value must be at least600.
Stop
Stops the ADB service. After you select the action, a dialog box opens in which you can set the ADB shutdown mode:
-
fast— the ADB service will be stopped after all transactions are interrupted and rolled back, and all active connections are closed. This is the default mode. -
smart— the ADB service will be stopped only if there are no active client connections. Otherwise, the action fails with a warning. -
immediate— the ADB service will be stopped after all transactions are aborted and PostgreSQL processes are killed. This mode does not allow a database server to complete transaction processing and clean up any temporary or in-process work files. It is not recommended to use theimmediatemode since it can damage databases in some cases.
Run SQL
Runs any custom SQL command on behalf of the gpadmin user.
The command is executed in the adb database unless another database is specified as the default database for client connections.
In the window that opens, in the SQL query field, enter your command.
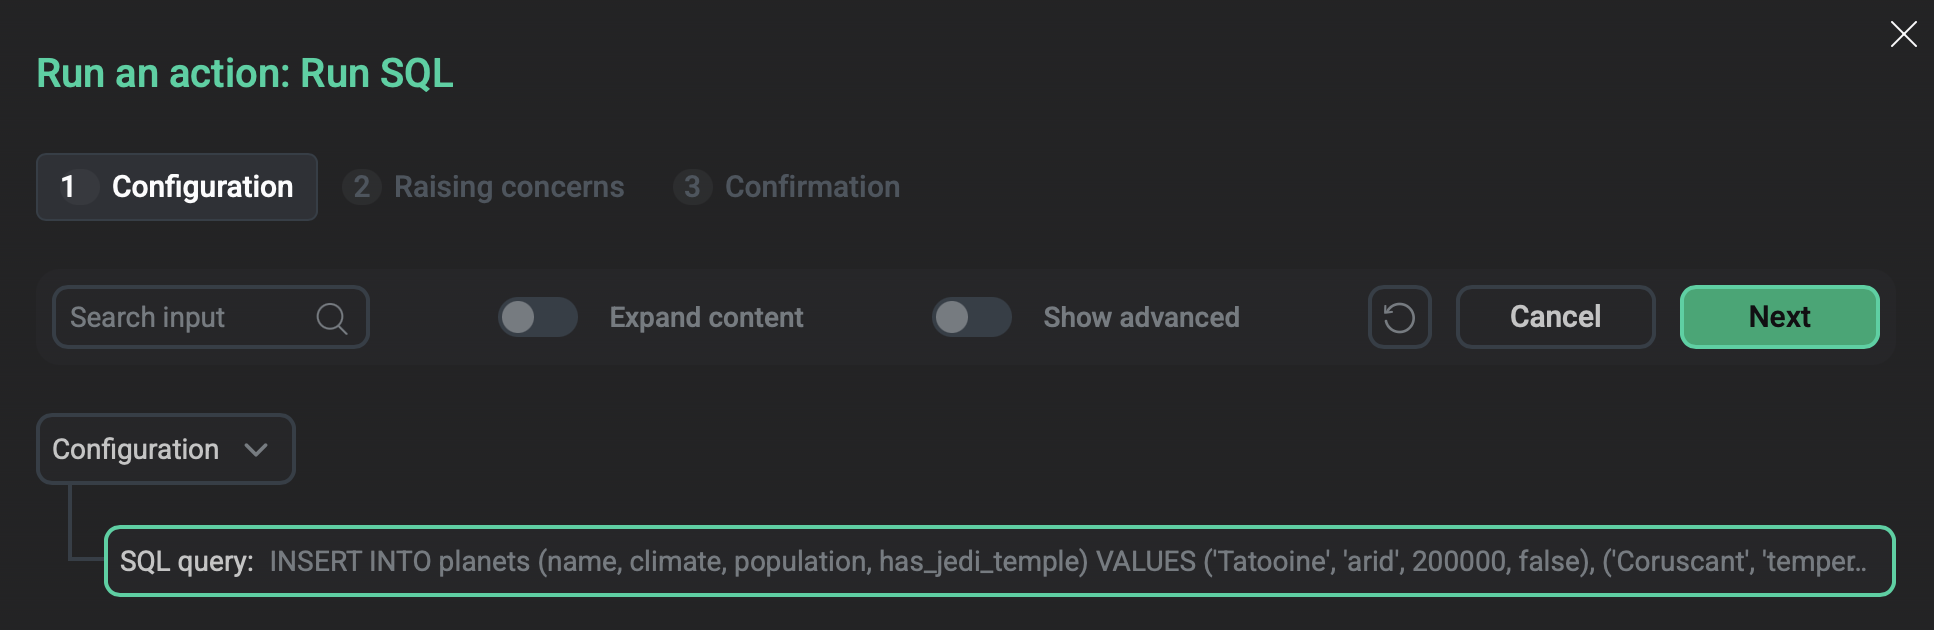
To view the action result, on the Jobs page click the action name and open the Ansible [check] tab — the result will be in the SQL query line.
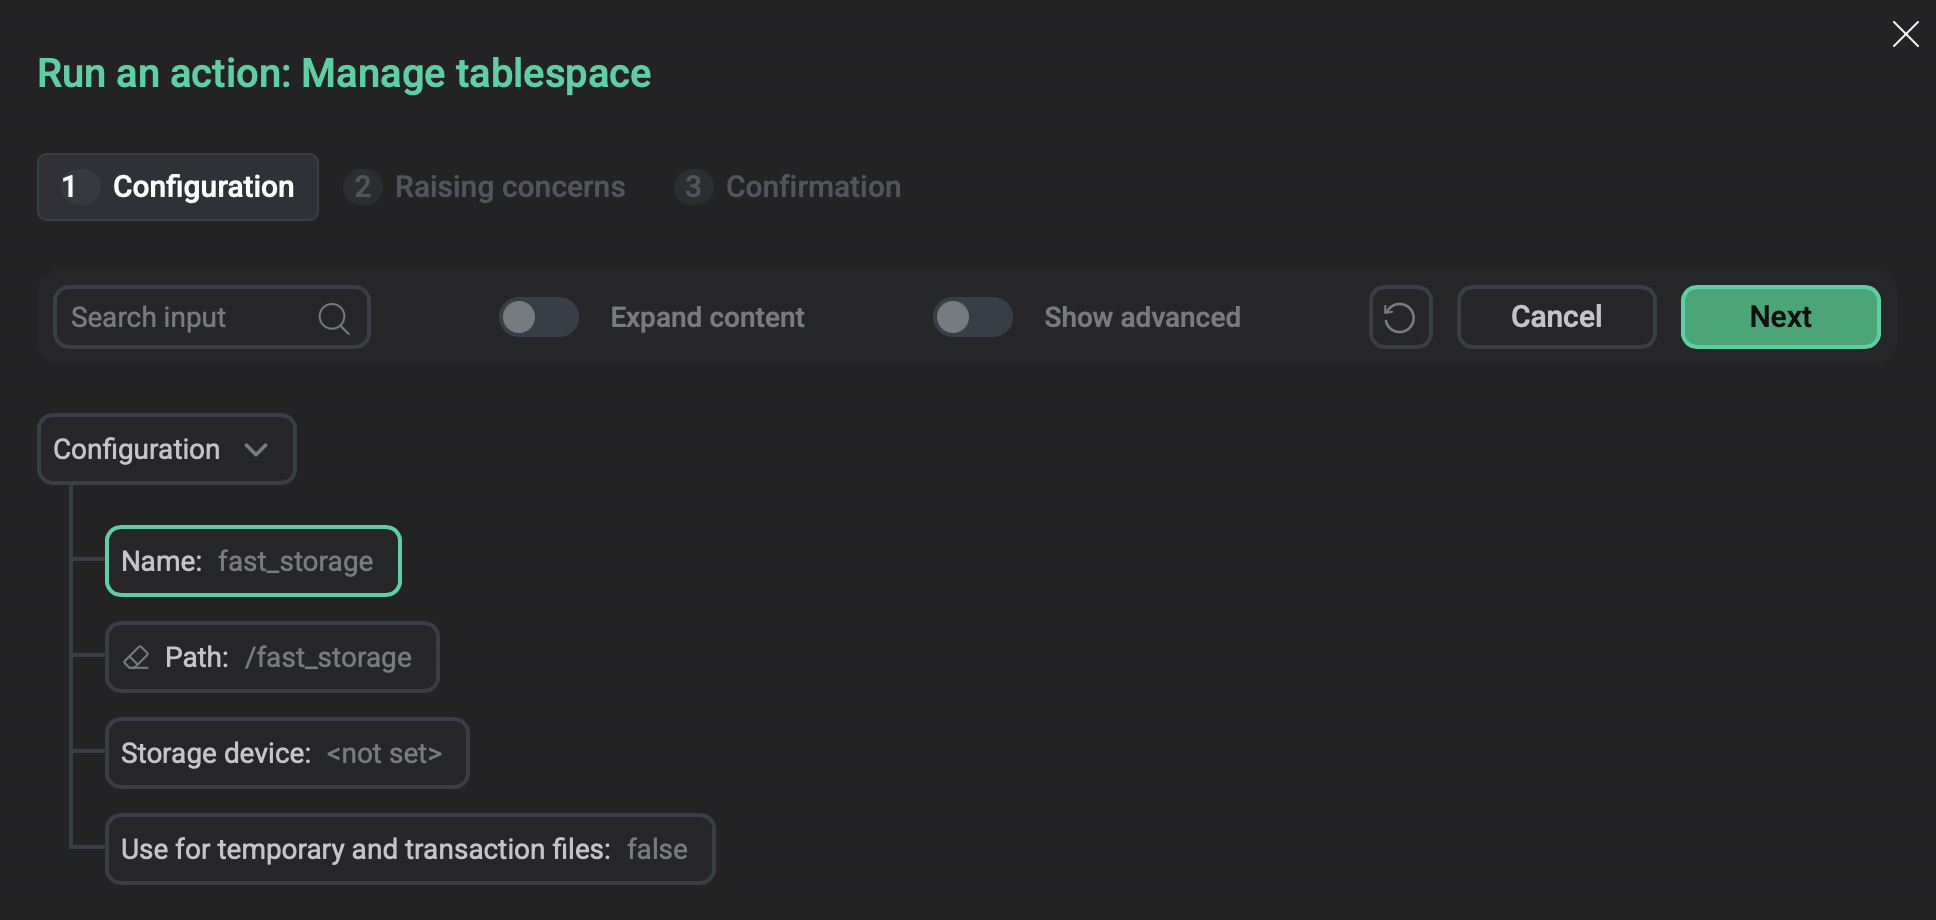
Manage tablespace
Creates a tablespace or modifies existing tablespaces.
| Parameter | Description | Default value |
|---|---|---|
Name |
A unique name for the new tablespace.
The name cannot start with the Alternatively, you can specify the name of an existing tablespace to modify its parameters |
pg_default |
Path |
The path to the directory that will be used for the tablespace. The parameter is required if you create a new tablespace. The directory must exist on the master host and on every segment host; the action does not create it |
— |
Storage device |
If you want to store the tablespace on a separate storage device, specify the name of a block device on the master host (in the /dev catalog). The action will create an XFS file system on that device, format and mount it to the directory specified in Path |
— |
Use for temporary and transaction files |
Use the tablespace to store temporary objects.
The action adds the tablespace to the To check tablespaces currently used to store temporary objects, you can run the following command: The output should be similar to: Values on all segments are consistent GUC : temp_tablespaces Master value: fast_storage Segment value: fast_storage |
false |