

Use PAM for LDAP authentication in ADB
Pluggable authentication modules (PAM) is a mechanism that provides the ability to use multiple low-level authentication types in applications by means of the single high-level API. User authentication is requested from the PAM system (by calling its API) rather than directly from security systems, which provides flexibility and allows you to use different authentication methods without making changes to the code of the applications themselves.
The article describes how to use PAM for configuring LDAP authentication in ADB.
Install and configure OpenLDAP server
The example below demonstrates how to install and configure an OpenLDAP server on the bds-pam.ru-central1.internal host with IP address 10.92.38.114 and operating system Ubuntu 22.04. All actions are performed with root privileges. In your environment, configuration steps can be different.
If you already have the LDAP server configured, go to the Configure ADB master step.
Set up FQDN
-
Run the following command to set up the fully qualified domain name (FQDN) of your future LDAP server:
$ sudo hostnamectl set-hostname bds-pam.ru-central1.internal -
Open the /etc/hosts configuration file for editing:
$ sudo vi /etc/hostsAdd one line to the file in the
<IP> <FQDN> <hostname>format:10.92.38.114 bds-pam.ru-central1.internal bds-pam
Save and close the file.
-
Run the command below to check the FQDN:
$ sudo hostname -fResult:
bds-pam.ru-central1.internal
-
Ping the hostname and ensure that you get response from the server IP address instead of
localhost:$ ping bds-pamResult:
PING bds-pam.ru-central1.internal (10.92.38.114) 56(84) bytes of data.
64 bytes from bds-pam.ru-central1.internal (10.92.38.114): icmp_seq=1 ttl=64 time=0.015 ms
64 bytes from bds-pam.ru-central1.internal (10.92.38.114): icmp_seq=2 ttl=64 time=0.038 ms
64 bytes from bds-pam.ru-central1.internal (10.92.38.114): icmp_seq=3 ttl=64 time=0.039 ms
^C
--- bds-pam.ru-central1.internal ping statistics ---
3 packets transmitted, 3 received, 0% packet loss, time 2051ms
rtt min/avg/max/mdev = 0.015/0.030/0.039/0.011 ms
Install OpenLDAP packages
-
Update all packages that are currently installed in your system:
$ sudo apt update -
Install the OpenLDAP packages using the following command:
$ sudo apt install slapd ldap-utilsDuring the OpenLDAP packages installation, you will be asked to set up the
adminpassword for OpenLDAP. Enter a password, then repeat your password in the next window.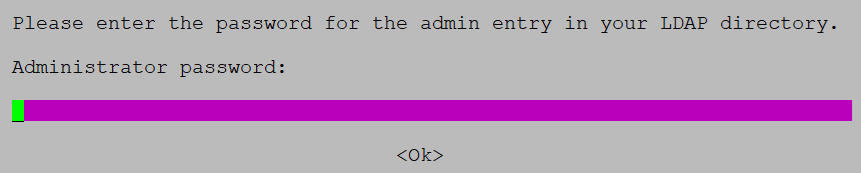 Set up the admin password for OpenLDAP
In the last dialog box (with selection of services for restart), you can confirm the default settings.
Configure OpenLDAP server
-
To start configuring OpenLDAP, run the following command:
$ sudo dpkg-reconfigure slapdDuring the configuration process, you will see several dialog boxes with parameters. The following parameters are required:
-
DNS domain name — domain name that will be used to construct the base distinguished name (DN) of your LDAP directory.
-
Organization name — organization name that will be used in the base DN of your LDAP directory. By default, it is the same as the domain name. You can use another name if necessary.
-
Administrator password — password of the
adminentry in the LDAP directory. Enter the password selected in step 2 of the Install OpenLDAP packages section. Then, confirm it in the next window.
 Fill in DNS domain name
 Fill in Organization name
In other dialog boxes, you can confirm the default settings.
The successful command result is shown below:
Backing up /etc/ldap/slapd.d in /var/backups/slapd-2.5.19+dfsg-0ubuntu0.22.04.1... done.
  Moving old database directory to /var/backups:
  - directory unknown... done.
  Creating initial configuration... done.
  Creating LDAP directory... done.
-
-
Open the /etc/ldap/ldap.conf file for editing:
$ sudo vi /etc/ldap/ldap.confIn the file, uncomment the
BASEandURIfields. As their values, enter your base DN and LDAP server URI accordingly:BASE dc=ru-central1,dc=internal URI ldap://bds-pam.ru-central1.internalSave and close the file.
-
Restart the
slapdservice to apply changes:$ sudo systemctl restart slapd -
Check the
slapdservice status:$ sudo systemctl status slapdThe command output should be as follows:
slapd.service - LSB: OpenLDAP standalone server (Lightweight Directory Access Protocol) Loaded: loaded (/etc/init.d/slapd; generated) Drop-In: /usr/lib/systemd/system/slapd.service.d └─slapd-remain-after-exit.conf Active: active (running) since Mon 2025-07-28 15:28:15 UTC; 7s ago Docs: man:systemd-sysv-generator(8) Process: 5958 ExecStart=/etc/init.d/slapd start (code=exited, status=0/SUCCESS) Tasks: 3 (limit: 19050) Memory: 3.3M CPU: 23ms CGroup: /system.slice/slapd.service └─5965 /usr/sbin/slapd -h "ldap:/// ldapi:///" -g openldap -u openldap -F /etc/ldap/slapd.d -
Check the OpenLDAP server configuration:
$ sudo ldapsearch -Q -LLL -Y EXTERNAL -H ldapi:///The command output should contain the correct base DN:
dn: dc=ru-central1,dc=internal
objectClass: top
objectClass: dcObject
objectClass: organization
o: ru-central1.internal
dc: ru-central1
Create base groups
-
Create a new LDIF file using the command below:
$ sudo vi base-groups.ldifIn the file, describe configuration of two base groups:
People(for storing users) andGroups(for storing groups):dn: ou=People,dc=ru-central1,dc=internal objectClass: organizationalUnit ou: People dn: ou=Groups,dc=ru-central1,dc=internal objectClass: organizationalUnit ou: GroupsSave and close the file.
-
Run the
ldapaddcommand to add groups from the previously created file to the LDAP directory:$ sudo ldapadd -x -D cn=admin,dc=ru-central1,dc=internal -W -f base-groups.ldifEnter the
adminpassword to confirm the operation.The successful result:
adding new entry "ou=People,dc=ru-central1,dc=internal"
adding new entry "ou=Groups,dc=ru-central1,dc=internal"
-
Run the
ldapsearchcommand to check that new groups have been created:$ sudo ldapsearch -Q -LLL -Y EXTERNAL -H ldapi:///The command returns new groups:
dn: dc=ru-central1,dc=internal
objectClass: top
objectClass: dcObject
objectClass: organization
o: ru-central1.internal
dc: ru-central1

dn: ou=People,dc=ru-central1,dc=internal
objectClass: organizationalUnit
ou: People

dn: ou=Groups,dc=ru-central1,dc=internal
objectClass: organizationalUnit
ou: Groups
Create a user
-
Run the
slappasswdcommand to generate an encrypted password for the new LDAP user:$ sudo slappasswdEnter the new user password and confirm it. Remember the password as it will be required during authentication check (see step 2 of the Check authentication section).
The encrypted password is displayed:
{SSHA}XXXXXXXXXXXXXXXXXXXXXXXXXXXXXXXX -
Create a new LDIF file using the command below:
$ sudo vi user.ldifIn the file, describe the
aliceuser configuration as follows. Note the following:-
In the
userPasswordfield, you should enter the encrypted password generated in the previous step. -
The user is added to the
Peoplebase group. If necessary, you can use another group.
dn: uid=alice,ou=People,dc=ru-central1,dc=internal
objectClass: inetOrgPerson
objectClass: posixAccount
objectClass: shadowAccount
uid: alice
sn: Test
givenName: Alice
cn: Alice Test
displayName: Alice Test
uidNumber: 10000
gidNumber: 5000
userPassword: {SSHA}XXXXXXXXXXXXXXXXXXXXXXXXXXXXXXXX
gecos: Alice Test
loginShell: /bin/bash
homeDirectory: /home/alice
Save and close the file.
-
-
Run the
ldapaddcommand to add a new user to the LDAP directory:$ sudo ldapadd -x -D cn=admin,dc=ru-central1,dc=internal -W -f user.ldifEnter the
adminpassword to confirm the operation.The successful command result:
adding new entry "uid=alice,ou=People,dc=ru-central1,dc=internal"
-
Check that the new user has been created:
$ sudo ldapsearch -x -LLL -b dc=ru-central1,dc=internal '(uid=alice)' cn uidNumber gidNumberResult:
dn: uid=alice,ou=People,dc=ru-central1,dc=internal
cn: Alice Test
uidNumber: 10000
gidNumber: 5000
Disable anonymous binding
|
IMPORTANT
If you disable anonymous binding to LDAP as follows, it will be necessary to fill in the |
If you need to disable anonymous binding to an LDAP server, perform the following:
-
Create a new LDIF file:
$ sudo vi ldap_disable_bind_anon.ldifAdd the following lines to the file:
dn: cn=config
changetype: modify
add: olcDisallows
olcDisallows: bind_anon

dn: cn=config
changetype: modify
add: olcRequires
olcRequires: authc

dn: olcDatabase={-1}frontend,cn=config
changetype: modify
add: olcRequires
olcRequires: authc
Save and close the file.
-
Run the
ldapaddcommand to apply changes:$ sudo ldapadd -Y EXTERNAL -H ldapi:/// -f ldap_disable_bind_anon.ldifResult:
SASL/EXTERNAL authentication started
SASL username: gidNumber=0+uidNumber=0,cn=peercred,cn=external,cn=auth
SASL SSF: 0
modifying entry "cn=config"
modifying entry "cn=config"
modifying entry "olcDatabase={-1}frontend,cn=config"
Configure ADB master
Run the following commands on the ADB master host:
-
Update all packages that are currently installed in your system:
$ sudo apt update -
Install the libpam-ldapd package:
$ sudo apt install libpam-ldapdDuring the configuration process, you will see several dialog boxes with parameters. The following parameters are required:
-
LDAP server URI — URI of the LDAP server, for example:
ldap://bds-pam.ru-central1.internal/. -
LDAP server search base — base DN for LDAP search, for example:
dc=ru-central1,dc=internal.
 Fill in LDAP server URI
 Fill in LDAP server search base
In other dialog boxes, you can confirm the default settings.
-
-
Open the PAM configuration file /etc/nslcd.conf for editing:
$ sudo vi /etc/nslcd.confThe file contents are shown below. For information on available options, see GitHub.
# nslcd configuration file. See nslcd.conf(5)
# for details.

# The user and group nslcd should run as.
uid nslcd
gid nslcd

# The location at which the LDAP server(s) should be reachable.
uri ldap://bds-pam.ru-central1.internal/

# The search base that will be used for all queries.
base dc=ru-central1,dc=internal

# The LDAP protocol version to use.
#ldap_version 3

# The DN to bind with for normal lookups.
binddn cn=admin,dc=ru-central1,dc=internal
bindpw qwerty

# The DN used for password modifications by root.
#rootpwmoddn cn=admin,dc=example,dc=com
Note that the
uriandbaseoption values are set automatically based on the data entered during thelibpam-ldapdinstallation. As for thebinddnandbindpwoptions, you should fill in them manually in the file (if necessary) — by passing the DN and password of your LDAP administrator accordingly.NOTEIf your environment allows anonymous binding to the LDAP server for searching (and the abovementioned step Disable anonymous binding was not performed), the
binddnandbindpwparameters are optional. If anonymous binding is forbidden, these parameters are required; otherwise, during authentication check, you get the following error:Authentication service cannot retrieve authentication info. -
Save changes to the /etc/nslcd.conf file (if any), close the file, and restart the
nslcdservice:$ sudo systemctl restart nslcd -
Create the /etc/pam.d/postgresql file to enter configuration options of the PAM module
postgresql:$ sudo vi /etc/pam.d/postgresqlAdd the following lines to the file:
auth        required      pam_ldap.so
account     sufficient    pam_ldap.so
Save and close the file.
Check authentication
To check PAM authentication, run the following commands on the ADB master host:
-
(Optional) Install the
pamtesterutility to precheck that all PAM settings are correct:$ sudo apt install pamtester -
(Optional) Run the
pamtesterutility by passing a name of the PAM module (postgresql) and the LDAP user name (alice) in the utility parameters:$ pamtester postgresql alice authenticateAfter running the utility, enter the
aliceuser password (see step 1 in the Create a user section). The successful authentication result is shown below:pamtester: successfully authenticated
-
Log in to the ADB master host under the
gpadminuser:$ sudo su - gpadmin -
Connect to the
adbdatabase usingpsql:$ psql adb -
Create the
alicerole:CREATE ROLE alice LOGIN;Exit
psql. -
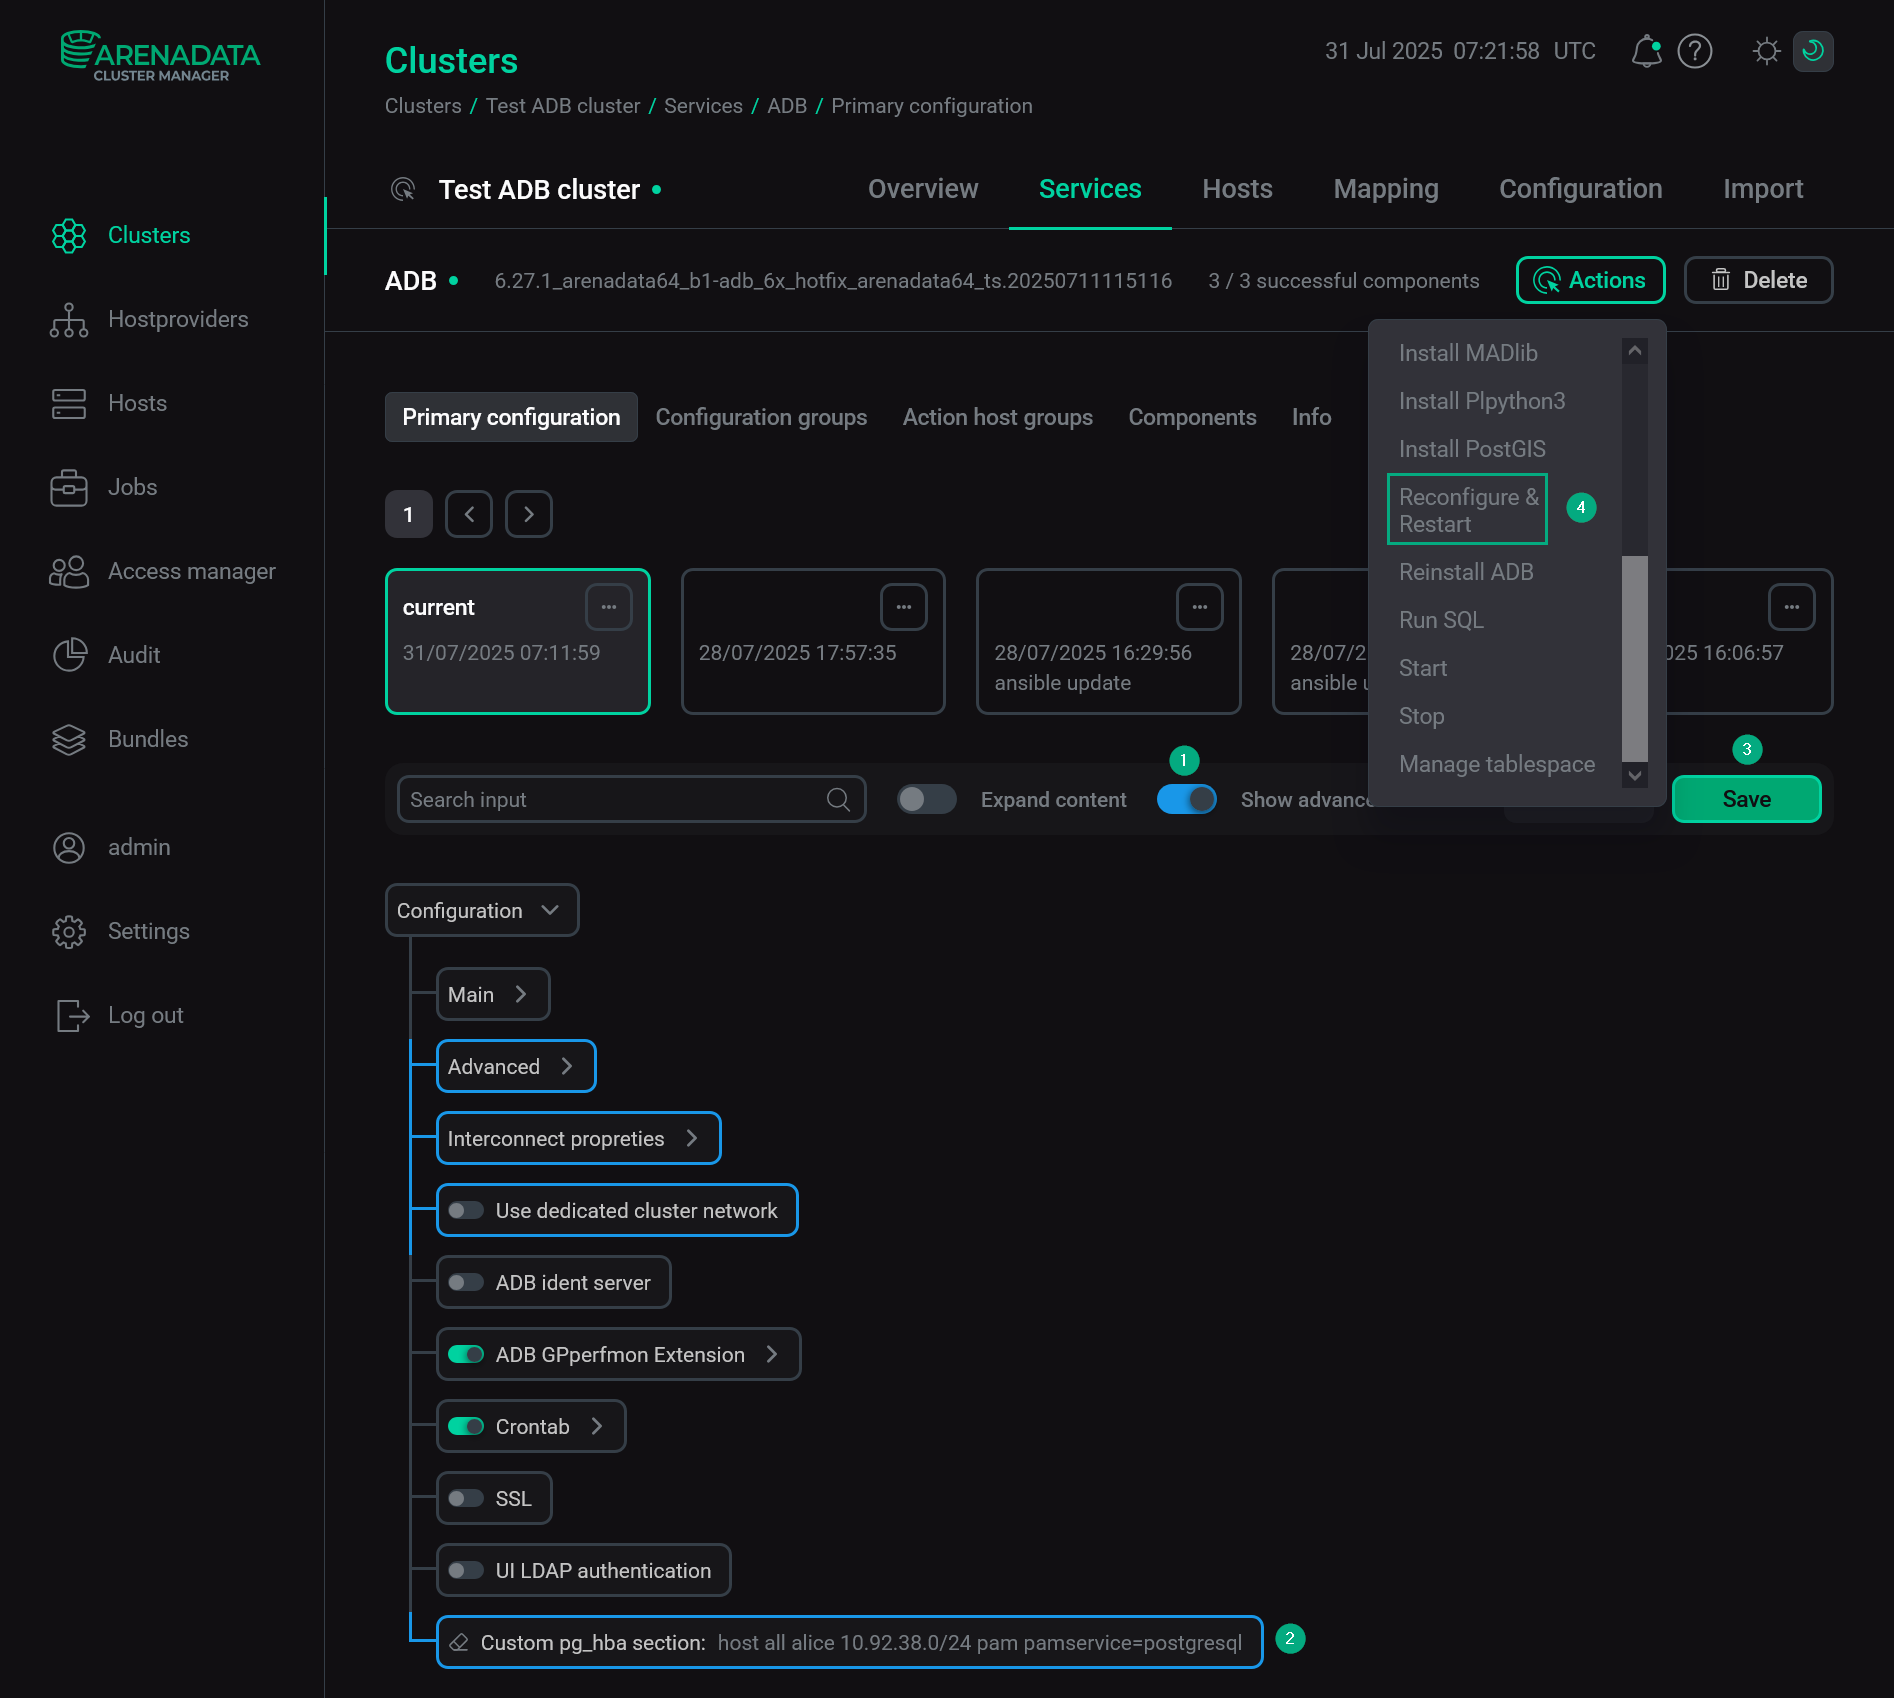
Open the ADB service configuration page in ADCM. In the Custom pg_hba section field, add information about PAM authentication using the following format:
host all alice 10.92.38.0/24 pam pamservice=postgresql
The abovementioned line allows the
alicerole to connect to all ADB databases using thepostgresqlPAM module from all hosts with IP addresses in the10.92.38.0—10.92.38.255range. For production environments, you should change allowed IP addresses and database names in the appropriate way.To apply changes, click Save and run the ADB service action Reconfigure & Restart.
 Configure PAM authentication for ADB via ADCM
 -
Using
psql, connect to theadbdatabase under thealiceuser:$ psql -d adb -U alice -h 10.92.38.37After running the utility, enter the
aliceuser password (see step 1 in the Create a user section). As a result of successful authentication,psqlprompts you to enter next commands:psql (9.4.26) Type "help" for help. adb=>