

Install a cluster
Step 1. Run installation
The last step of adding a new Enterprise Tools cluster is to install its services. To do this:
-
Apply the Install action to the cluster selected on the Clusters page by clicking the

 icon in the Actions column.
 Switch to cluster installation
 -
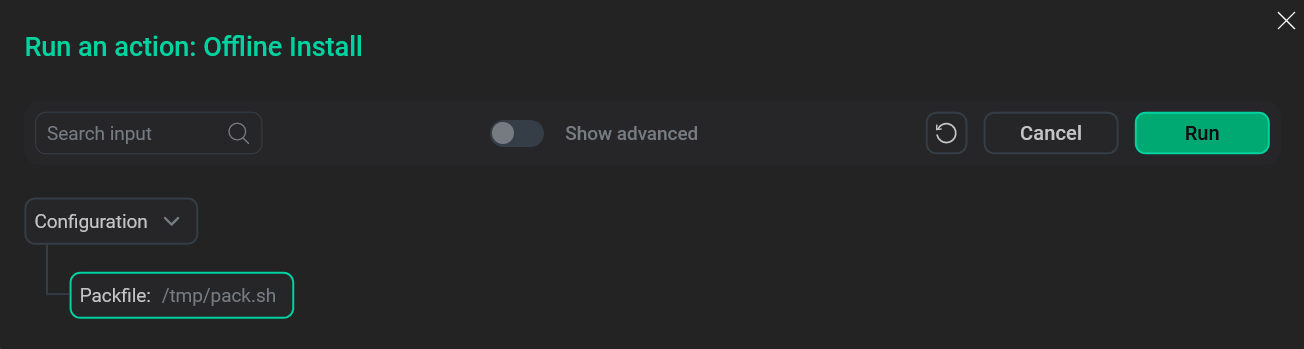
In the opened dialog box, on the Configuration tab:
-
Enable the Offline Install toggle.
-
In the Packfile field, enter a full path to the shell script that is received from the Arenadata support team.
-
Click Next.
 Configure installation parameters
-
-
On the Raising concerns tab:
-
If necessary, enable the Raise non-blocking concern toggle to run the action without blocking the cluster during action execution.
-
Click Next.
-
-
On the Confirmation tab:
-
Add a comment with a brief description of the changes.
-
Select the Verbose checkbox to display additional information about the action execution on the Jobs page.
-
Click Run.
-
-
Wait until the installation process is completed.
NOTEIn case of errors, you can find logs on the Jobs page. Cluster installation is completed
Step 2. Upload packages for offline installation
In addition to installing the ET services, it is required to upload all installation files and images to an initialized HTTP repository and Docker Registry on the host where the ET cluster is deployed. It is necessary for future offline deployment of Arenadata products.
In case of insufficient disk space errors, perform the following steps on the host:
-
Determine the Docker data storage directory:
$ sudo docker info | grep 'Docker Root Dir'The result should look like this:
Docker Root Dir: /var/lib/docker
-
Check available disk space:
$ sudo df -h /var/lib/docker $ sudo df -h /opt/arenadata/etools $ sudo df -h /tmpNOTEIf the command output for the specified directories shows the same mount point (theMounted oncolumn), it means that the directories are located in the same filesystem and use a common disk space. In this case, refer to the value in theAvailcolumn for that filesystem rather than for each directory separately. -
Check actual disk space usage:
$ sudo du -sh /var/lib/docker $ sudo du -sh /opt/arenadata/etools $ sudo docker image ls -
If necessary, remove unused Docker objects:
IMPORTANT-
The command removes unused Docker images, containers, networks, and temporary data used by various services and applications on the server, not only ET components.
-
Before running the command, ensure that the resources being removed are not used by other services or applications.
$ sudo docker system prune -a -
To upload the packages, perform the following steps:
-
Apply the Upload Pack action to the cluster selected on the Clusters page by clicking the
icon in the Actions column.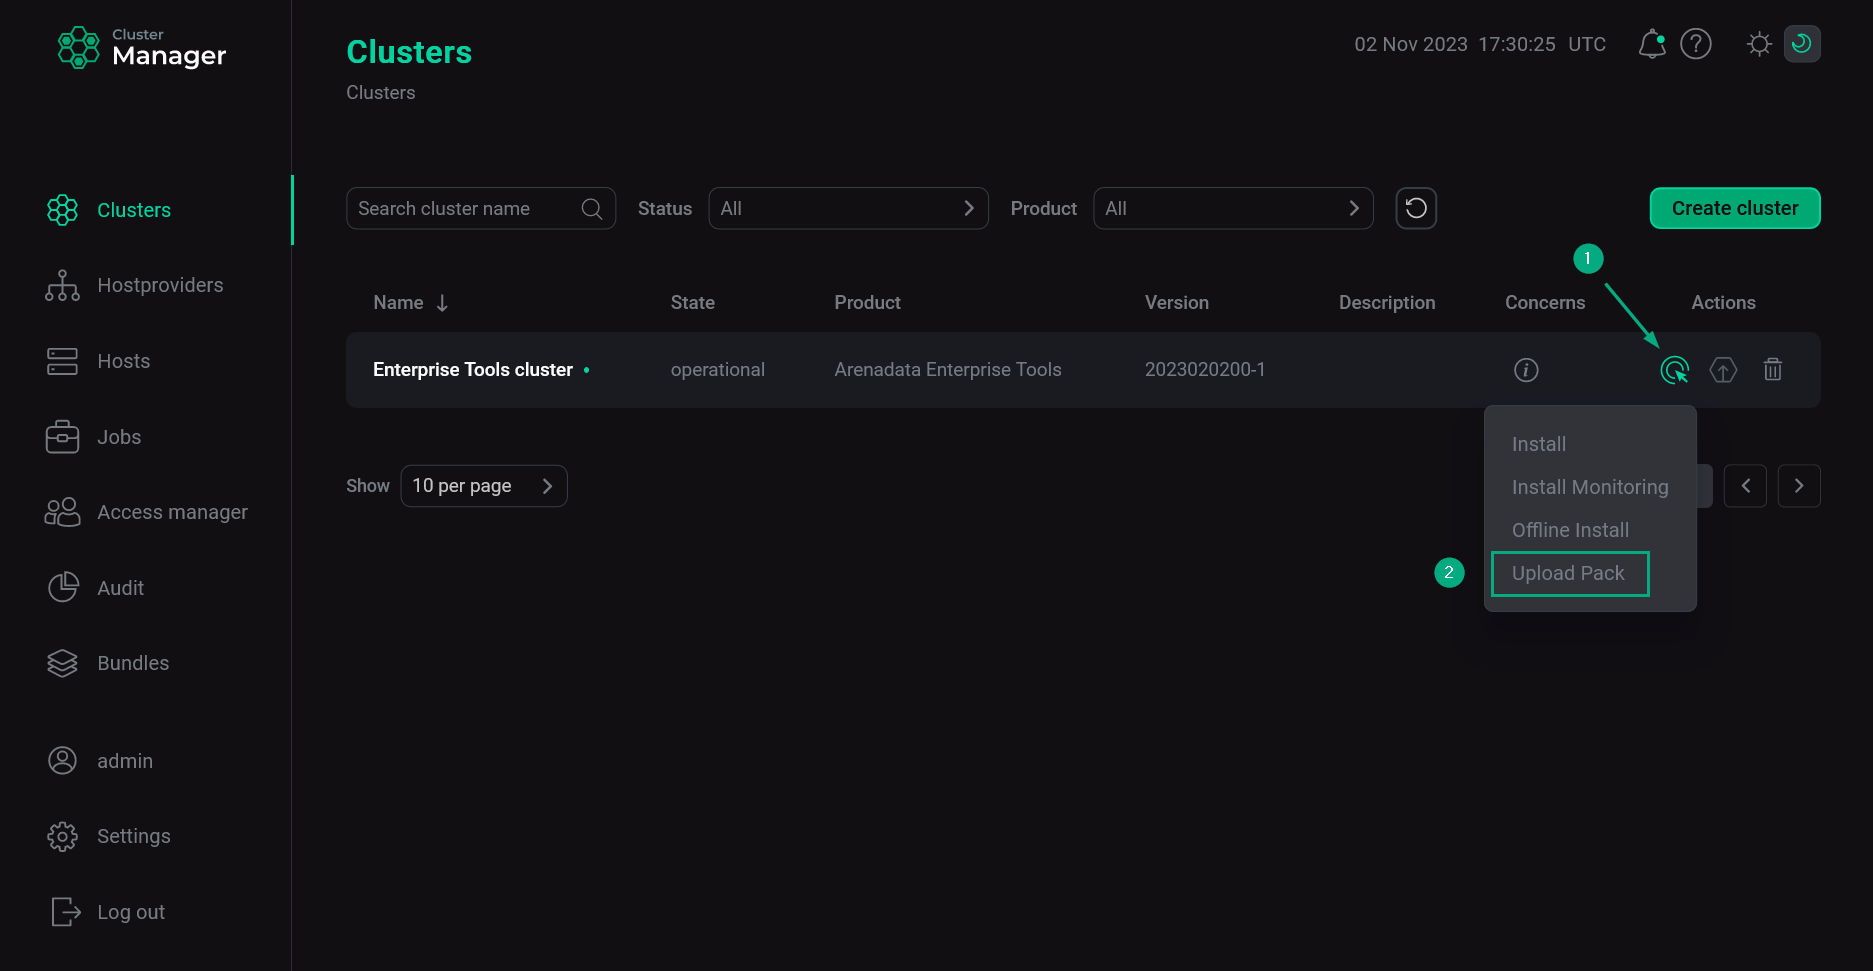 Switch to uploading packages
 -
In the opened dialog box, on the Configuration tab:
-
In the Packfile field, enter a full path to the shell script received from the Arenadata support team.
-
Click Next.
 Configure package upload parameters
-
-
On the Raising concerns tab:
-
If necessary, enable the Raise non-blocking concern toggle to run the action without blocking the cluster during action execution.
-
Click Next.
-
-
On the Confirmation tab:
-
Add a comment with a brief description of the changes.
-
Select the Verbose checkbox to display additional information about the action execution on the Jobs page.
-
Click Run.
-
-
Wait until the upload process is completed.
NOTEIn case of errors, you can find logs on the Jobs page.
Step 3. Verify results
The steps for checking the installation results are listed below:
-
Check that ports
443and81are listened at the host where cluster is installed. The first port is used by the Docker Registry service, the second one — by the HTTP Mirror service.$ sudo netstat -ntlp|grep L|grep -E "81|443"The result should look like this:
tcp        0      0 0.0.0.0:443             0.0.0.0:*               LISTEN      30124/docker-proxy
tcp        0      0 0.0.0.0:81              0.0.0.0:*               LISTEN      68462/docker-proxy
-
Check that the /opt/arenadata/etools/httprepo/packages/arenadata-repo folder exists at the host where the cluster is installed. This folder should contain the data necessary for offline installation of the products that you have chosen before getting a shell script from the Arenadata support team.
$ ls -la /opt/arenadata/etools/httprepo/packages/arenadata-repoThe following example displays the data that can be placed in this folder for ADS and ADS Control installation.
total 0
drwxr-xr-x. 5 root root 45 May 23 16:01 .
drwxr-xr-x. 3 root root 28 May 23 16:00 ..
drwxr-xr-x. 3 root root 17 May 23 16:01 ADM
drwxr-xr-x. 3 root root 19 May 23 16:00 ADS
drwxr-xr-x. 3 root root 21 Nov 23 19:12 ADSCC
drwxr-xr-x. 3 root root 19 May 23 16:01 zookeeper