

Use MIT Kerberos in Kafka
This article describes the first steps in Kafka with Kerberos SASL installed.
|
NOTE
Enabling Kerberos SASL authentication is done in accordance with the article MIT Kerberos.
|
Check installed Kerberos SASL
-
Check the settings set for Kerberos in the cluster configurations.
Go to the cluster configuration, select Show advanced, find the section with Kerberos configurations, expand it.
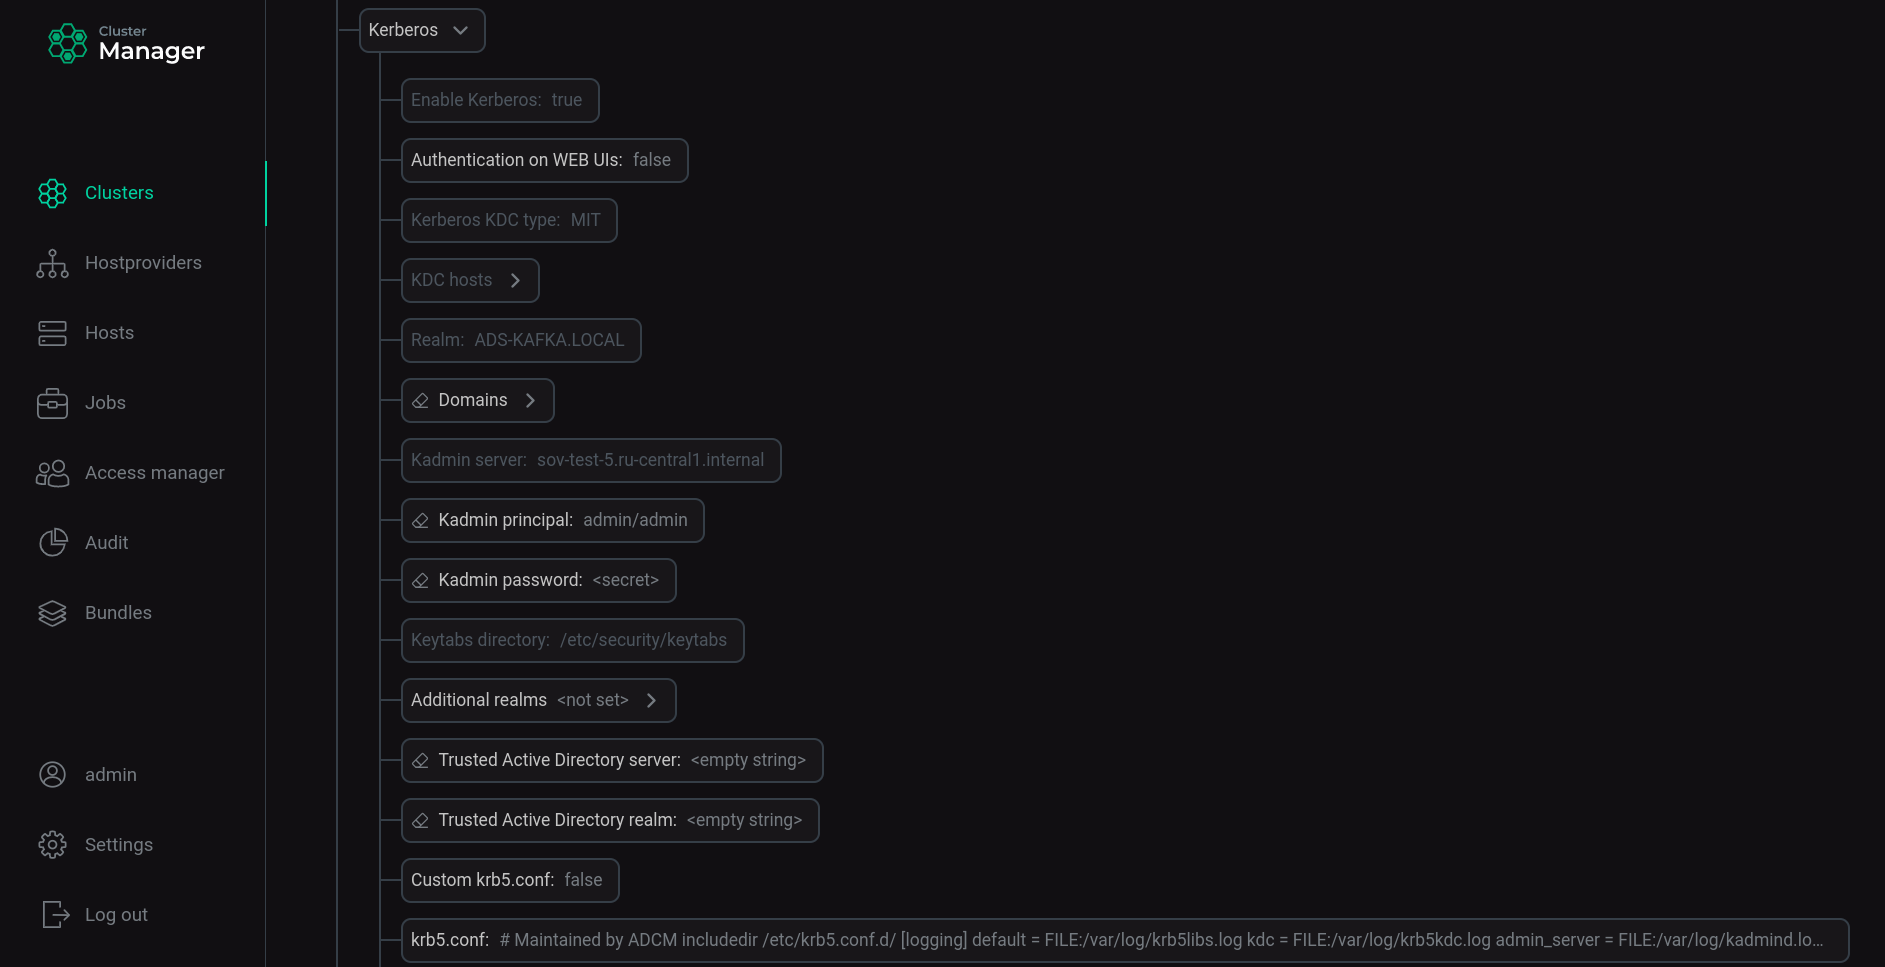 Installed ADS cluster configuration settings for Kerberos
 -
Check the security and authentication configuration of the Kafka brokers.
On each host with a Kafka broker, issue the command:
$ sudo vim /usr/lib/kafka/config/server.propertiesEnsure that in the server.properties file for each Kafka broker, the lines defining the security protocol are changed to
SASL_PLAINTEXT; lines defining the authentication mechanism - toGSSAPI.security.inter.broker.protocol=SASL_PLAINTEXT sasl.mechanism.inter.broker.protocol=GSSAPI sasl.enabled.mechanisms=GSSAPI -
Verify that after installing Kerberos SASL in the Kafka service settings in the server.properties group, the listeners parameter has changed from
PLAINTEXT://:9092toSASL_PLAINTEXT://:9092. -
Check for the created principals for each service.
On the host with the KDC server installed, enter the command:
$ sudo kadmin.local list_principalsThe output of the list of principals shows that there are principals for each host of each installed service, principals for admins and other technical principals for the created realm:
K/M@ADS-KAFKA.LOCAL
admin/admin@ADS-KAFKA.LOCAL
kadmin/admin@ADS-KAFKA.LOCAL
kadmin/changepw@ADS-KAFKA.LOCAL
kadmin/sov-ads-test-0.ru-central1.internal@ADS-KAFKA.LOCAL
kafka/sov-ads1-test.ru-central1.internal@ADS-KAFKA.LOCAL
kafka/sov-ads2-test.ru-central1.internal@ADS-KAFKA.LOCAL
kafka/sov-ads3-test.ru-central1.internal@ADS-KAFKA.LOCAL
kiprop/sov-ads-test-0.ru-central1.internal@ADS-KAFKA.LOCAL
krbtgt/ADS-KAFKA.LOCAL@ADS-KAFKA.LOCAL
zookeeper/sov-ads1-test.ru-central1.internal@ADS-KAFKA.LOCAL
zookeeper/sov-ads2-test.ru-central1.internal@ADS-KAFKA.LOCAL
zookeeper/sov-ads3-test.ru-central1.internal@ADS-KAFKA.LOCA
-
Check for the presence on hosts with installed services of files for storing passwords *.service.keytab.
On each host with installed services, issue the command:
$ ls -la /etc/security/keytabs/The file listing shows that *.service.keytab files have been created for each service installed on the host:
total 16
drwxr-xr-x. 2 root       root        102 Aug  9 20:55 .
drwxr-xr-x. 7 root       root       4096 Aug  9 19:38 ..
-rw-------. 1 kafka      kafka       826 Aug  9 20:54 kafka.service.keytab
-rw-------. 1 zookeeper  zookeeper   858 Aug  9 20:55 zookeeper.service.keytab
Set up accounts for authentication in Kafka
For the producer and the consumer you can create the user principals.
To do this, enter the commands one by one using the username and password:
$ sudo kadmin.local -q "add_principal -pw PASSWORD reader@ADS-KAFKA.LOCAL"
$ sudo kadmin.local -q "add_principal -pw PASSWORD writer@ADS-KAFKA.LOCAL"
Get the result for each created account:
Principal "reader@ADS-KAFKA.LOCAL" created.
Principal "writer@ADS-KAFKA.LOCAL" created.
Create a JAAS file for a user
A JAAS file (Java Authentication and Authorization Service) must be created for all principals. It specifies how tickets for a particular principal will be used.
|
NOTE
|
For broker principals, connection parameters are automatically created in the kafka-jaas.conf file after kerberization. To view the contents of the file, enter the following command:
$ sudo vim /usr/lib/kafka/config/kafka-jaas.confFor the new writer and reader principals, you must create the JAAS file yourself.
-
Run command:
$ sudo vim /tmp/client.jaas -
Write data to the file:
KafkaClient {
com.sun.security.auth.module.Krb5LoginModule required
useTicketCache=true;
};
where
useTicketCacheis a parameter specifying whether a ticket for this user will be obtained from the ticket cache. If you set this parameter totrue, you must create a user ticket before connecting to Kafka.
Create a configuration file .properties for the user
To create a configuration file .properties for the user, run the command:
$ sudo vim /tmp/client.propertiesFill the file with data:
security.protocol=SASL_PLAINTEXT
sasl.mechanism=GSSAPI
sasl.kerberos.service.name=kafka
Connect to Kafka (create tickets) and work with .sh files (scripts) with the participation of different users
-
Open terminal session 1 and connect to one of the Kafka brokers.
-
Create a ticket for user
writer:$ kinit -p writer@ADS-KAFKA.LOCALEnter the password specified when creating the user.
-
Check ticket:
$ klistTicket cache: FILE:/tmp/krb5cc_1000 Default principal: writer@ADS-KAFKA.LOCAL Valid starting Expires Service principal 08/10/2022 20:44:12 08/11/2022 20:44:12 krbtgt/ADS-KAFKA.LOCAL@ADS-KAFKA.LOCAL
NOTEFor a complete description of the kinit command functions and applicable options, see kinit. -
Export the generated client.jaas file as a JVM option for the given user using the
KAFKA_OPTSenvironment variable:$ export KAFKA_OPTS="-Djava.security.auth.login.config=/tmp/client.jaas" -
Create a topic by specifying the path to the created client.properties file:
$ /usr/lib/kafka/bin/kafka-topics.sh --create --topic test-topic --bootstrap-server sov-ads-test-1.ru-central1.internal:9092,sov-ads-test-2.ru-central1.internal:9092,sov-ads-test-3.ru-central1.internal:9092 --command-config /tmp/client.propertiesGet a confirmation:
Created topic test-topic.
-
Write a message to the topic, specifying the path to the created client.properties file:
$ /usr/lib/kafka/bin/kafka-console-producer.sh --topic test-topic --bootstrap-server sov-ads-test-1.ru-central1.internal:9092,sov-ads-test-2.ru-central1.internal:9092,sov-ads-test-3.ru-central1.internal:9092 --producer.config /tmp/client.properties>One >Two >Three >Four >Five
-
Open terminal session 2 and connect to one of the Kafka brokers.
-
Create a ticket for user
reader:$ kinit -p reader@ADS-KAFKA.LOCALEnter the password specified when creating the user.
-
Check ticket:
$ klistTicket cache: FILE:/tmp/krb5cc_1000 Default principal: reader@ADS-KAFKA.LOCAL Valid starting Expires Service principal 08/10/2022 21:30:47 08/11/2022 21:30:47 krbtgt/ADS-KAFKA.LOCAL@ADS-KAFKA.LOCAL
-
Export the generated client.jaas file as a JVM option for the given user using the
KAFKA_OPTSenvironment variable:$ export KAFKA_OPTS="-Djava.security.auth.login.config=/tmp/client.jaas" -
Read messages from a topic by specifying the path to the created client.properties file:
$ /usr/lib/kafka/bin/kafka-console-consumer.sh --topic test-topic --from-beginning --bootstrap-server sov-ads-test-1.ru-central1.internal:9092,sov-ads-test-2.ru-central1.internal:9092,sov-ads-test-3.ru-central1.internal:9092 --consumer.config /tmp/client.propertiesMessages received:
One
Two
Three
Four
Five
Verify that the received messages are correct.