

Data backup and restore
To back up and restore data stored in your ADQM cluster, you can use the Backup/Restore action that the ADCM web interface provides for the ADQMDB service.
When the action is started, Wizard opens, where you can sequentially configure all the necessary parameters to create a backup or restore a data object of your ADQM cluster.
Each step with configuration parameters has the following navigation actions:
-
Discard changes — resets all the parameters of the current step to the default values.
-
Next step — saves the parameter values specified in the current step and navigates you to the next configuration page.
The last step has only the Run action which starts data backup or recovery.
To exit Wizard, click Exit in the top right corner. Your current progress will be saved, and the next time you run the Backup/Restore action, you will be prompted to continue configuring from the last completed step or start over. For more information about Wizard, refer to ADCM documentation.
|
NOTE
|
Create data backups
To create a backup of ADQM data, run the Backup/Restore action of the ADQMDB service and prepare it for execution as described below:
-
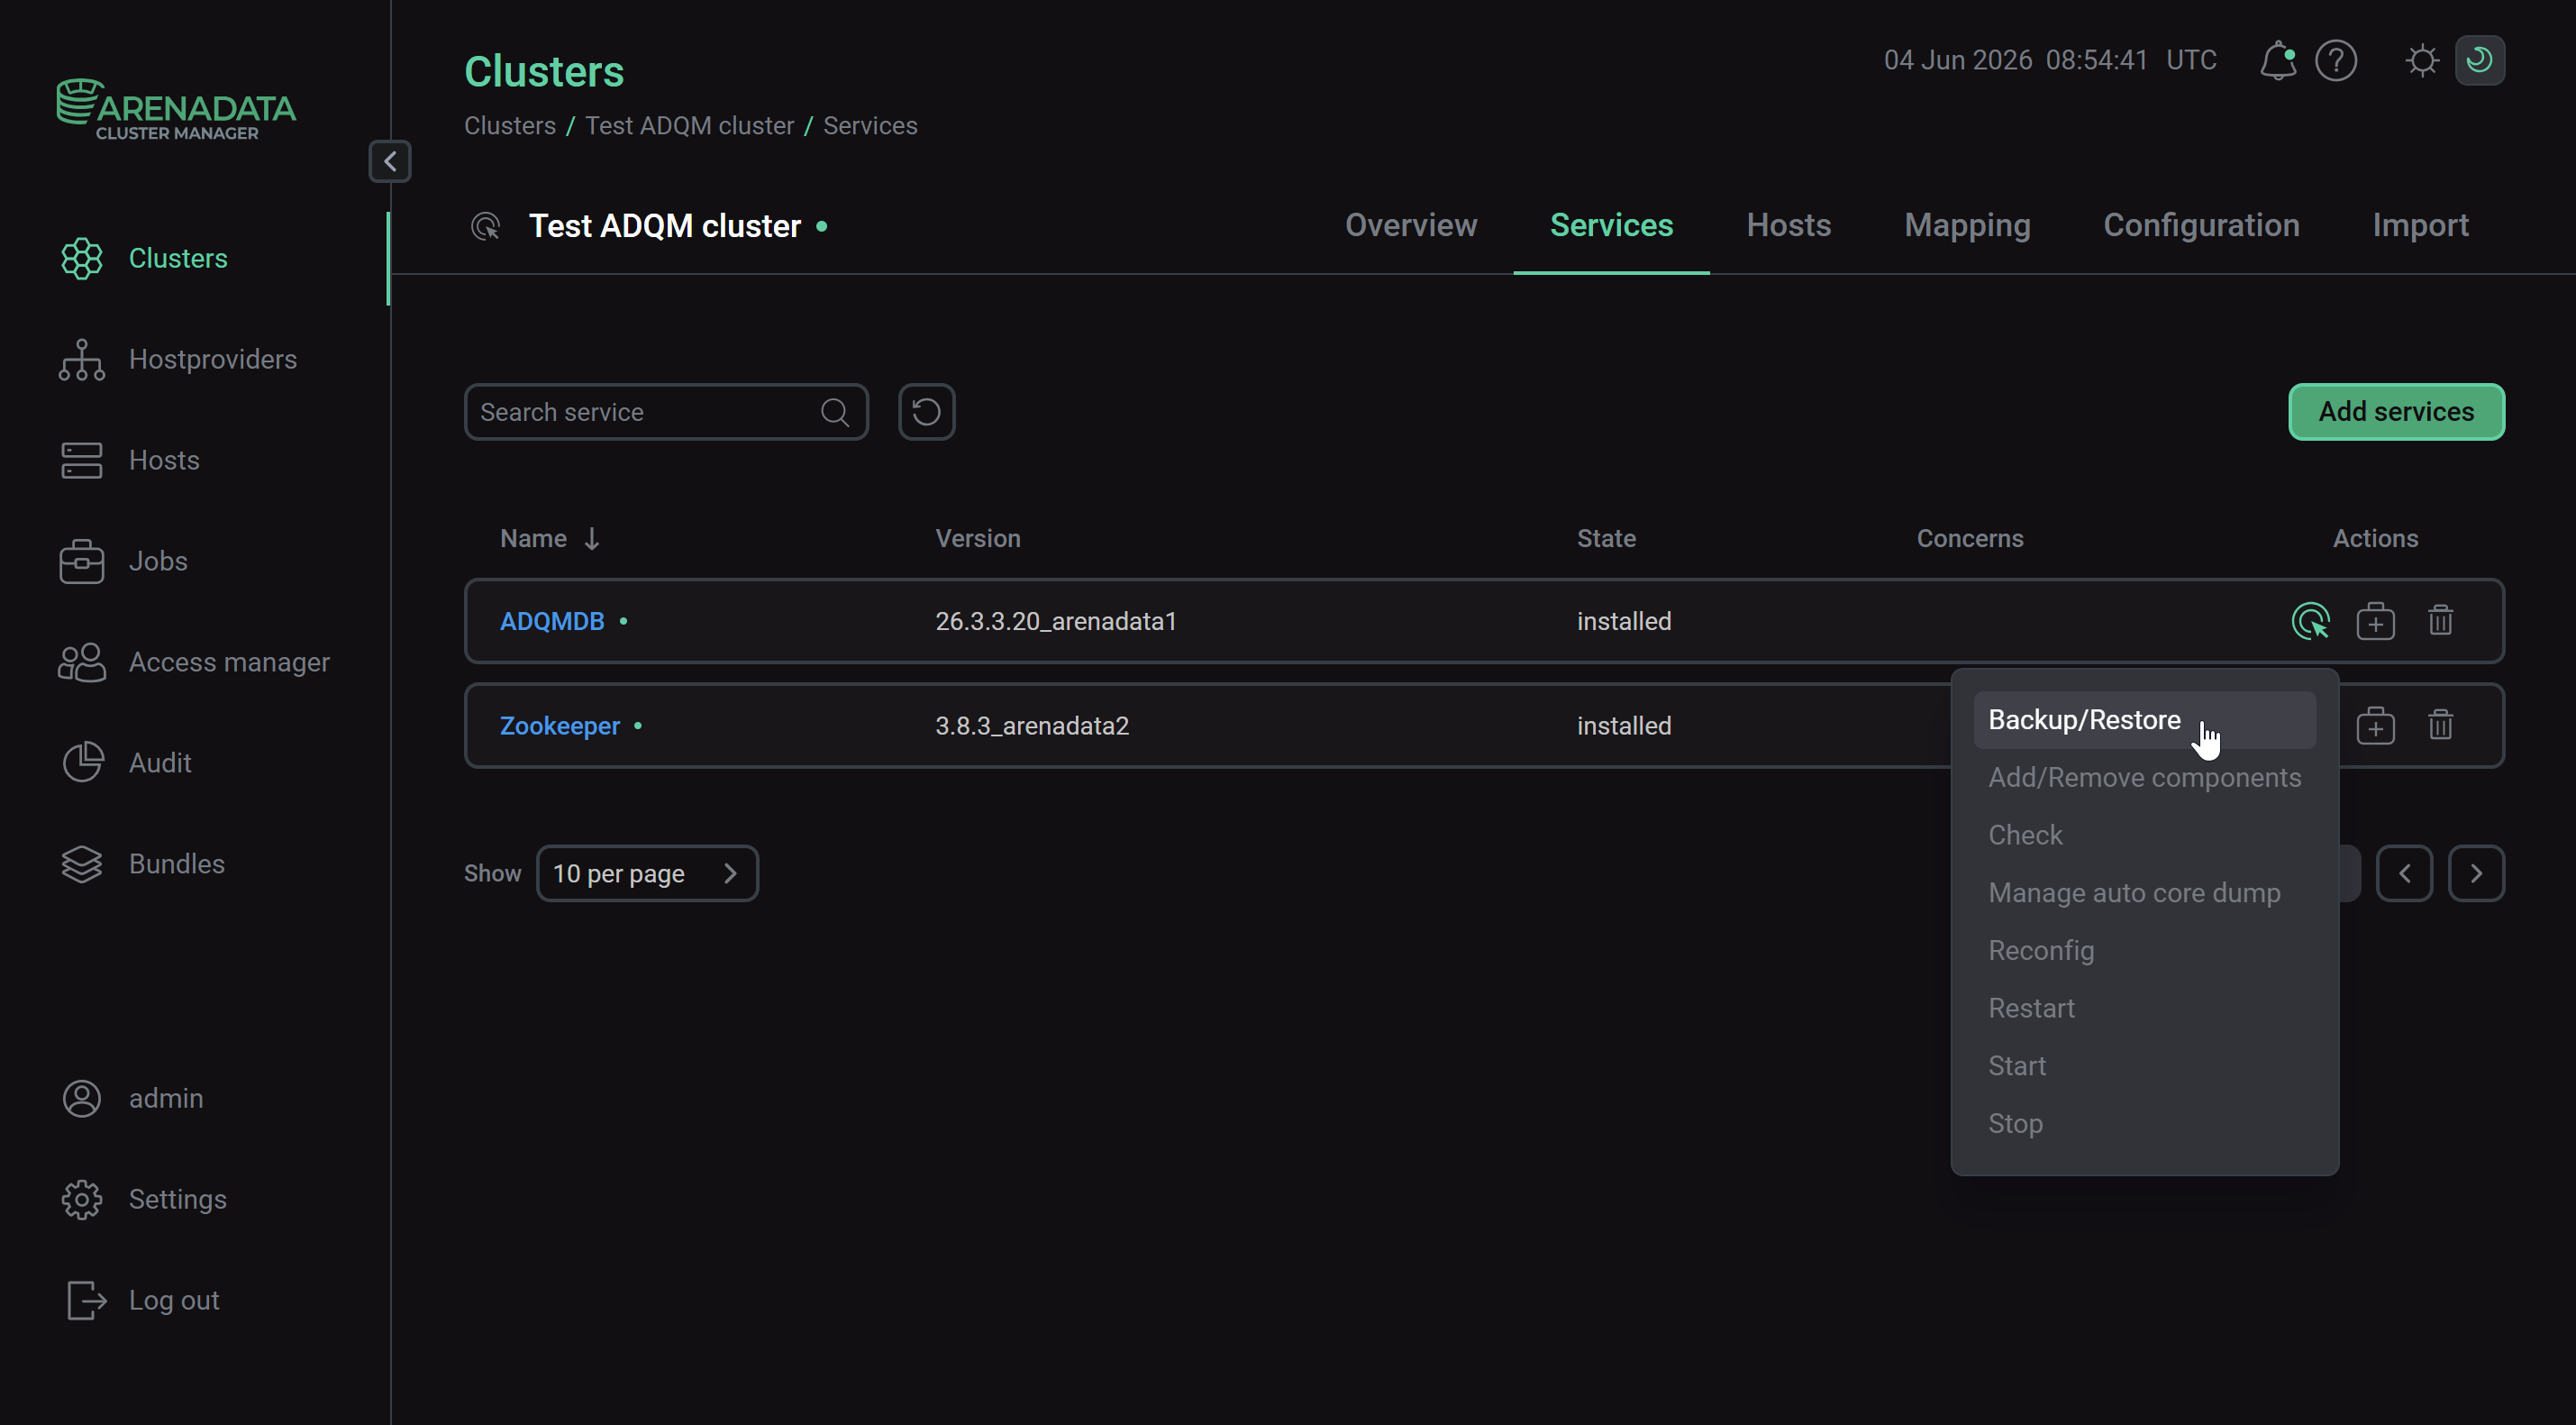
Select the Backup action.
 Select the data backup action
 -
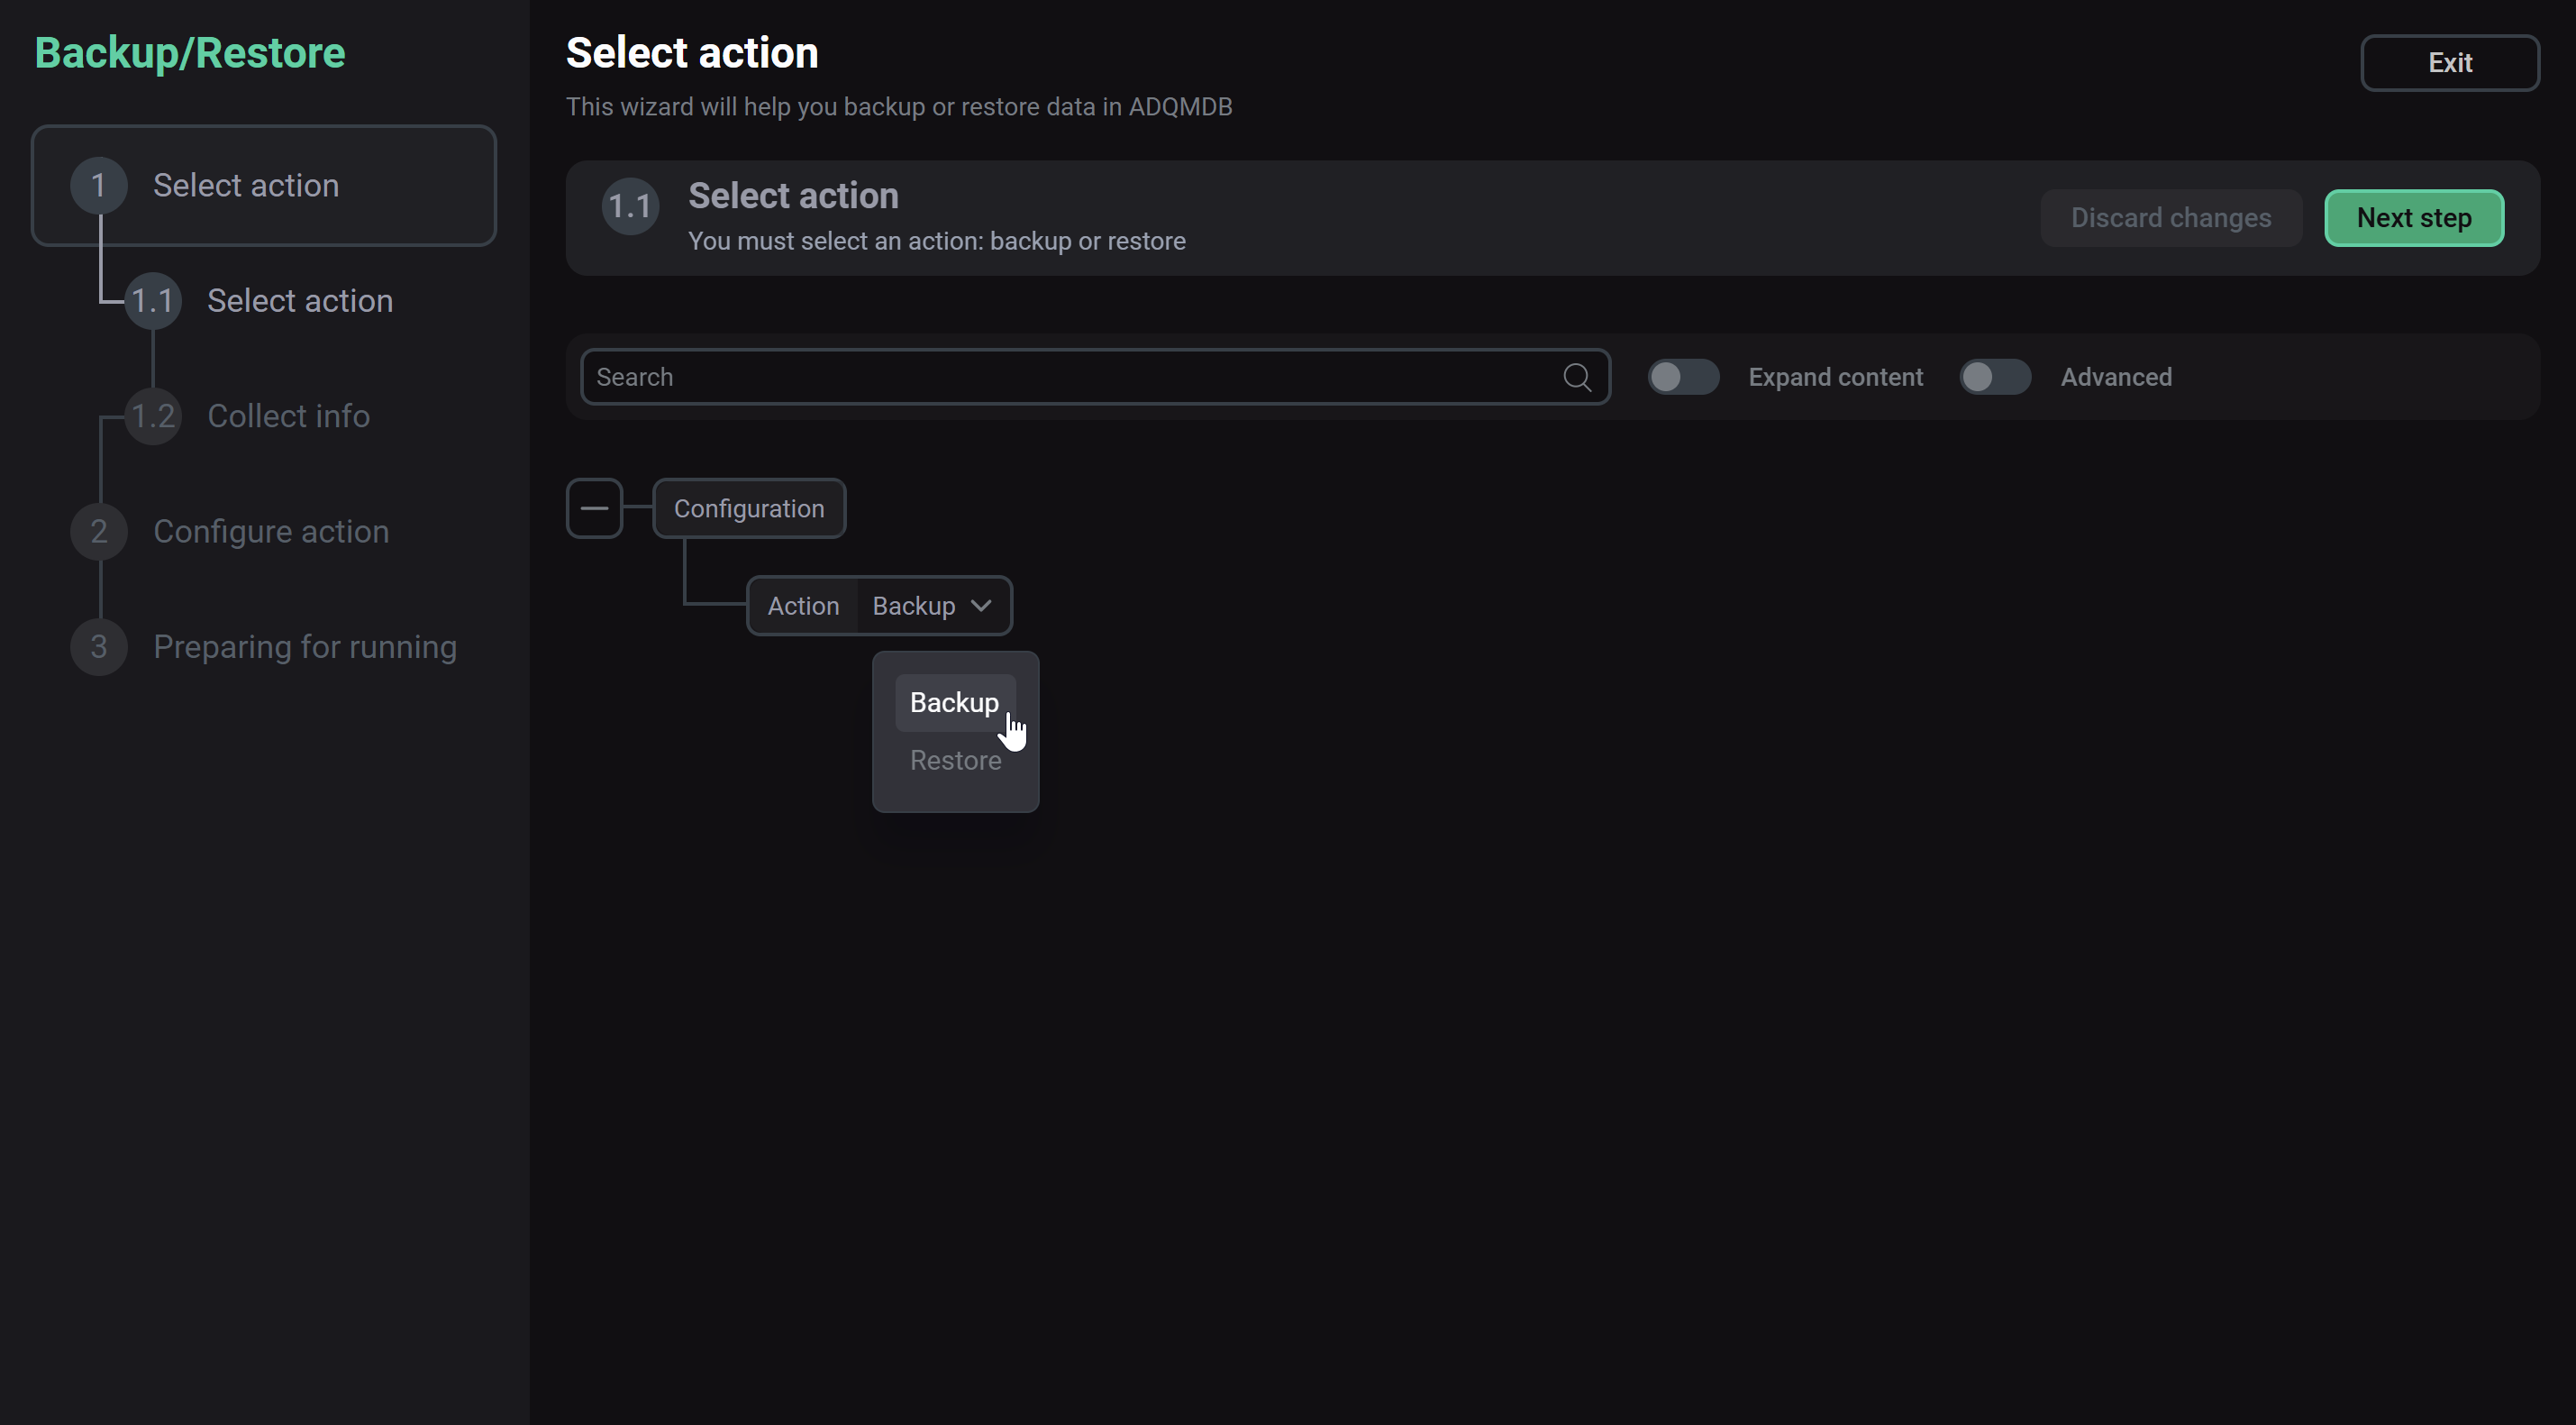
On the next configuration page, click Collect info and wait until the collection of information about the ADQM cluster data objects (databases, tables, dictionaries, created backups) is complete.
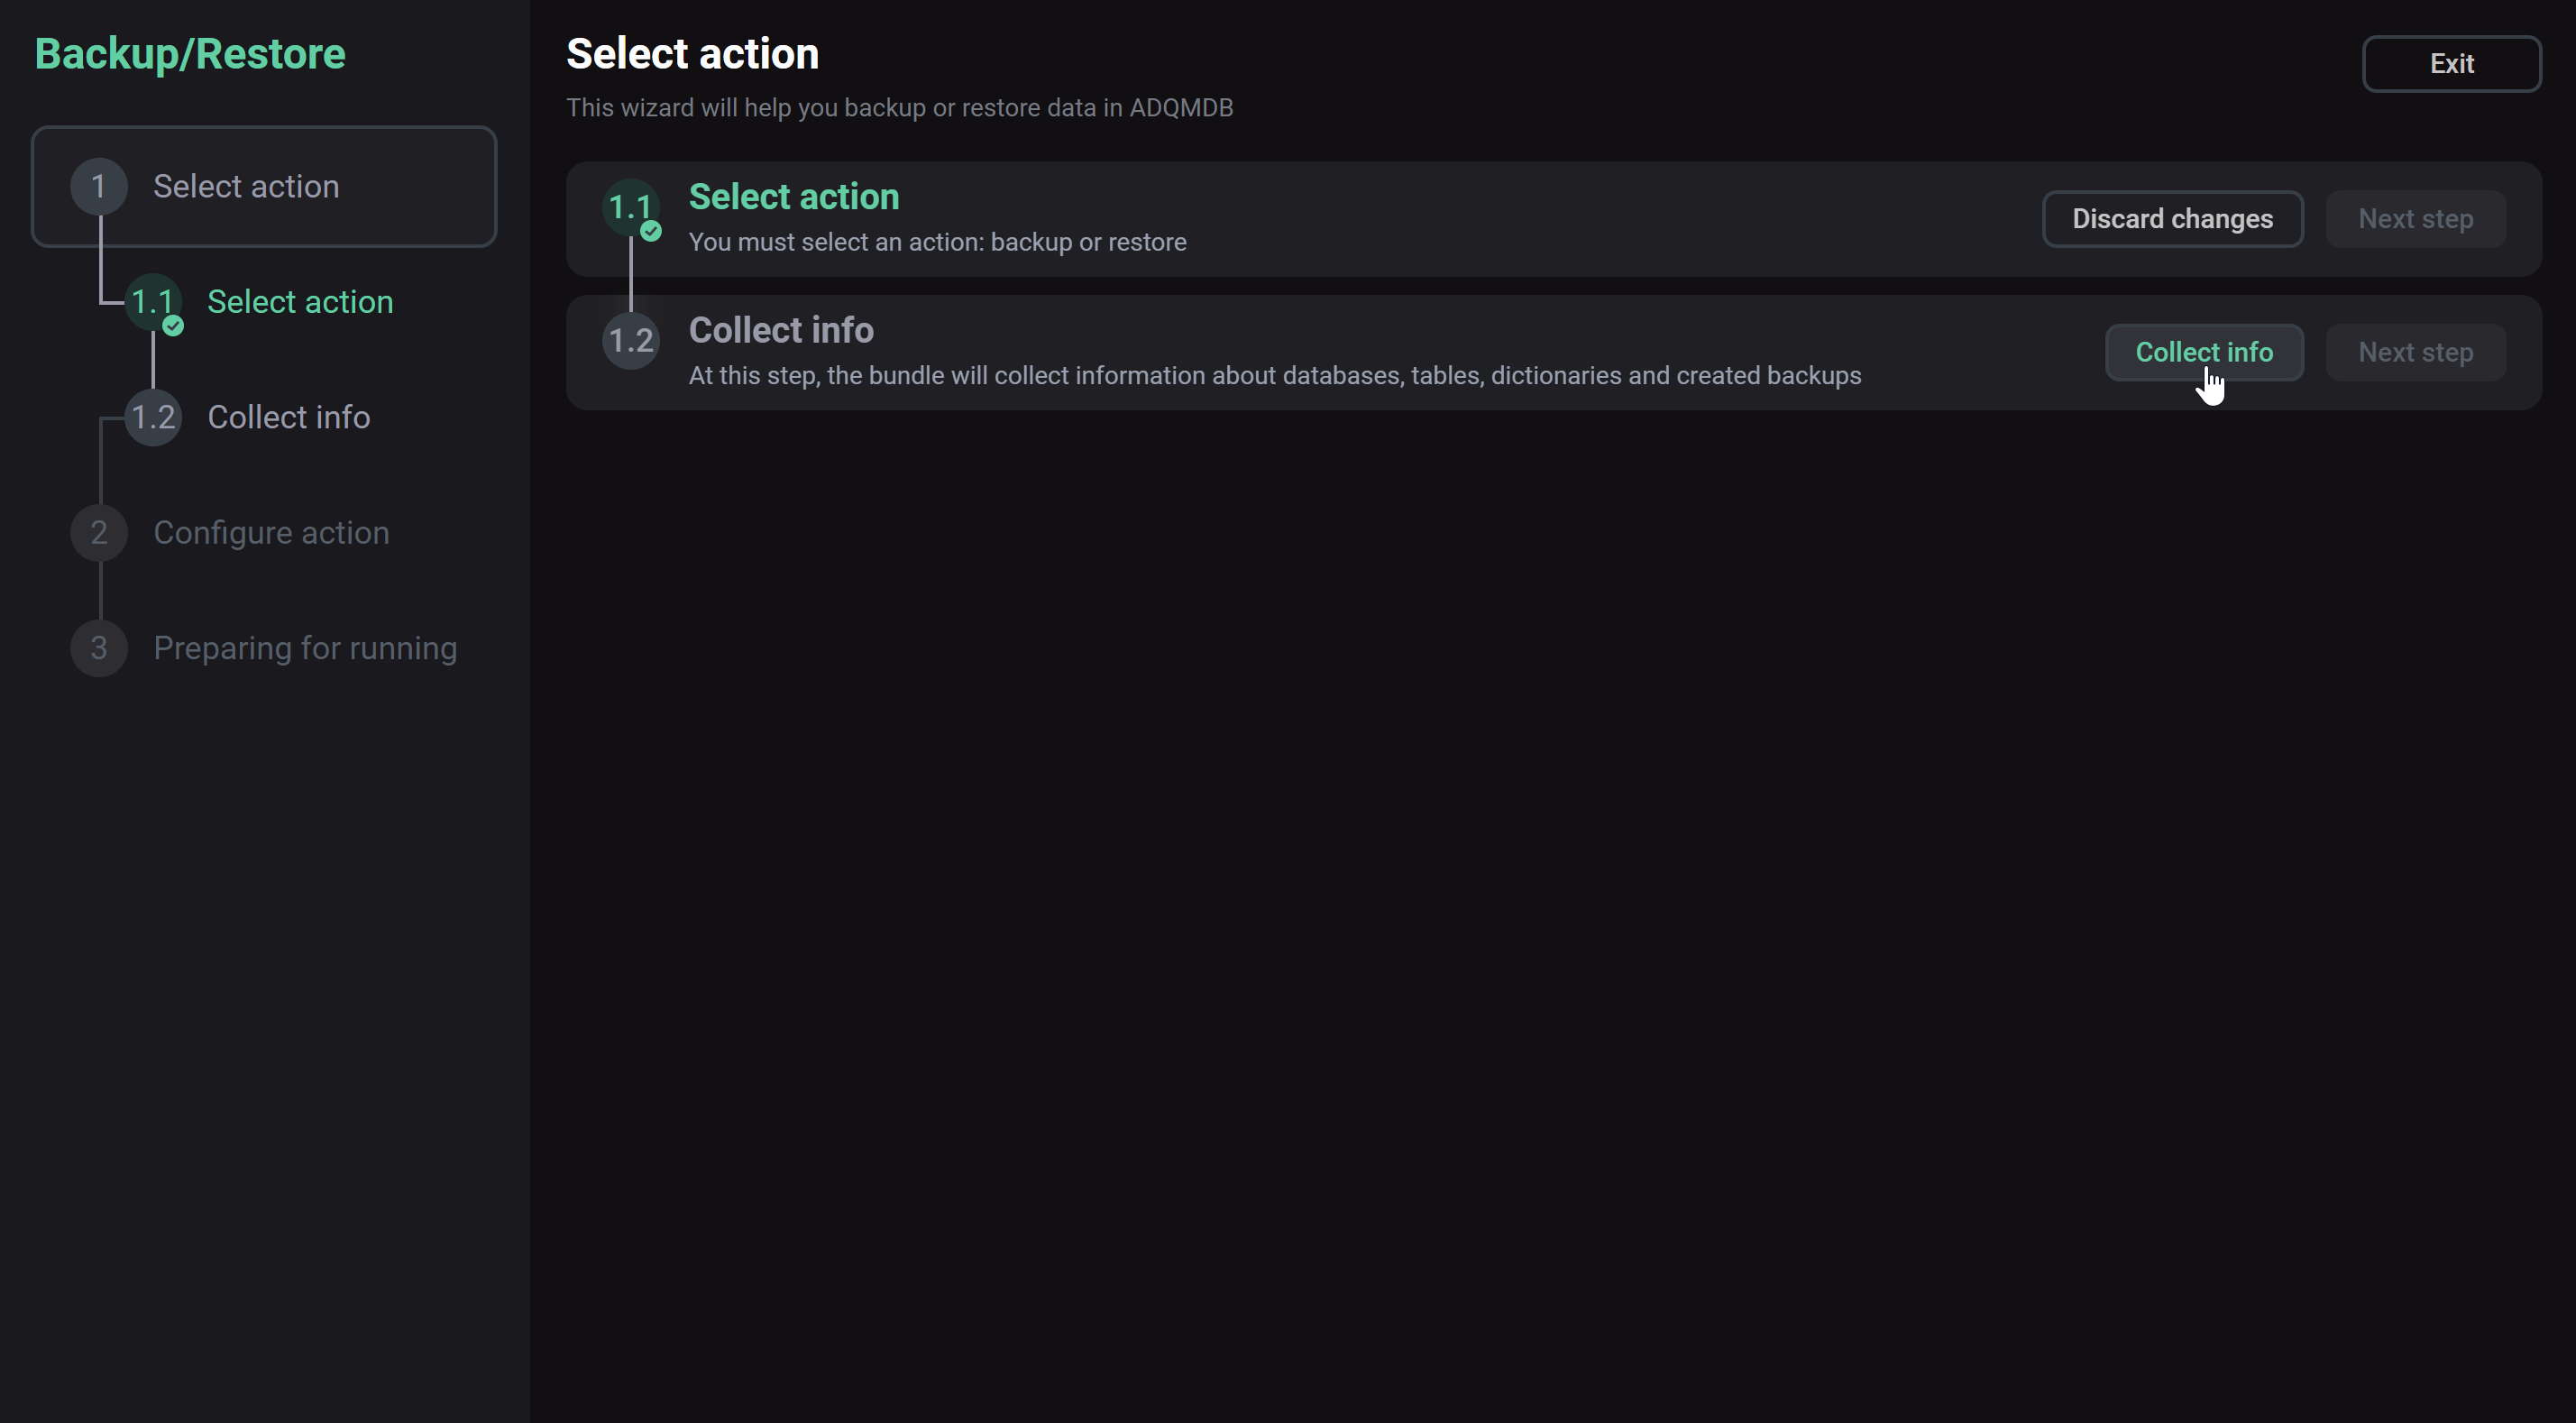 Collect information about ADQM cluster data objects
 -
Specify the parameters for creating a backup (fields highlighted in red are required).
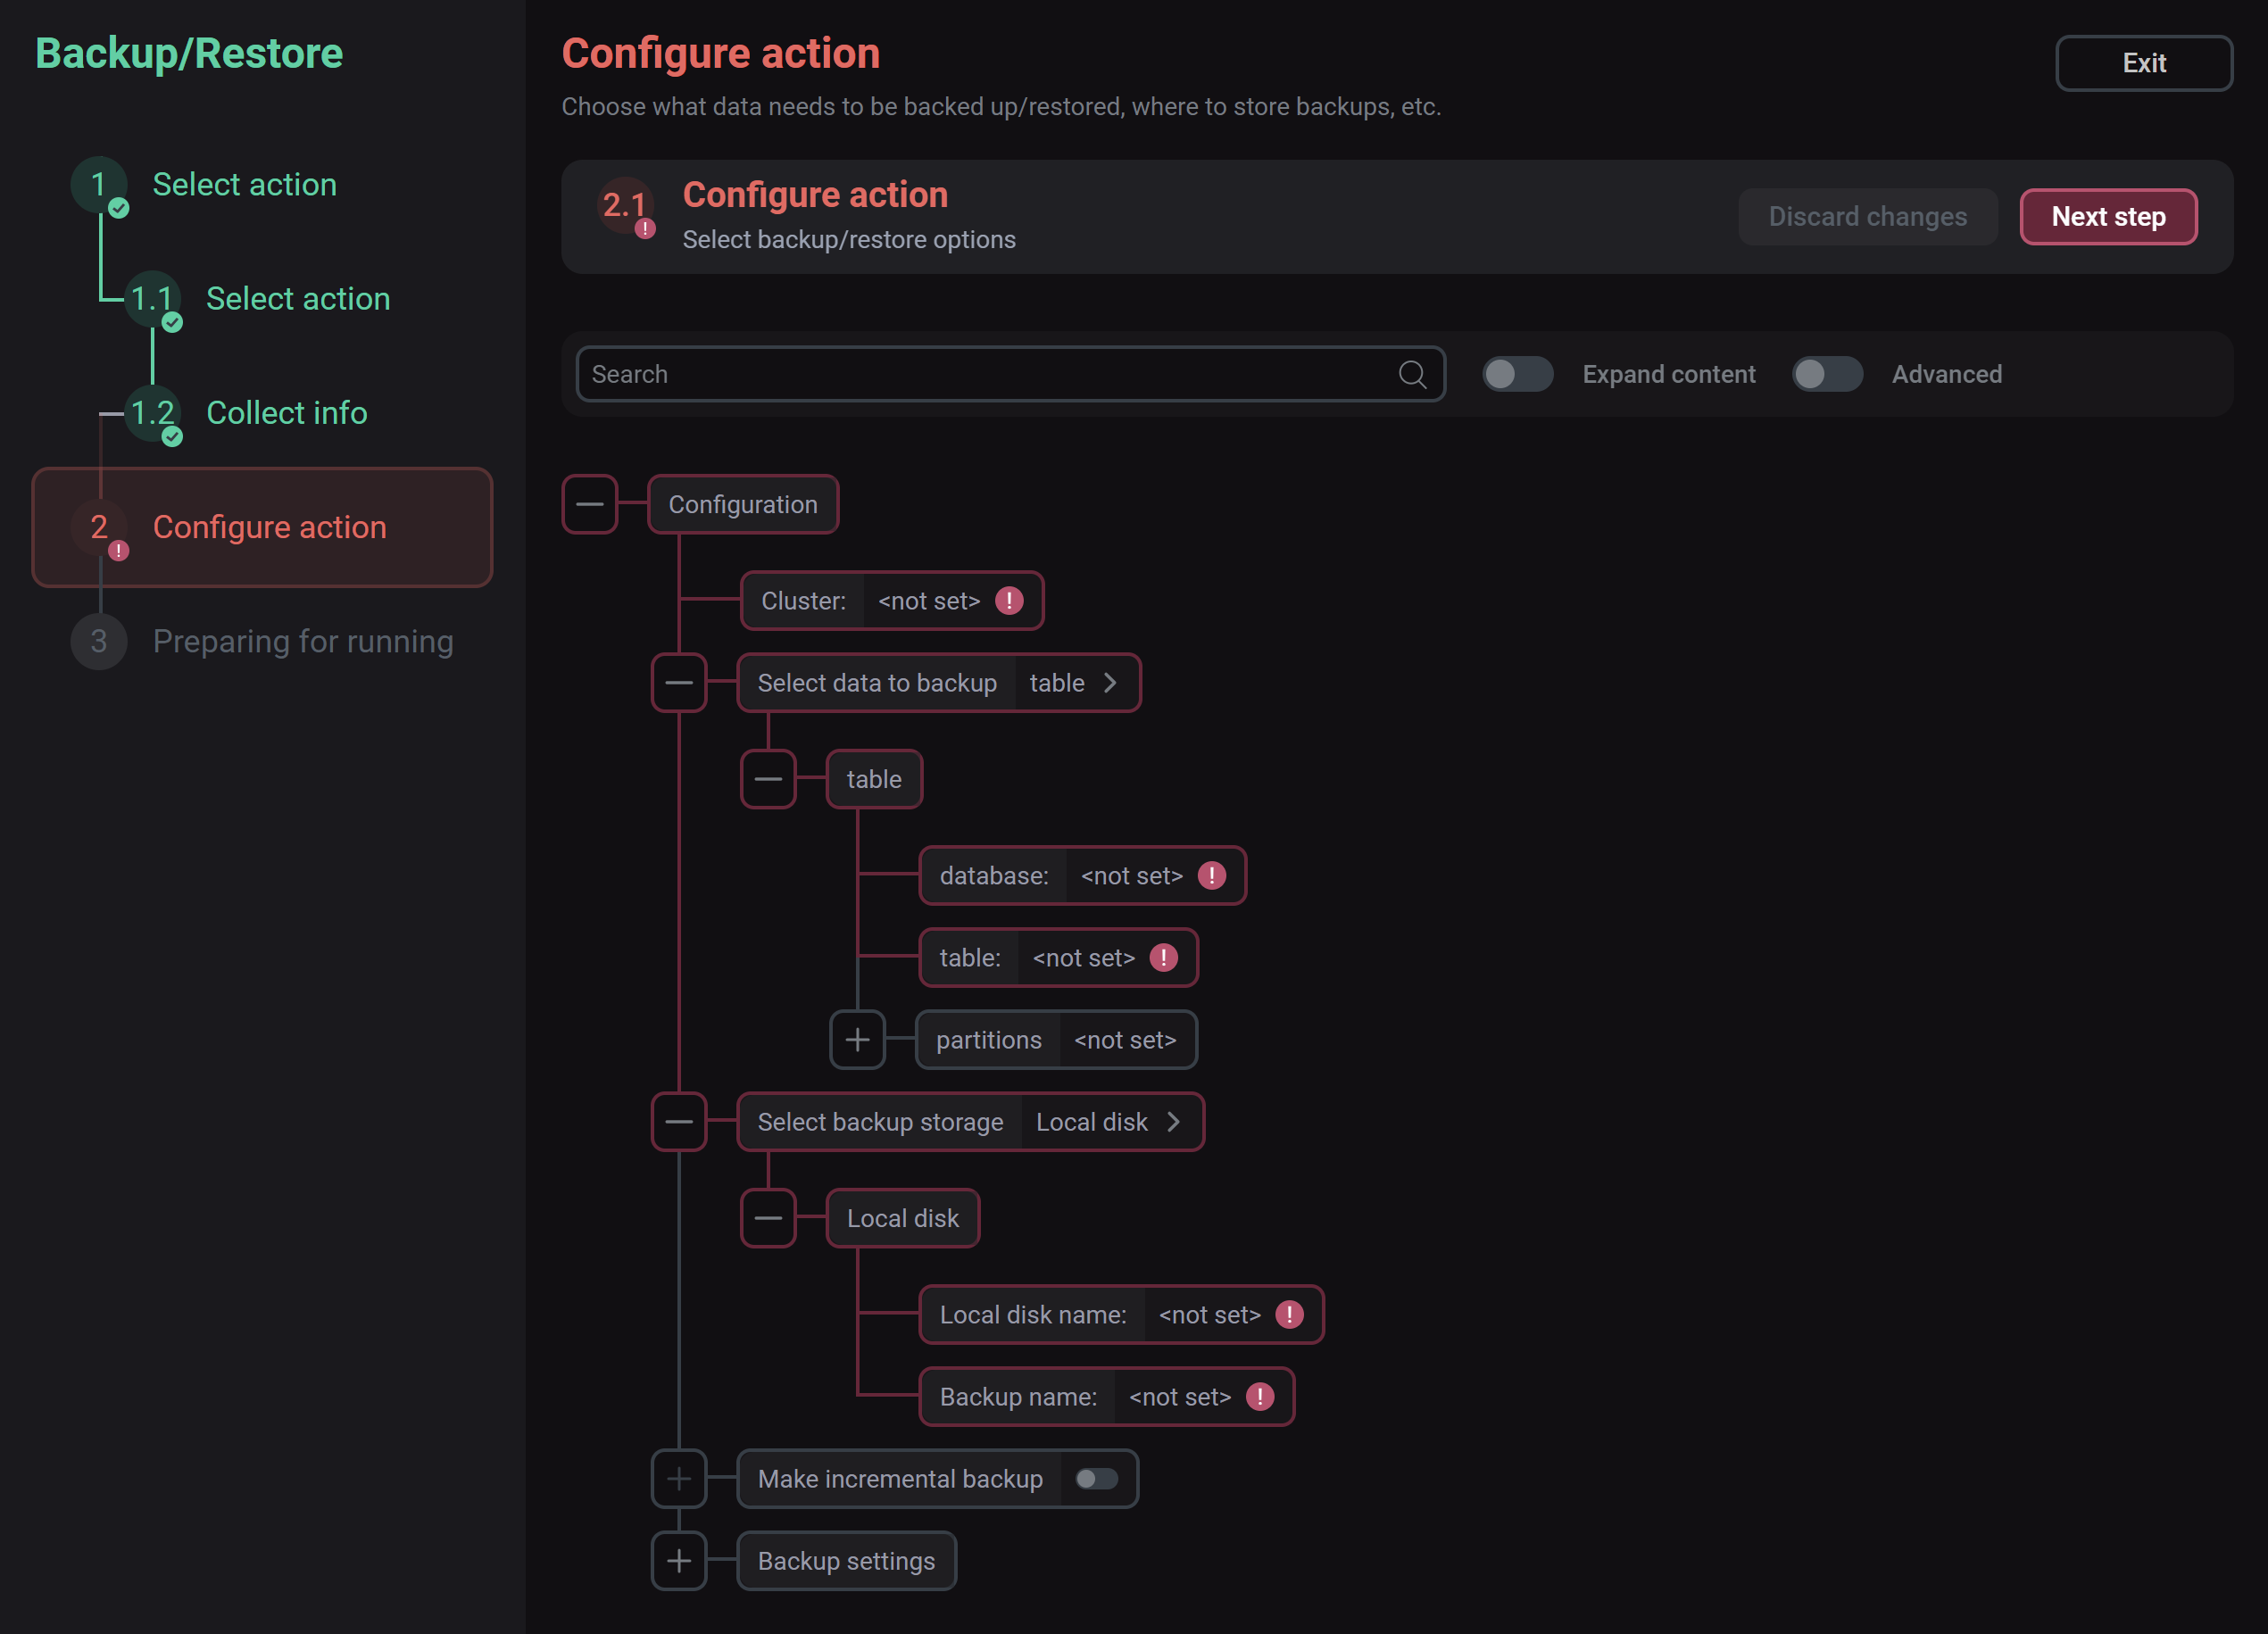 Configure the Backup action
-
Cluster — ADQM logical cluster to determine on which nodes a data object to be backed up exists. At least one logical cluster should be configured in Cluster configuration.
-
Select data to backup — data object to be backed up. Possible values:
table,dictionary,database,all. Depending on the value you select, fields become available that you should fill in to specify a specific data object to be backed up — for example, for a table, specify the database, the table name, and (optionally) one or more partitions. -
Select backup storage — backup location. Possible values:
-
Local disk— configured local disk; -
S3 disk— configured S3 disk; -
Local file— file in the local file system; -
S3 endpoint— S3 endpoint.
Depending on the selected value, the corresponding set of parameters is displayed in the interface.
Local diskParameter Description Local disk name
Local disk name. The disk should be configured (with the allow_for_backup option enabled) in the ADQMDB service settings — see the Configure data storages article for more information on how to manage disks in ADQM
Backup name
Backup name (without single quotes)
S3 diskParameter Description S3 disk name
S3 disk name. The disk should be configured (with the allow_for_backup option enabled) in the ADQMDB service settings — see the Configure data storages article for more information on how to manage disks in ADQM
Backup name
Backup name (without single quotes)
Local fileParameter Description Local file path
Local file path. The path should be added to the Other → Allowed path for backup list on the configuration page of the ADQMDB service.
Backup name
Backup name (without single quotes)
S3 endpointParameter Description endpoint
S3 endpoint
Access key ID
S3 access key id
Secret access key
S3 access secret key
If the specified backup name (Backup name) ends with .zip, .zipx, .tar, .tar.gz, .tgz, .tar.bz2, .tar.lzma, .tar.zst, .tzst, or .tar.xz, a backup will be saved as a single archive file (not as a directory).
-
-
Make incremental backup — create an incremental backup to store only the data that has changed since the previous (base) backup was created. To specify the base backup from which an incremental one will be created, use the Select base backup storage setting. Object data can be restored from an incremental backup, but the base backup should also be kept available.
-
Backup settings — additional backup settings (see the list of parameters in the ClickHouse documentation).
-
-
Confirm the action.
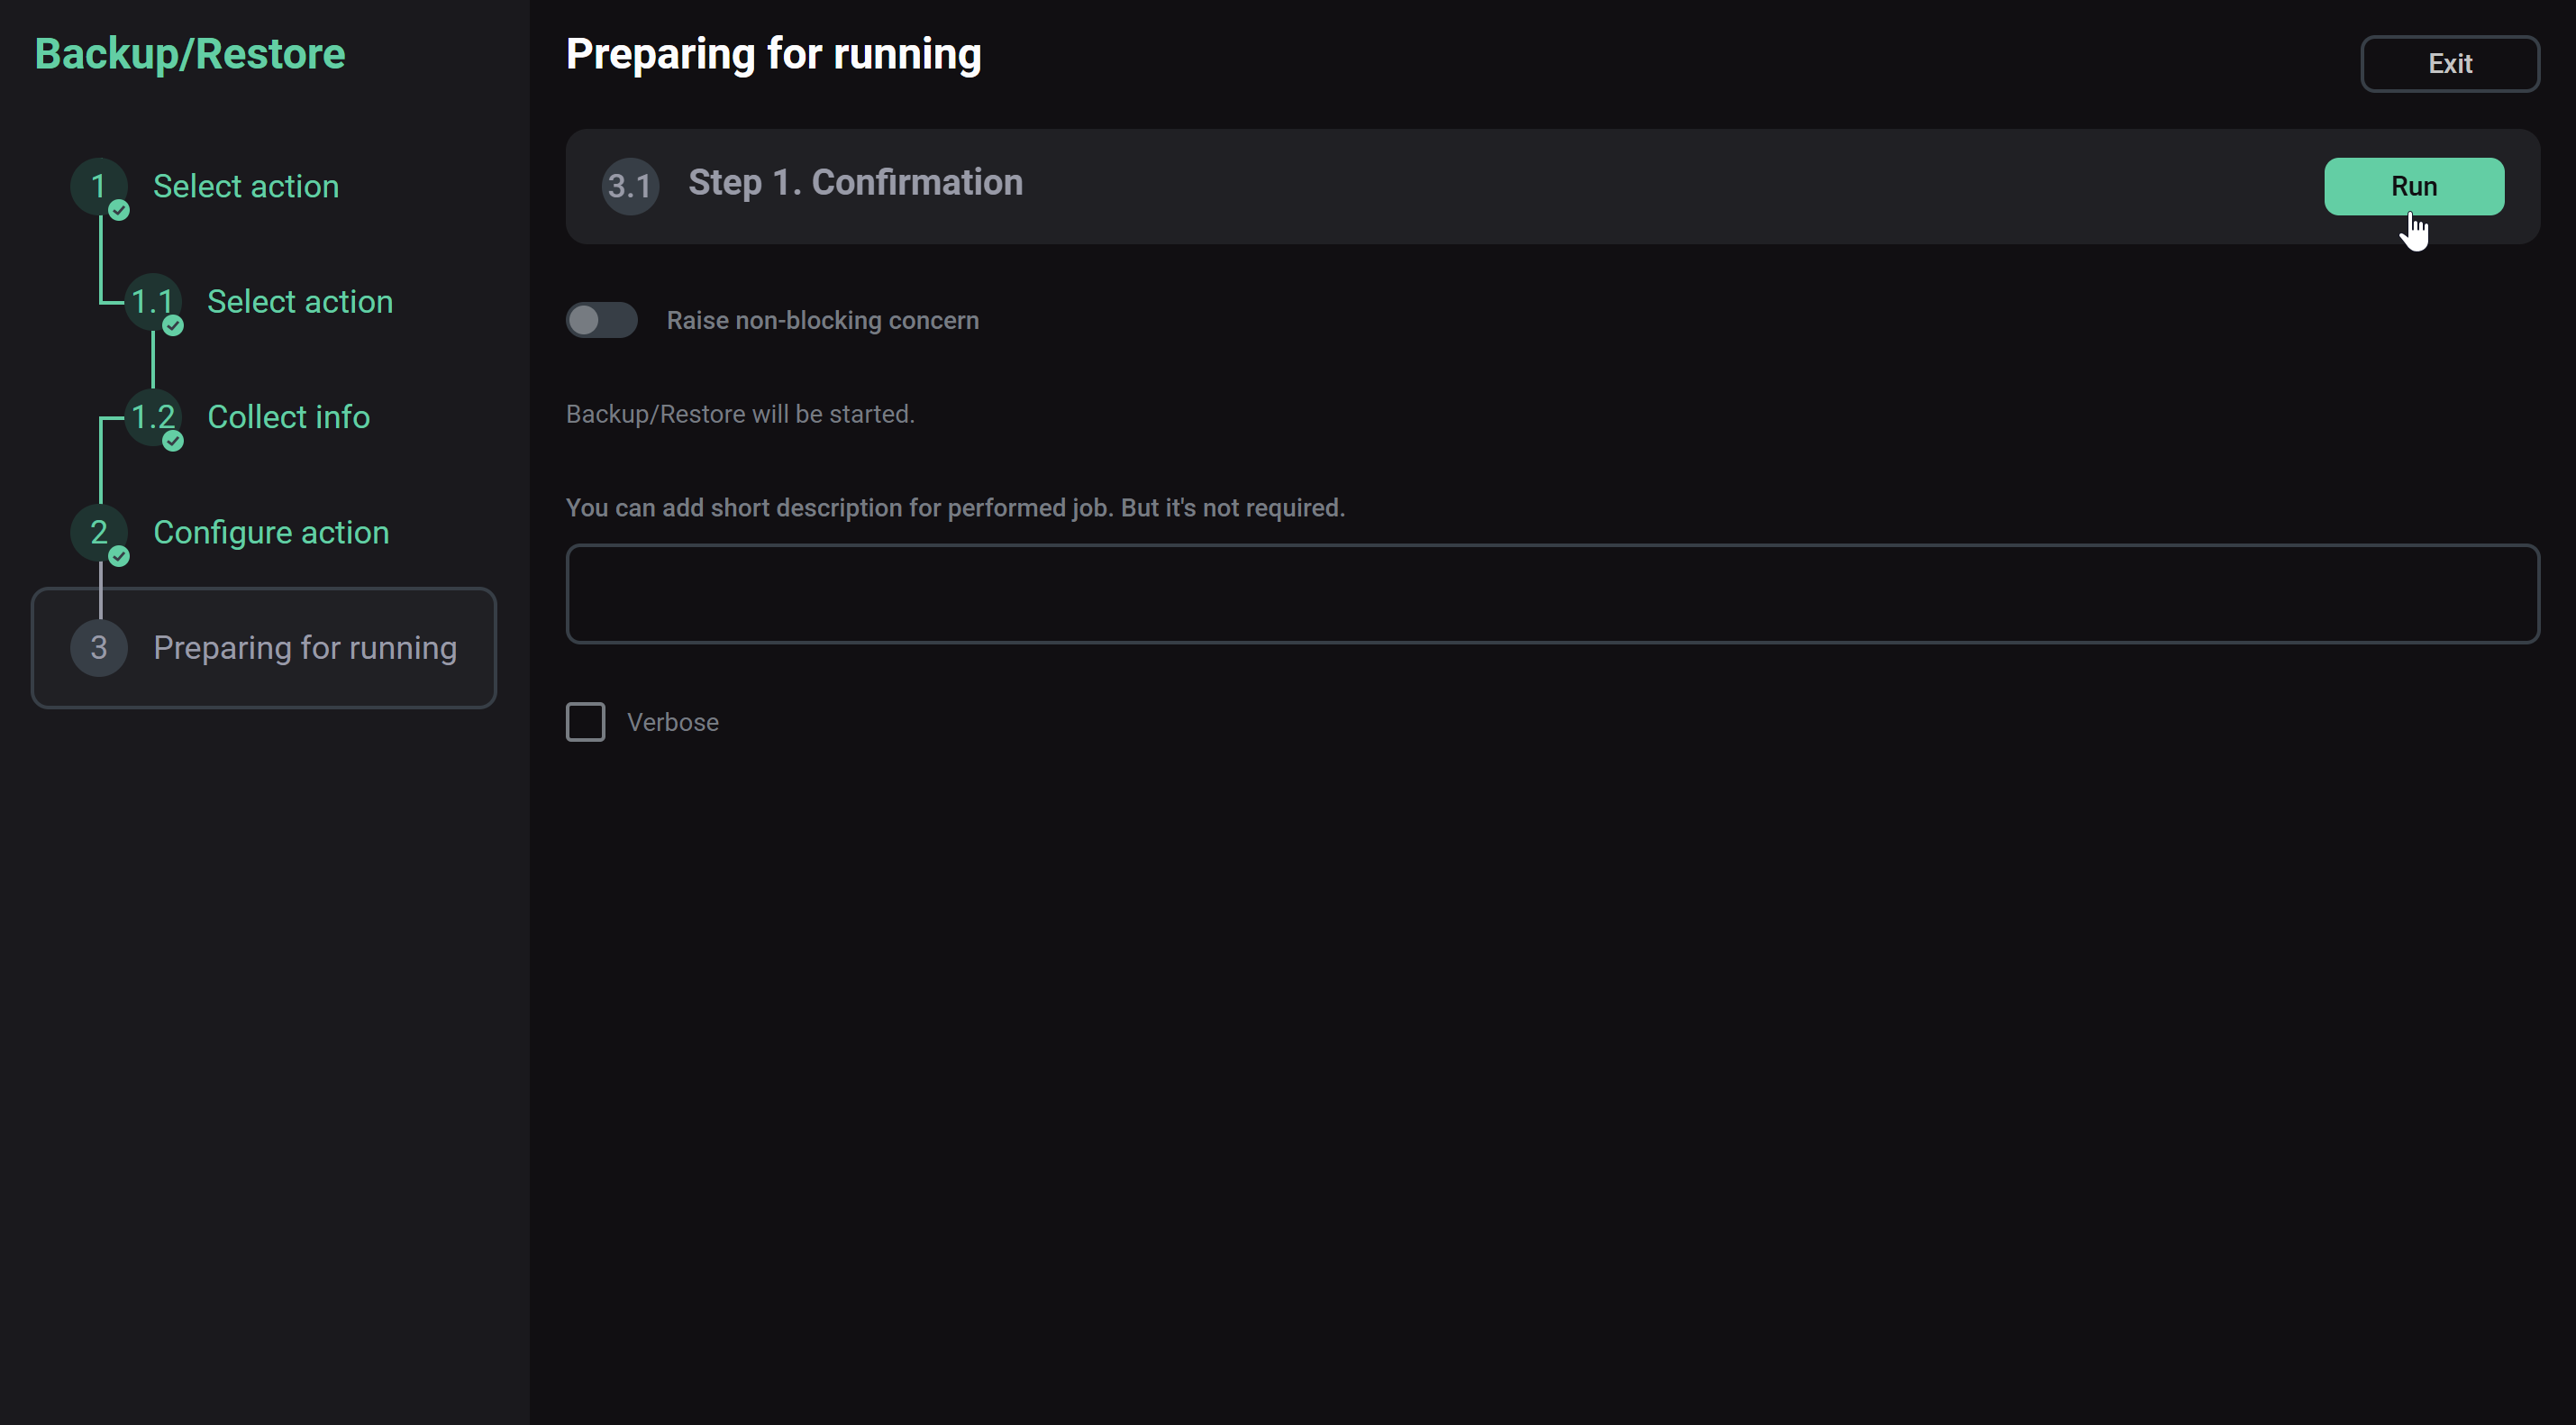 The action confirmation step
Data backup is performed asynchronously. Job execution details are displayed on the Jobs page. On this page, you can also analyze errors if they occur.
Restore data
To restore ADQM data from a backup, run the ADQMDB service’s Backup/Restore action and configure it as follows:
-
Select the Restore action and specify a backup from which you want to restore data using the Restore source setting. In the restore source configuration, the same storage types are available (
Local disk,S3 disk,Local file,S3 endpoint) with the same parameters for each of them as for backup storage (see the description of the parameters above).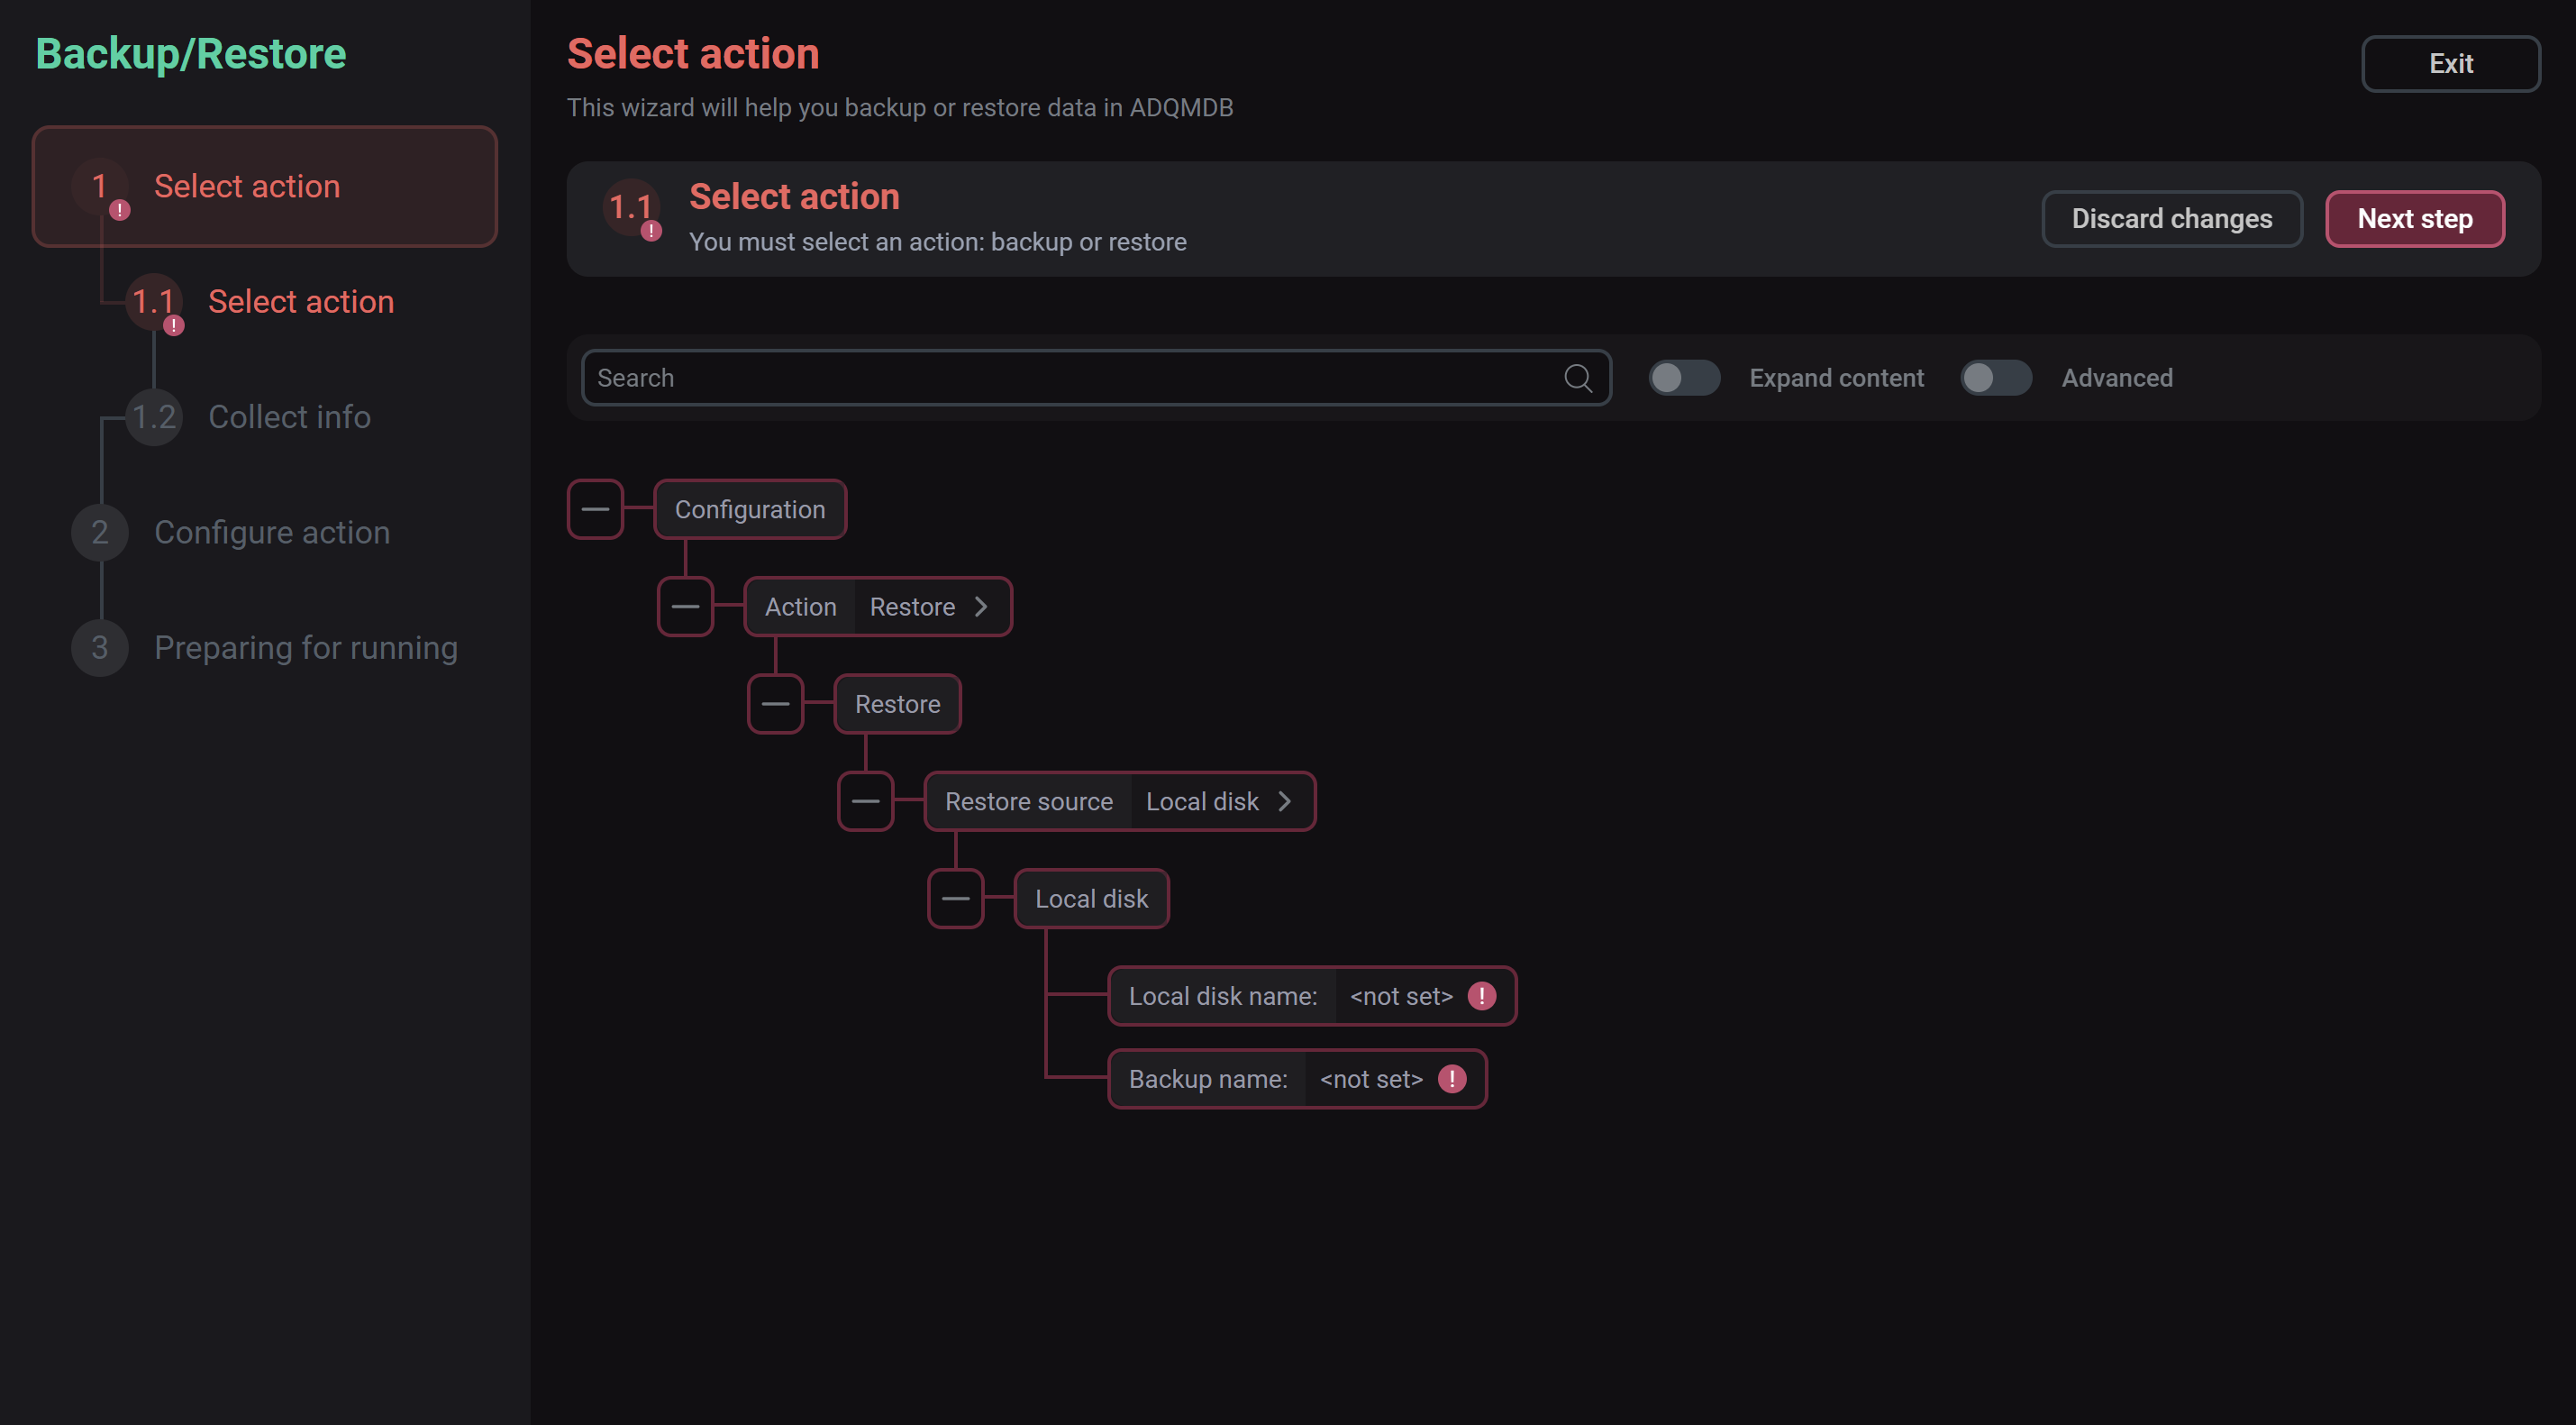 Select the action to restore data
Note that:
-
To restore from a local or S3 disk, it should have the allow_for_backup setting enabled — only such disks are shown in the list of sources.
-
When inspecting an S3 backup during recovery, the TLS certificate is not checked.
-
-
On the next configuration page, click Collect info and wait for the information about the selected backup to be collected.
Collect backup information -
Specify the parameters for restoring data from a backup.
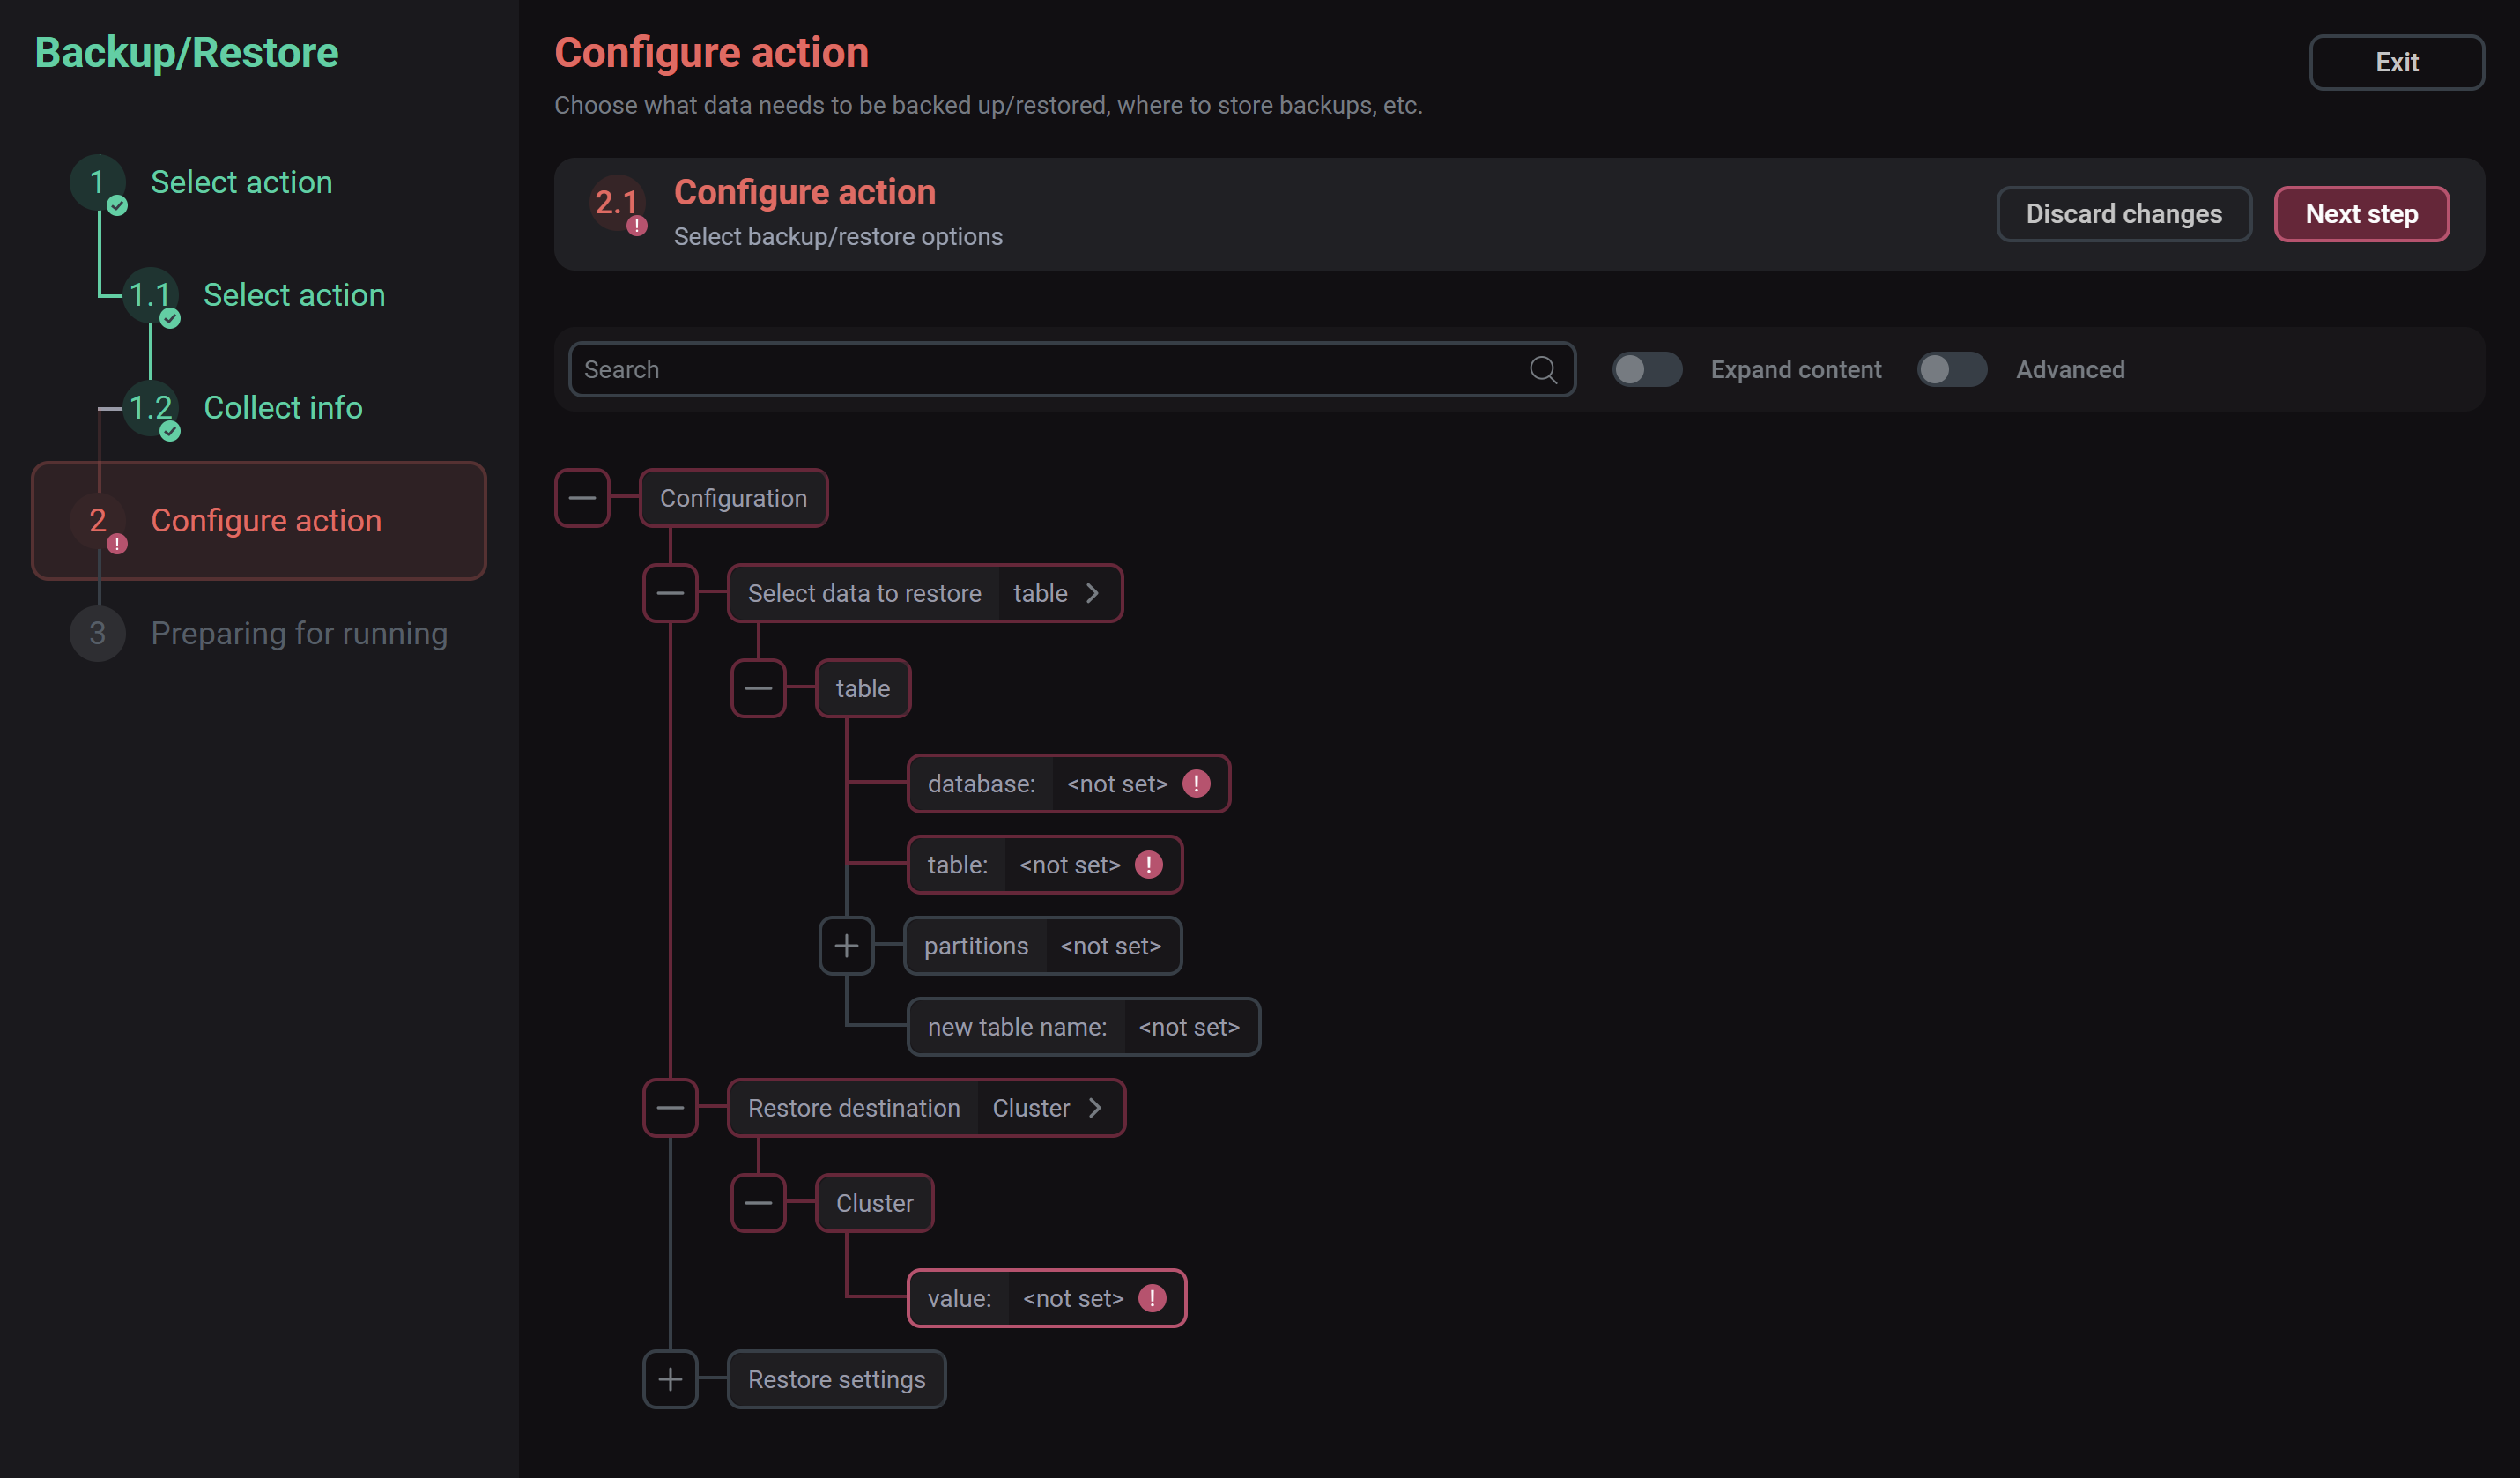 Configure the Restore action
-
Select data to restore — data to be restored. Possible values:
table,dictionary,database,all. For each object type (database/table/dictionary), the corresponding parameters are shown, through which you should specify a data object to be restored, as well as the additional new <object> name field, where you can optionally specify a new name to be assigned to the restored object. When restoring a table, you can specify a list of partition IDs using the optional partitions parameter to restore only those partitions. If you leave this parameter empty, all table partitions will be restored.When restoring from an archive backup, Collect info cannot read its contents — in this case, a database/table/dictionary name should be entered manually.
-
Restore destination — restored data location.
Possible values when restoring from a cluster backup:
-
Cluster— restoring data withON CLUSTER '<cluster_name>'to all nodes of the selected ADQM logical cluster. It can be a logical cluster other than the one from which the backup was saved. -
Single host— restoring data to only one selected node (withoutON CLUSTER).
When restoring from a single-node backup, only one of the cluster hosts can be selected as the parameter value.
-
-
Restore settings — additional restore settings (see the list of parameters in the ClickHouse documentation).
-
-
Confirm to start the action.
The action confirmation stepData recovery is performed asynchronously. View information about the job on the Jobs page, if necessary.
You can also view the results of a backup or restore operation in the
system.backup_logsystem table:SELECT name, total_size, hostname, status, error, event_time FROM clusterAllReplicas(<cluster_name>, system.backup_log) WHERE (id = '<operation_id>') AND (status NOT IN ('CREATING_BACKUP', 'RESTORING')) ORDER BY event_time_microseconds DESC SETTINGS skip_unavailable_shards = 1;where:
-
<cluster_name>— ADQM logical cluster name; -
<operation_id>— identifier of the backup or restore operation, which you can view on the Ansible [check] tab of the Jobs page in the output of the task ADQMDB.Clickhouse Server: Show backup/restore result.Backup/Restore operation ID on the Jobs page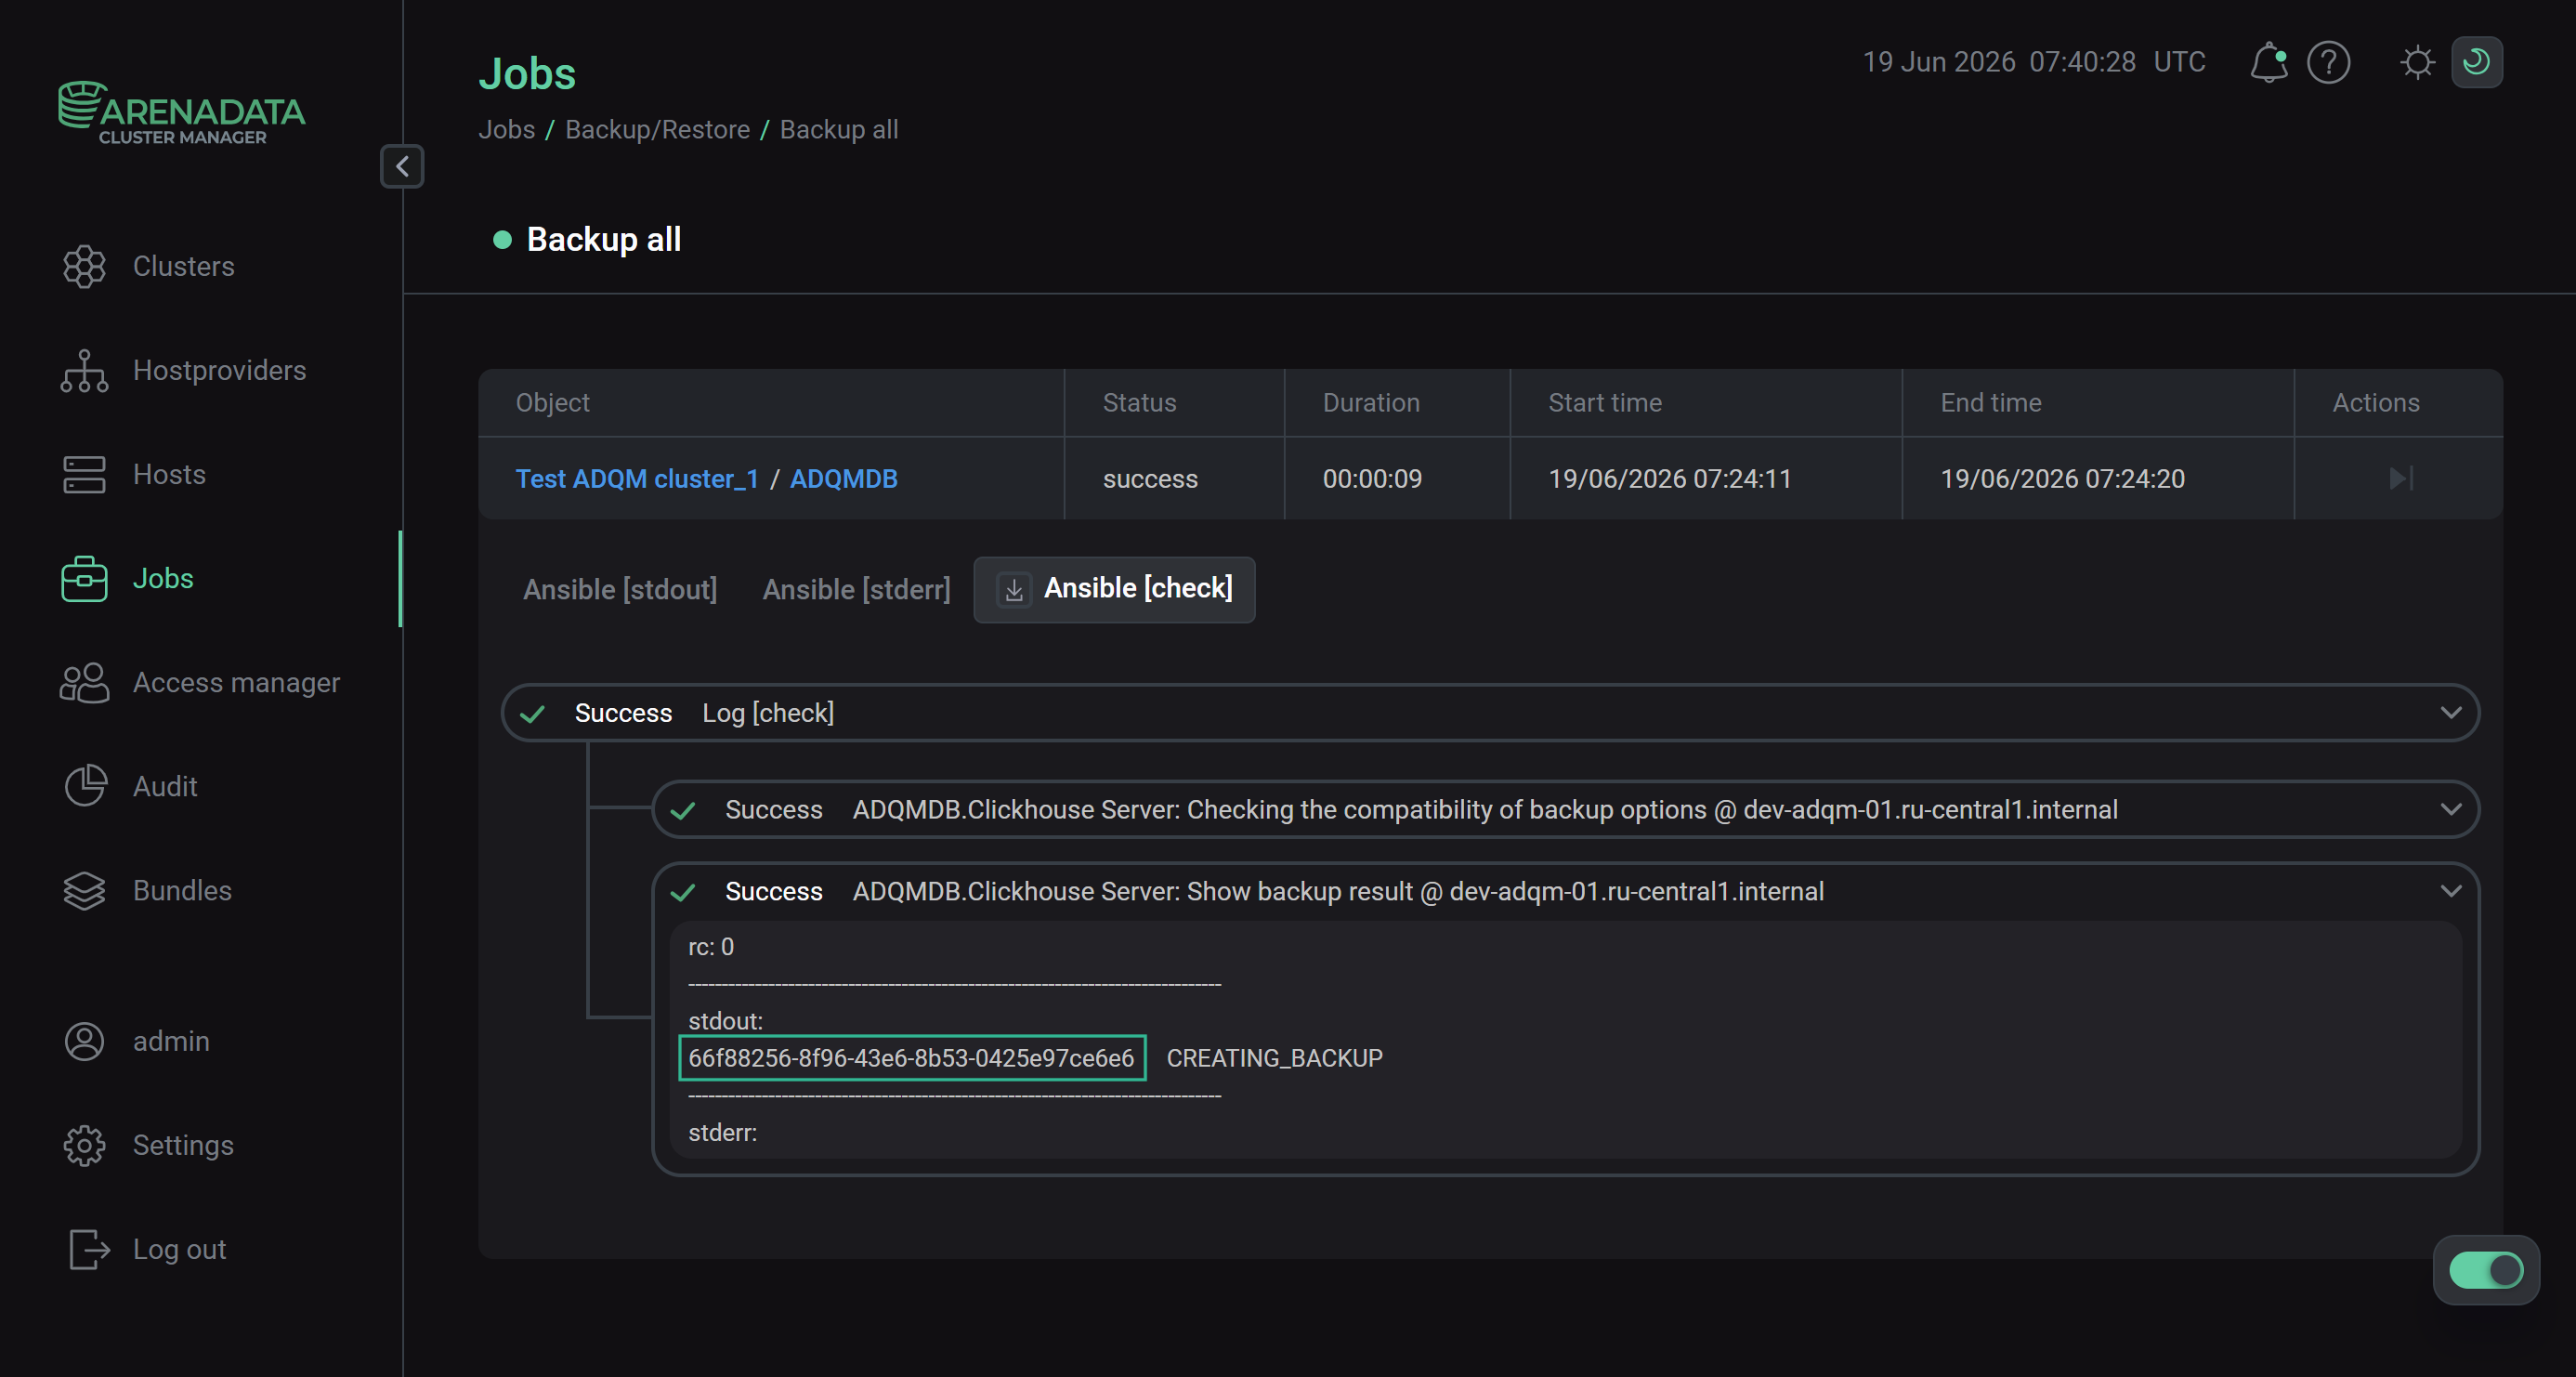 Example of a backup operation identifier
-