

Wizard
In the ADCM web interface, Wizard was implemented for the convenience of working with an action. Wizard is the preparation phase of an action before its launch and represents a sequence of steps that should be completed gradually.
|
IMPORTANT
Wizard is available only if it is supported in the product and in the description of the corresponding action. For the detailed information about implementation of the Wizard support, see the actions article.
|
Wizard has the following functional capabilities:
-
Filling in configuration parameter values followed by running the action.
-
Mapping between hosts and components in an object.
-
Running specialized checks to detect conflicts in the current object configuration before it is applied.
Wizard provides the following advantages:
-
Configuring a cluster step by step.
-
Saving the states of steps already filled in by the user.
-
Validating values of the action configuration parameters entered by the user.
Working with Wizard is shown below using the example of running the Install Wizard action for the ADH cluster, whose prototype contains the wizard_template parameter:
---
  actions:
    install_wizard:
      display_name: "Install Wizard"
      type: task
      allow_to_terminate: true
      wizard_template:
        file:
          path: wizard_jinja/manage_install.j2
        engine:
          type: jinja2
      scripts_template:
        file:
          path: wizard_jinja/install_wizard.j2
        engine:
          type: jinja2
      states:
        available:
          - created
- faulty_installed- name: manage_ssl_stage
display_name: "Manage SSL"
description: "Setting up centralized management of SSL/TLS certificates and encryption settings"
steps:
- name: configure_ssl
display_name: "Configure SSL"
description: "Setting up an SSL connection"
config_template:
file:
path: configs_jinja/manage_ssl.j2
engine:
type: jinja2
- name: manage_kerberos
display_name: "Manage Kerberos"
steps:
- name: configure_kerberos
display_name: "Configure Kerberos"
description: "Setting up Kerberos authentication and configuration"
config_template:
file:
path: adcm_job_platform_security/configs/configs_jinja/manage_kerberos.j2
engine:
type: jinja2
- name: general_options
display_name: "General options"
description: "Setting up basic configuration options"
steps:
- name: general_options
display_name: "General options"
description: "Basic parameters for launching an action"
config_template:
file:
path: wizard_jinja/general_options.j2
engine:
type: jinja2- name: ssl_config
display_name: "Enable SSL"
type: group
activatable: true
active: True
subs:
- name: keystore_path
display_name: "Keystore path"
description: "Keystore path"
type: string
default: "{{ cluster.config.ssl_default_config.keystore_path }}"
- name: keystore_password
display_name: "Keystore password"
description: "Keystore password"
type: password
required: True
- name: truststore_path
display_name: "Truststore path"
description: "Truststore path"
type: string
default: "{{ cluster.config.ssl_default_config.truststore_path }}"- name: mit_kerberos_client
display_name: "Existing MIT KDC"
type: group
activatable: true
- name: enable_kerberos_authentication_web
display_name: "Authentication on WEB UIs"
description: "Kerberos-authentication to Web UIs can be enabled"
type: boolean
default: {{ cluster.config.kerberos_client.enable_kerberos_authentication_web }}
- name: kdc_hosts
display_name: "KDC hosts"
type: list
required: False
default: {{ cluster.config.kerberos_client.kdc_hosts or [] }}
- name: realm
display_name: "Realm"
type: string
required: False
default: {{ cluster.config.kerberos_client.realm or '' }}
- name: domains
display_name: "Domains"
type: list
required: False
default: {{ cluster.config.kerberos_client.domains or [] }}
- name: admin_server
display_name: "Kadmin server"
type: string
required: False
default: {{ cluster.config.kerberos_client.admin_server or '' }}
- name: kadmin_principal
display_name: "Kadmin principal"
type: string
required: False
default: {{ cluster.config.kerberos_client.kadmin_principal or '' }}
- name: kadmin_password
display_name: "Kadmin password"
type: password
required: True
- name: keytab_dir
display_name: "Keytabs directory"
type: string
default: {{ cluster.config.kerberos_client.keytab_dir or '' }}
- name: add_realms
display_name: "Additional realms"
type: structure
yspec: adcm_job_platform_security/realms_conf.yaml
required: False
default: {{ cluster.config.kerberos_client.add_realms or null }}
- name: kinit_delay
display_name: "Delay between kinit invocation attempts"
type: integer
default: {{ cluster.config.kerberos_client.kinit_delay }}
ui_options:
advanced: True
- name: kinit_retries
display_name: "Number of retries for kinit invocation attempts"
type: integer
default: {{ cluster.config.kerberos_client.kinit_retries }}
ui_options:
advanced: True
- name: ad_trust_server
display_name: "Trusted Active Directory server"
description: "Active Directory server for one-way cross-realm trust from the MIT Kerberos KDC"
type: string
default: {{ cluster.config.kerberos_client.ad_trust_server or '' }}
required: False
- name: ad_trust_realm
display_name: "Trusted Active Directory realm"
description: "Active Directory realm for one-way cross-realm trust from the MIT Kerberos KDC"
type: string
default: {{ cluster.config.kerberos_client.ad_trust_realm or '' }}
required: False- name: run_checks
display_name: "Run service checks"
description: "Run service checks after cluster install"
type: boolean
default: True-
On the Clusters page in the Actions column, click the

 icon and select the Install Wizard action from the drop-down list. As a result, the page of the first Manage SSL stage will be displayed.
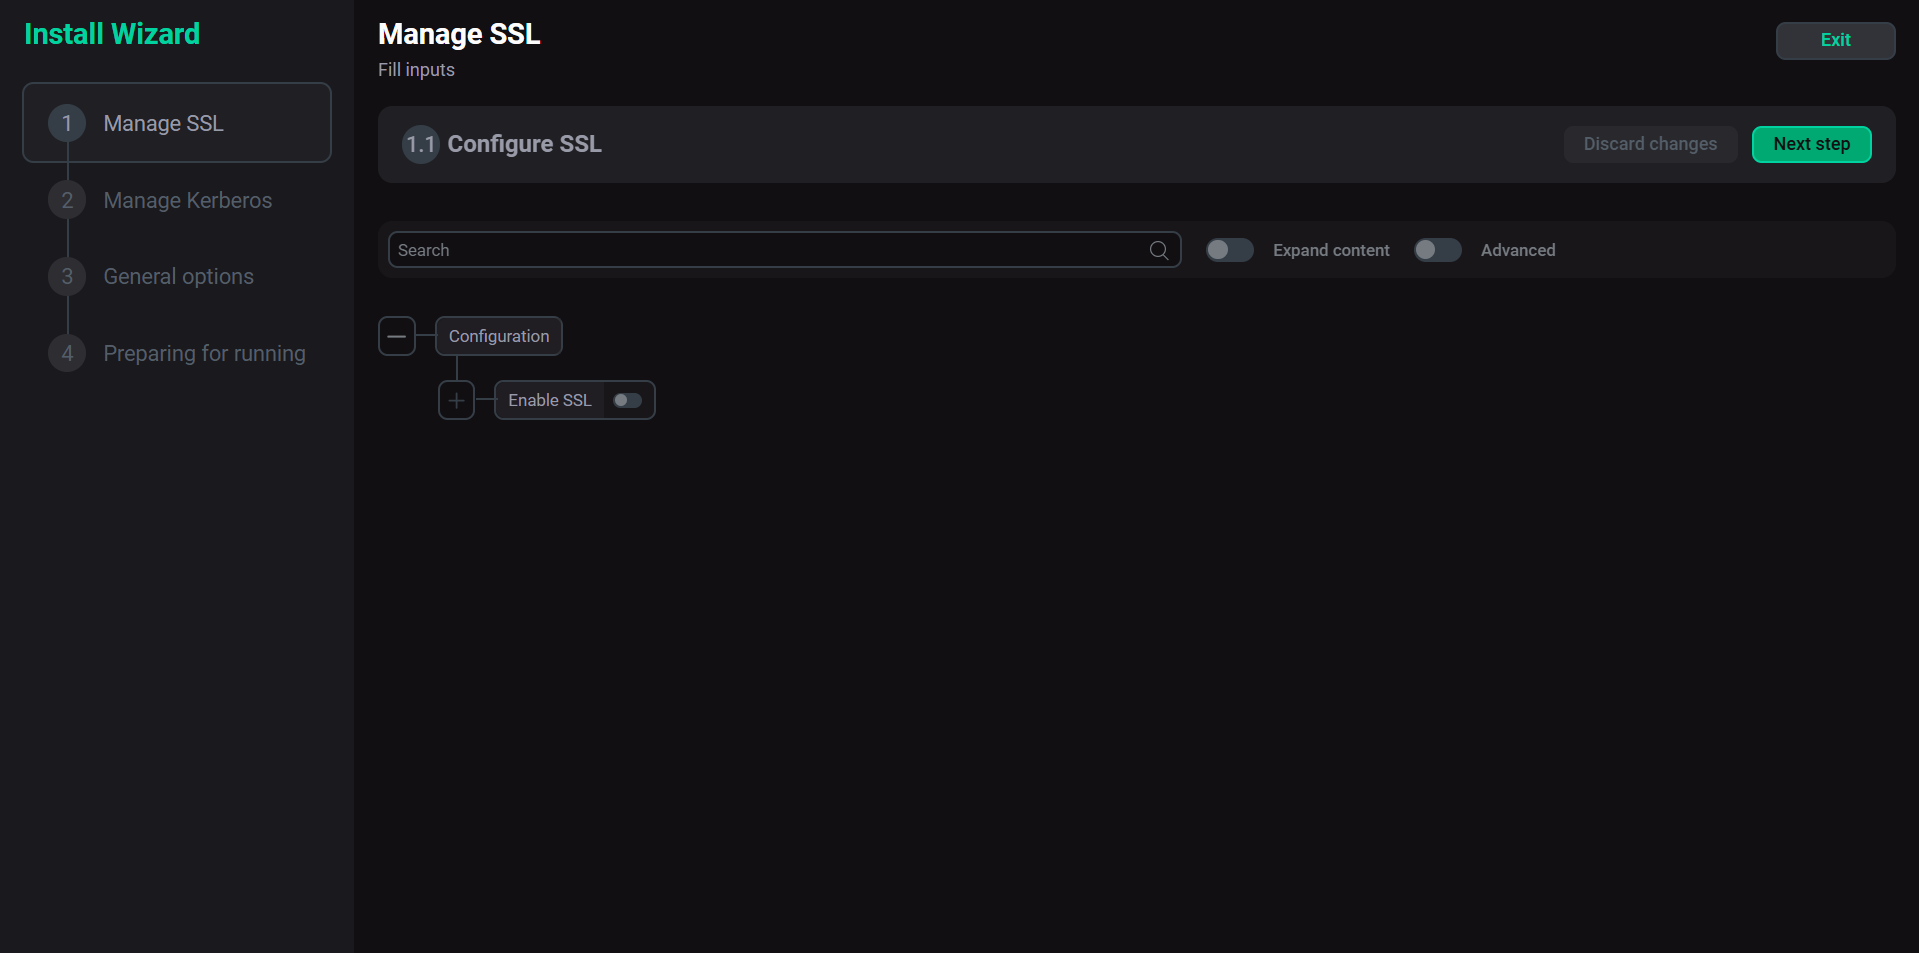 The Manage SSL stage
On the left side of the page, there is the navigation panel for the Wizard stages and steps to quickly switch between them.
The main work area contains the following control elements:
-
buttons:
-
Exit — used to exit Wizard. Note that all parameter values entered on previous stages are saved. When the action is started again, the Continue process dialog box will appear offering the user to continue the previously started stage or launch the process from the very beginning.
-
Next step — allows proceeding to the next stage of the process while preserving the entered data.
-
Discard changes — allows resetting the values of configuration parameters for the current step, which also resets the state of all subsequent steps.
-
-
the Search field — designed for searching configuration parameters.
-
toggle switches:
-
Expand content — allows expanding and collapsing the configuration parameter tree.
-
Advanced — makes visible some of the fine-tuning configuration parameters.
 The Continue process dialog box
-
-
-
Specify the parameter values to manage the SSL encryption for the services of the ADH cluster. For information about the configuration parameters of the Manage SSL stage, refer to the Manage SSL article.
-
Click Next step. The page of the second Manage Kerberos stage will appear.
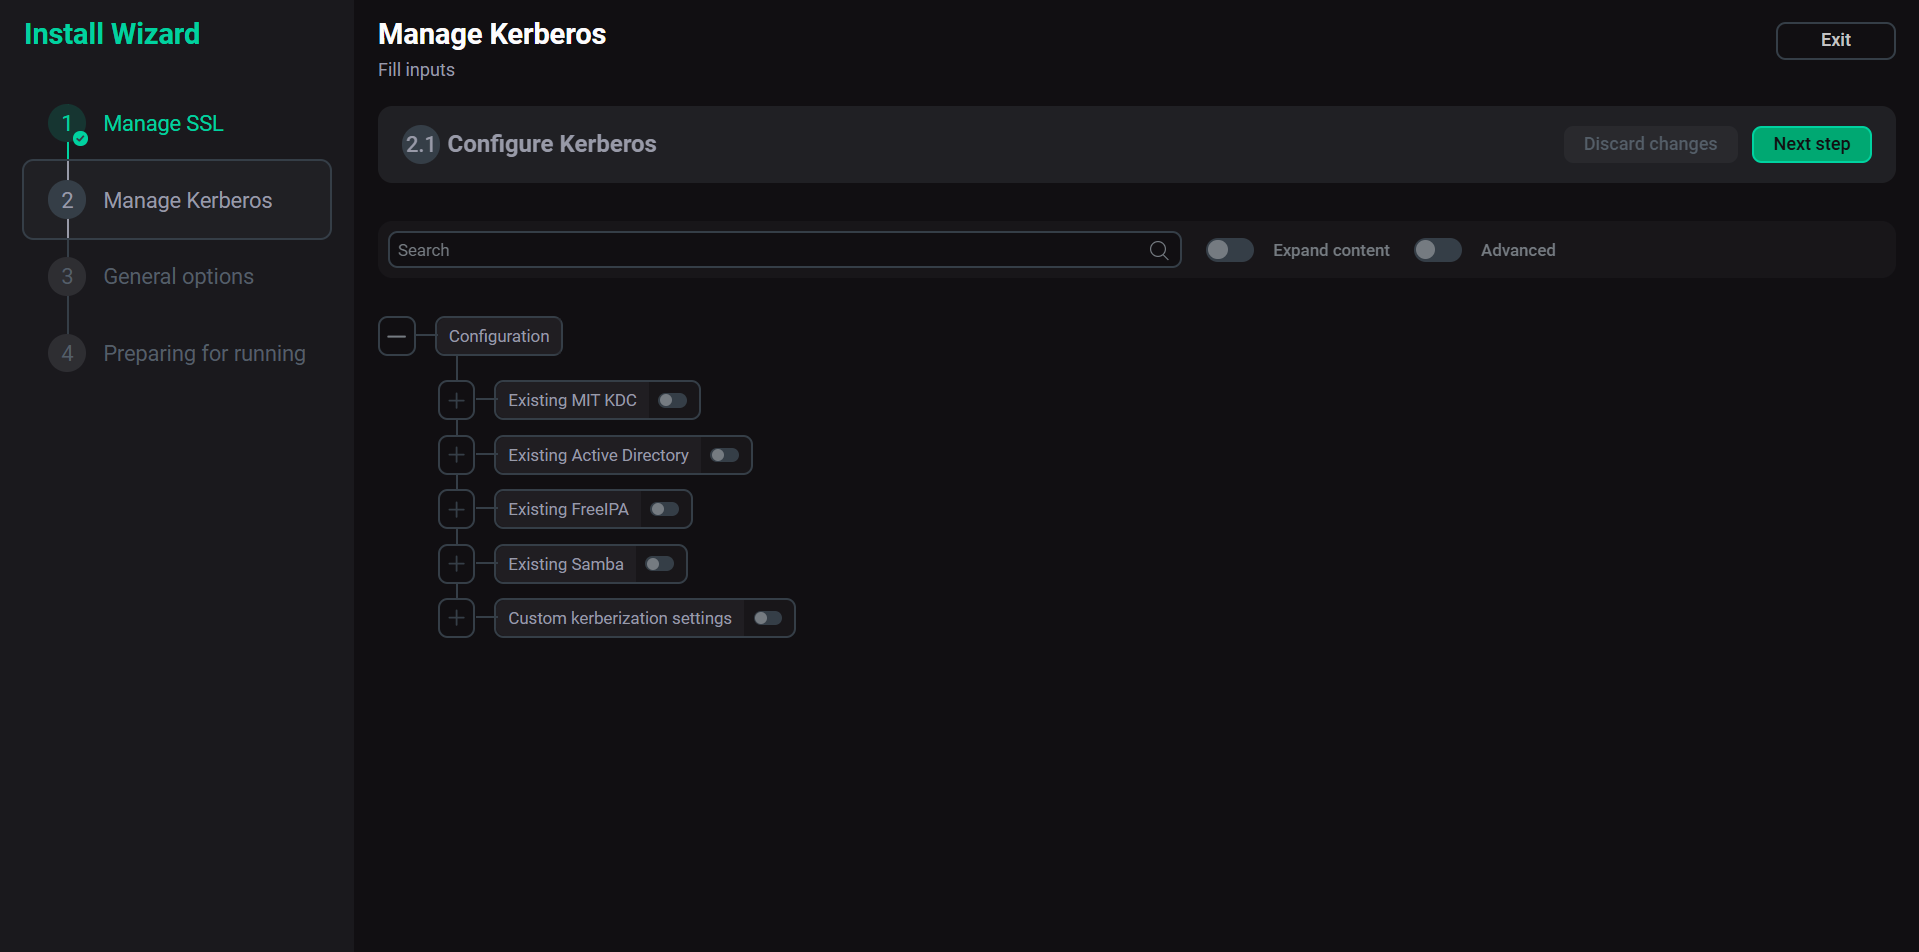 The Manage Kerberos stage
 -
Specify the parameter values to manage Kerberos for the services of the ADH cluster. For information about the configuration parameters of the Manage Kerberos stage, refer to the Manage Kerberos article.
-
Click Next step. The page of the third General options stage will appear.
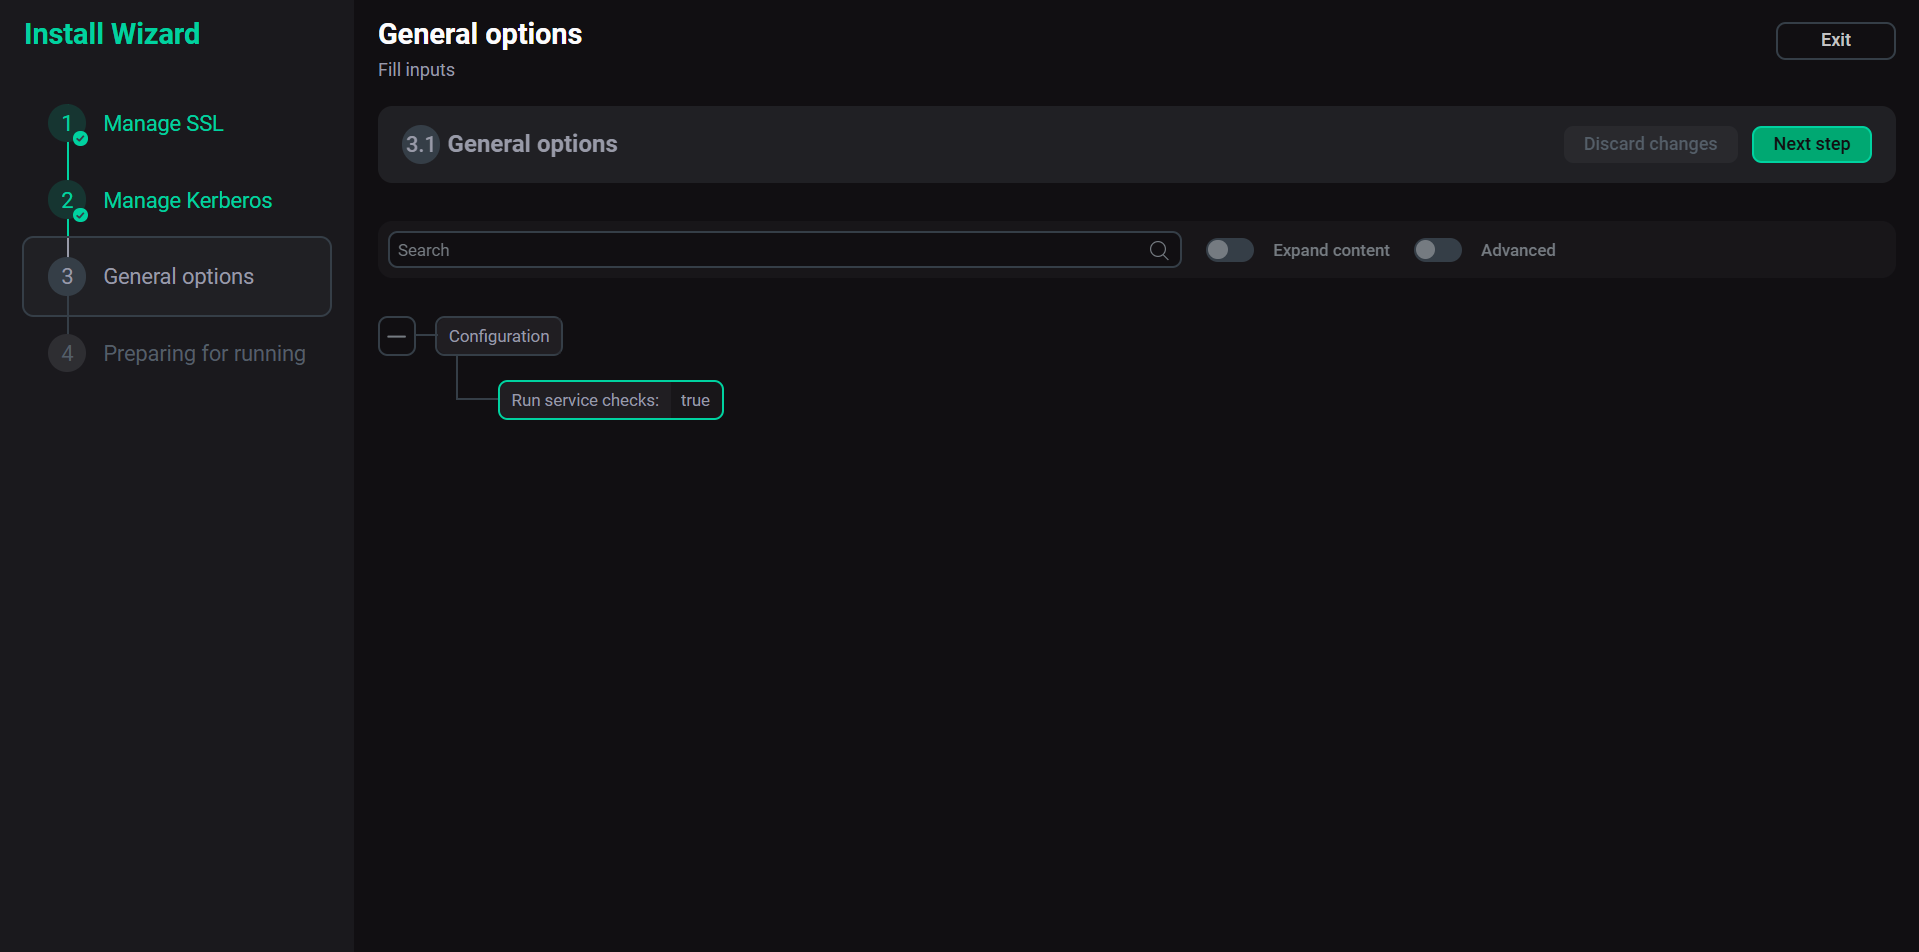 The General options stage
 -
If necessary, set the
falsevalue for the Run service checks parameter to disable automatic service availability checks after cluster is installed. -
Click Next step. The page of the last Preparing for running stage will appear.
 The Preparing for running stage
 -
If necessary, do the following:
-
Activate the Raise non-blocking concern switch to run the action without blocking the cluster.
-
Add your comment with a brief description of the changes.
-
Select the Verbose checkbox to view additional information about the action execution on the Jobs page.
-
-
Click Run. The information about the action execution progress and the final result will be available on the Jobs page.