

Integration between ADQM and Kafka
ClickHouse supports integration with Apache Kafka through a special table engine — Kafka. It allows you to:
-
subscribe to Kafka topics to load streaming data from Kafka to ClickHouse (it is the most common use case) or publish data from ClickHouse to Kafka;
-
create fault-tolerant storage;
-
process streams as they become available.
This article explains how to use the Kafka table engine on the example of ADQM and ADS (Arenadata Streaming) that provides the Kafka service.
Overview
The Kafka table engine allows ClickHouse to read data from a Kafka topic directly and track message streaming, but each message can be retrieved only once from a Kafka-engine table. When data is queried from a Kafka table, it is considered already consumed from the queue. In this case, an offset for a consumer is increased, and data cannot be re-read without resetting these offsets. Thus, it is not recommended to select data from a Kafka table directly (via the SELECT query) — use a materialized view instead. This approach requires you to create the following tables on the ClickHouse side:
-
Table based on the Kafka engine to be a Kafka consumer that reads data flow.
-
Target table with the desired structure to be a persistent storage of data received from Kafka. Typically, a target table is implemented based on an engine from the MergeTree family.
-
Materialized view to collect data from the Kafka table in the background (it will receive new records in blocks when a trigger fires on inserting data into the Kafka table), convert it into the required format, and transfer it to the previously created target table.
Sometimes it is necessary to apply various transformations to data coming from Kafka — for example, to store raw and aggregated data. In this case, you can bind multiple materialized views to one Kafka table to store data with different levels of detail across multiple tables.
To write data from ClickHouse to Kafka, insert it directly into a Kafka-engine table.
Kafka table engine
Create a Kafka table
The basic syntax of a query that creates a Kafka table in ADQM is:
CREATE TABLE <table_name> (<column_name> <column_type> [ALIAS <expr>], ...)
ENGINE = Kafka()
SETTINGS
    kafka_broker_list = '<host_name>:9092,...',
    kafka_topic_list = '<topic_name>,...',
    kafka_group_name = '<consumer_group_name>',
    kafka_format = '<data_format>'[,]
    [kafka_schema = '',]
    [kafka_num_consumers = <N>,]
    [kafka_max_block_size = 0,]
    [kafka_skip_broken_messages = <N>,]
    [kafka_commit_every_batch = 0,]
    [kafka_client_id = '',]
    [kafka_poll_timeout_ms = 0,]
    [kafka_poll_max_batch_size = 0,]
    [kafka_flush_interval_ms = 0,]
    [kafka_thread_per_consumer = 0,]
    [kafka_handle_error_mode = 'default',]
    [kafka_commit_on_select = false,]
    [kafka_max_rows_per_message = 1];
The Kafka table engine has the following required parameters. You can specify these parameters in parentheses when creating a table (see an example).
kafka_broker_list |
List of Kafka brokers separated by commas |
kafka_topic_list |
List of Kafka topics separated by commas |
kafka_group_name |
Group of Kafka consumers. Offsets to read messages are tracked for each group separately. If you want to avoid duplicate messages in your cluster, use the same consumer group name for all Kafka tables |
kafka_format |
Kafka message format. For this parameter, use the same format names as for the |
kafka_schema |
Use this parameter if the format requires a schema definition. For example, CapnProto requires the path to the schema file and the name of the root |
kafka_num_consumers |
Number of consumers per table. Default value is |
kafka_max_block_size |
Maximum batch size (in messages) for a poll. Default value is equal to a value of the max_insert_block_size parameter |
kafka_skip_broken_messages |
Maximum number of allowed schema-incompatible messages per block. If |
kafka_commit_every_batch |
Specifies whether to commit each consumed and handled batch instead of the whole block. Default value is |
kafka_client_id |
Client identifier. The parameter is empty by default |
kafka_poll_timeout_ms |
Timeout for a single poll from Kafka. Default value is equal to a value of the stream_poll_timeout_ms parameter |
kafka_poll_max_batch_size |
Maximum number of messages to be polled in a single Kafka poll. Default value is equal to a value of the max_block_size parameter |
kafka_flush_interval_ms |
Timeout for flushing data from Kafka. Default value is equal to a value of the stream_flush_interval_ms parameter |
kafka_thread_per_consumer |
Specifies whether to provide an independent thread for each consumer. When this option is enabled, each consumer flushes data independently, in parallel (otherwise — rows from several consumers are squashed to form one block). Default value is |
kafka_handle_error_mode |
Specifies how to handle errors for the Kafka table engine. Possible values:
|
kafka_commit_on_select |
Specifies whether to commit messages when executing the |
kafka_max_rows_per_message |
Maximum number of rows in one Kafka message for row-based formats. Default value is |
|
TIP
For production environments, it is recommended to pass parameters using named collections.
|
Extended configuration
In the ClickHouse configuration file (config.xml), you can specify additional settings that the Kafka table engine supports:
-
global settings in the
<kafka>section; -
topic-level settings in the
<kafka_topic>section inside the<kafka>tag (specify a topic name via the<name>parameter).
For example, the following parameter allows you to enable debug logging for the Kafka library (librdkafka):
<kafka>
   <debug>all</debug>
</kafka>
See a list of possible configuration parameters in the Configuration properties article of the librdkafka library documentation. For ADQM, replace a dot in a parameter name with an underscore — for example, use <auto_offset_reset>latest</auto_offset_reset> instead of auto.offset.reset = latest.
Settings of the Kafka engine for ADQM are also available in the ADCM interface. On the configuration page of the ADQMDB service, activate the Kafka engine option and list required parameters of the Kafka engine (corresponding tags with values, without the <kafka> tag) in the Kafka Properties field.
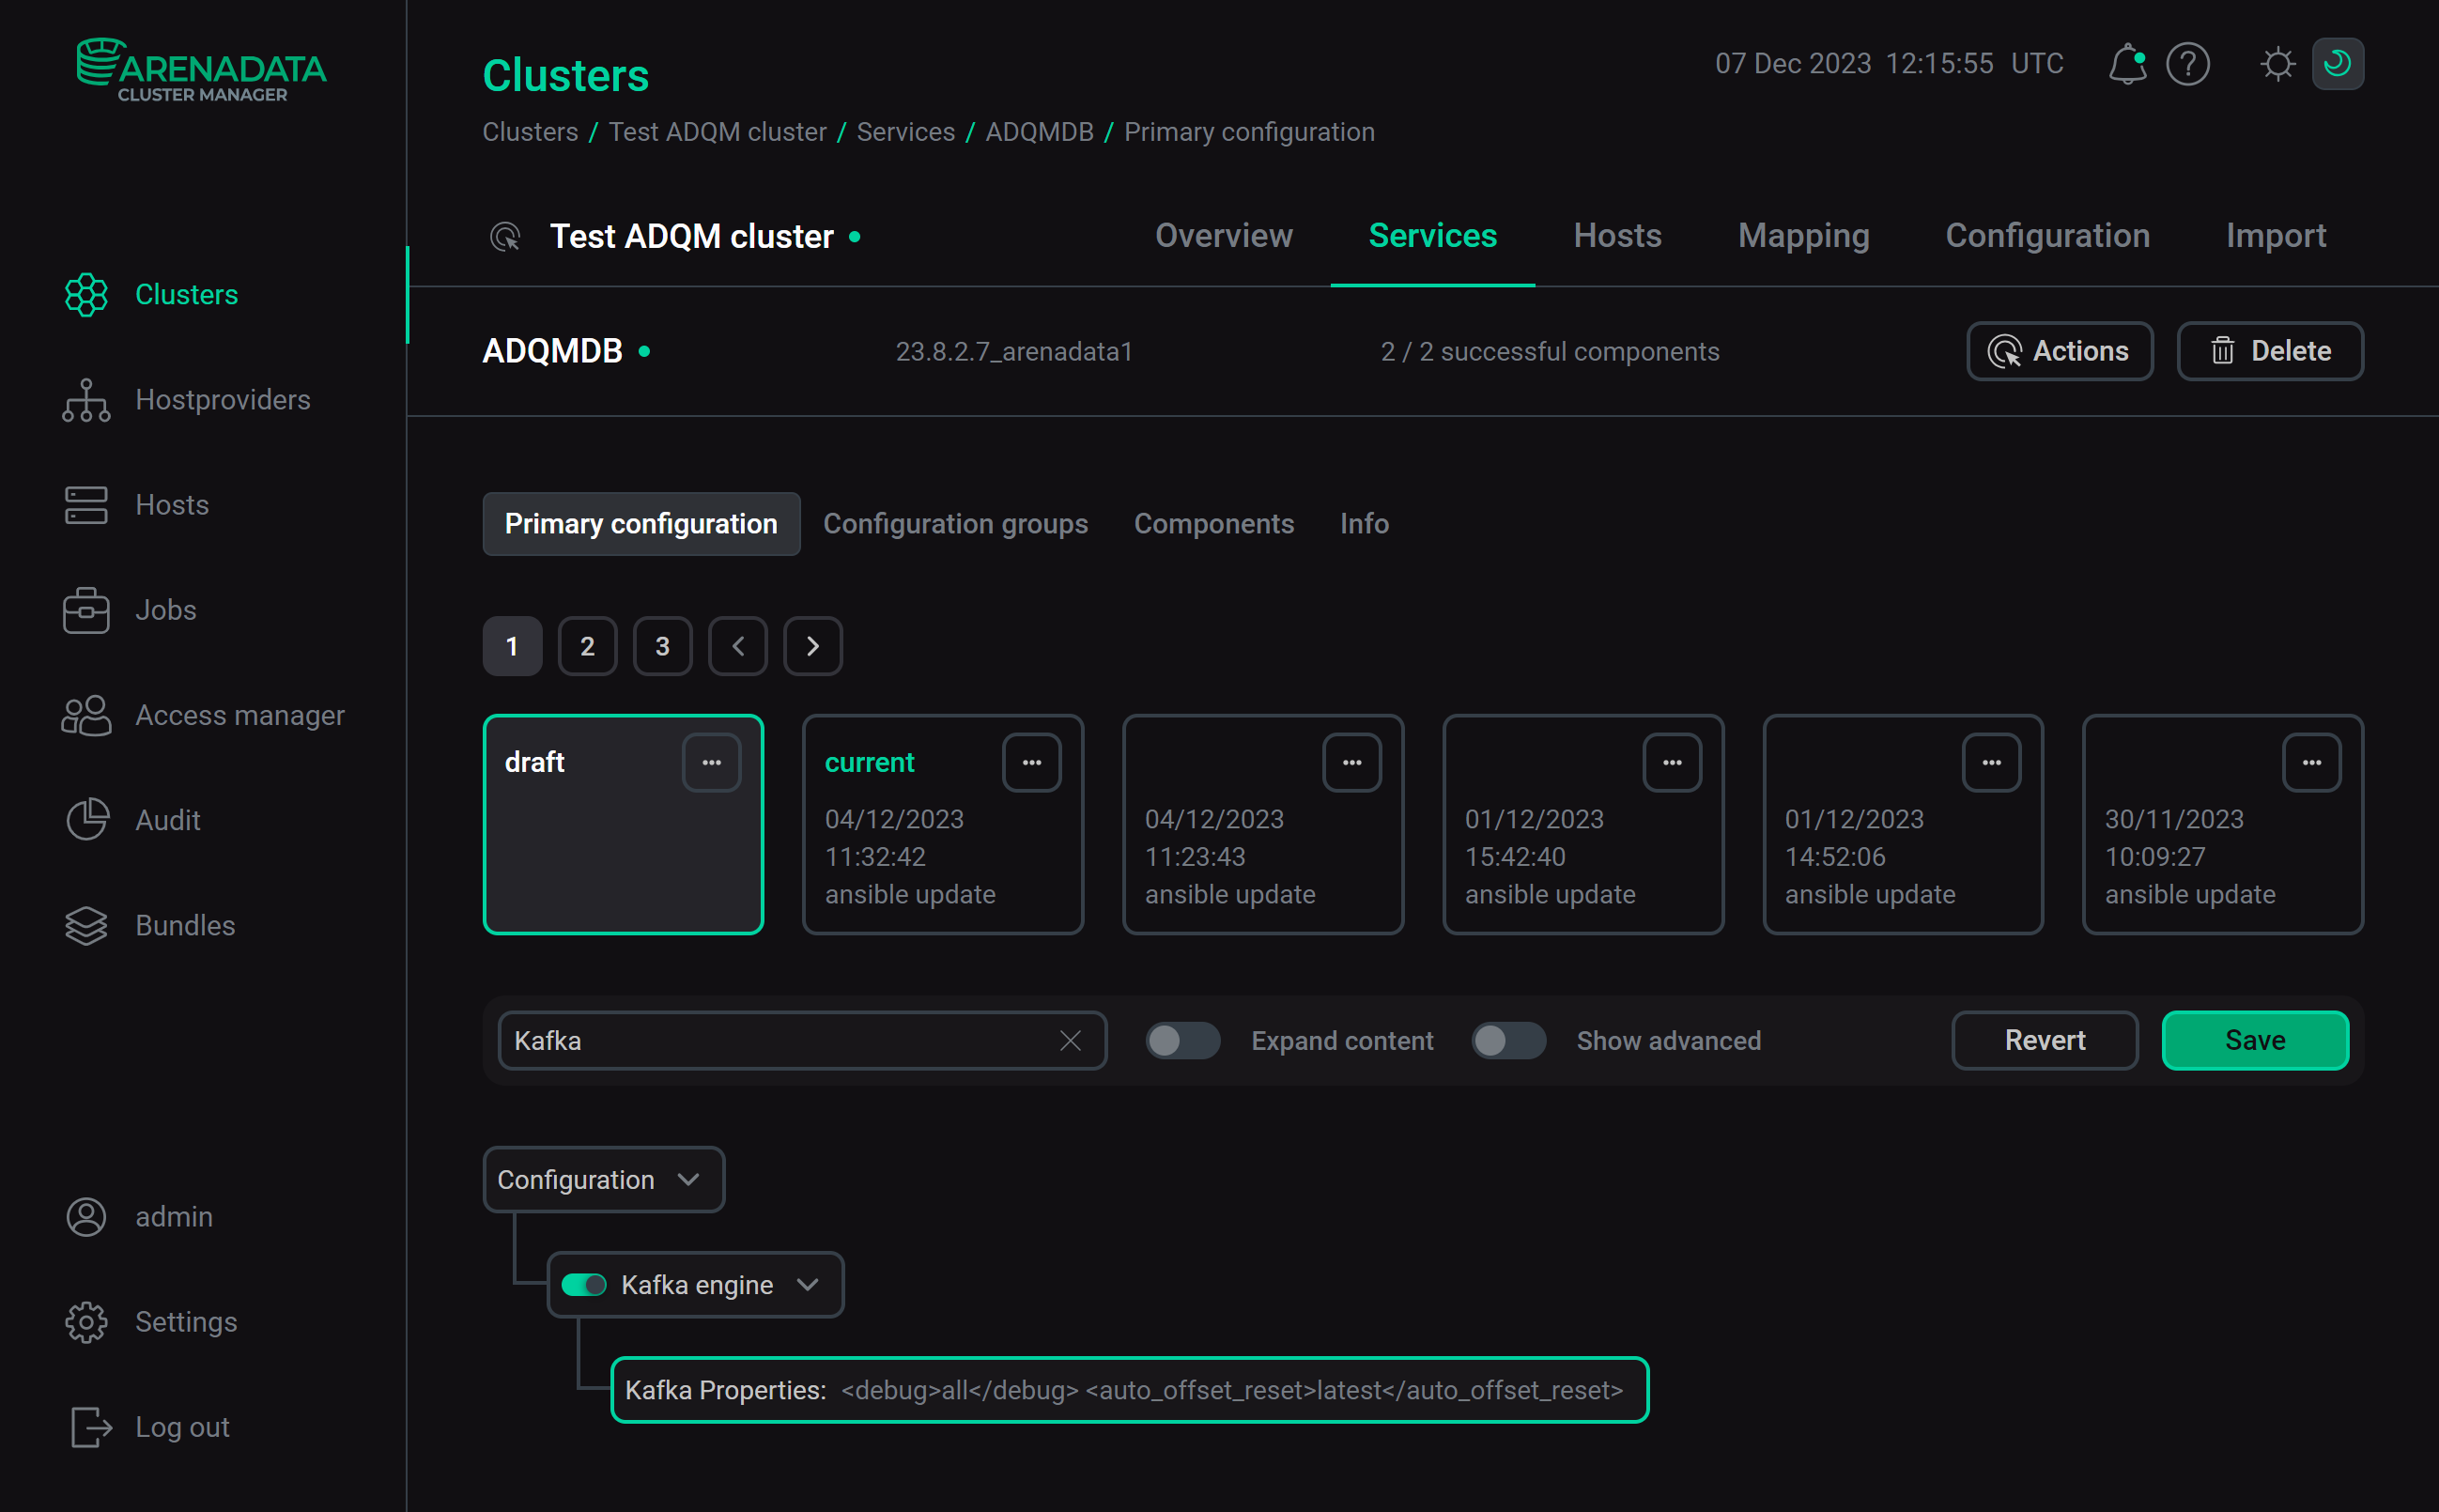
Click Save and execute the Reconfig action with the Restart option for the ADQMDB service — after the action is completed, the <kafka> section with the specified parameters will be added to the config.xml file.
Kerberos support
For integration with Kerberos-aware Kafka, set the security_protocol parameter to sasl_plaintext. It is enough if the Kerberos ticket-granting ticket is obtained and cached by the operating system. ClickHouse can maintain Kerberos credentials using a keytab file. Use also the sasl_kerberos_service_name, sasl_kerberos_keytab, and sasl_kerberos_principal parameters to set up Kerberos authentication — see the example below.
Virtual columns
It can be useful to track metadata of Kafka messages being loaded into ClickHouse. For example, you may need to have coordinates of a consumed message or to know how many messages were received from a certain topic or partition. For this purpose, the Kafka engine provides the following virtual columns.
| Column name | Data type | Description |
|---|---|---|
_topic |
LowCardinality(String) |
Kafka topic |
_key |
String |
Message key |
_offset |
UInt64 |
Message offset |
_timestamp |
Nullable(DateTime) |
Message timestamp |
_timestamp_ms |
Nullable(DateTime64(3)) |
Message timestamp in milliseconds |
_partition |
UInt64 |
Partition of a Kafka topic |
_headers.name |
Array(String) |
Array of message header keys |
_headers.value |
Array(String) |
Array of message header values |
_error |
String |
Text of an exception thrown when the parsing of a message failed. The column is filled if the Kafka engine’s |
_raw_message |
String |
Raw message that could not be parsed successfully. The column is filled if the Kafka engine’s |
To get values of virtual columns in ADQM, add the corresponding columns to a target table and specify them in the SELECT clause of a materialized view — see the example below. There is no need to create virtual columns in a Kafka table as they are available automatically.
Common operations
Stop and restart message consumption
To stop receiving messages from a topic, detach a Kafka-engine table:
DETACH TABLE <kafka_engine_table>;Detaching a Kafka table does not affect an offset of the consumer group. To restart consumption and continue it from the previous offset, reattach the table:
ATTACH TABLE <kafka_engine_table>;Modify a target table
If it is needed to change a target table, the following sequence of steps is recommended:
-
Detach the Kafka table (
DETACH TABLE). -
Change the target table (
ALTER TABLE). -
Delete the materialized view to avoid discrepancies between the modified target table and data from the view (
DROP VIEW). -
Re-attach the Kafka table (
ATTACH TABLE). -
Re-create the materialized view (
CREATE MATERIALIZED VIEW).
Example
Create a Kafka topic
Connect to any ADS host where the Kafka service is installed. Go to the root directory with scripts for executing commands in the Kafka environment (.sh files) and follow the steps below.
-
Create the
topic-kafka-to-adqmtopic via the following command (replace<kafka_host>with a name of an ADS host where the topic is created):$ bin/kafka-topics.sh --create --topic topic-kafka-to-adqm --bootstrap-server <kafka_host>:9092The result:
Created topic topic-kafka-to-adqm.
NOTEFor more information on creating and reading Kafka topics, see Quick start with Kafka in the ADS documentation.
-
Write test messages to the topic as follows.
Run the command that starts the message recording mode:
$ bin/kafka-console-producer.sh --topic topic-kafka-to-adqm --bootstrap-server <kafka_host>:9092On the next line after entering the command, enter messages — each message on a new line (use
Enterto move to a new line):>1,"one" >2,"two" >3,"three"To exit the message recording mode, go to the next line after writing the last message and press
Ctrl+C.
Create ADQM tables for integration with Kafka
On an ADQM host, run the clickhouse-client console client and follow the steps below.
-
Create a table based on the Kafka engine:
CREATE TABLE kafka_table (id Int32, name String) ENGINE = Kafka ('<kafka_host>:9092', 'topic-kafka-to-adqm', 'clickhouse', 'CSV'); -
Create a target table to store data from Kafka:
CREATE TABLE kafka_data (id Int32, name String) ENGINE = MergeTree() ORDER BY id; -
Create a materialized view that will receive data from the Kafka table and put it into the target MergeTree table:
CREATE MATERIALIZED VIEW kafka_data_mv TO kafka_data AS SELECT id, name FROM kafka_table;Now the materialized view is connected to the Kafka-engine table — it starts reading Kafka data and inserting corresponding data rows into the target table. This process will continue indefinitely — all subsequent insertions of messages into the Kafka topic will be consumed.
Read data from Kafka
-
Verify that data from Kafka is inserted into the target table:
SELECT * FROM kafka_data;┌─id─┬─name──┐ │ 1 │ one │ │ 2 │ two │ │ 3 │ three │ └────┴───────┘
-
Insert more messages into the Kafka topic (on the ADS host):
$ bin/kafka-console-producer.sh --topic topic-kafka-to-adqm --bootstrap-server <kafka_host>:9092>4,"four" >5,"five" -
Check that new data is in the ADQM table:
SELECT * FROM kafka_data;┌─id─┬─name──┐ │ 1 │ one │ │ 2 │ two │ │ 3 │ three │ │ 4 │ four │ │ 5 │ five │ └────┴───────┘
Insert data from ADQM to Kafka
-
On the ADQM host, insert data into the Kafka-engine table:
INSERT INTO kafka_table VALUES (6, 'six'); -
On the ADS host, check that the corresponding message is sent to the Kafka topic:
$ bin/kafka-console-consumer.sh --topic topic-kafka-to-adqm --from-beginning --bootstrap-server <kafka_host>:90921,"one" 2,"two" 3,"three" 4,"four" 5,"five" 6,"six"
-
Ensure also that new data is written to the target ADQM table with Kafka data:
SELECT * FROM kafka_data;┌─id─┬─name──┐ │ 1 │ one │ │ 2 │ two │ │ 3 │ three │ │ 4 │ four │ │ 5 │ five │ │ 6 │ six │ └────┴───────┘
Change the target table
To include meta information about Kafka messages (for example, the topic name and message offset) into the target table, make the following changes:
-
Detach the Kafka table:
DETACH TABLE kafka_table; -
Add the
topicandoffsetcolumns to the target table:ALTER TABLE kafka_data ADD COLUMN topic String, ADD COLUMN offset UInt64; -
Delete the materialized view:
DROP VIEW kafka_data_mv; -
Re-attach the Kafka-engine table:
ATTACH TABLE kafka_table; -
Re-create the materialized view:
CREATE MATERIALIZED VIEW kafka_data_mv TO kafka_data AS SELECT id, name, _topic as topic, _offset as offset FROM kafka_table;
Now, for each newly consumed message, the topic and offset columns of the target ADQM table will contain a name of the Kafka topic and the message offset in the partition. To check this:
-
Insert a new message into the Kafka topic on the ADS host:
$ bin/kafka-console-producer.sh --topic topic-kafka-to-adqm --bootstrap-server <kafka_host>:9092>7,"seven" -
Query data from the
kafka_datatable in ADQM:SELECT * FROM kafka_data;┌─id─┬─name──┐ │ 1 │ one │ │ 2 │ two │ │ 3 │ three │ │ 4 │ four │ │ 5 │ five │ │ 6 │ six │ └────┴───────┘ ┌─id─┬─name──┬─topic───────────────┬─offset─┐ │ 7 │ seven │ topic-kafka-to-adqm │ 6 │ └────┴───────┴─────────────────────┴────────┘
Example of connecting ADQM to Kafka with Kerberos SASL
Set up ADS
-
Configure MIT Kerberos KDC on a separate host and kerberize your ADS cluster according to the instructions from the MIT Kerberos article. Use
ADS-KAFKA.LOCALas a realm name. -
Ensure that Kafka authentication is configured correctly by following the steps from the Check installed Kerberos SASL section.
-
Create a user principal for authentication in Kafka (for example,
ads_user) by running the following command on the host where the MIT Kerberos KDC is deployed:$ sudo kadmin.local -q "add_principal -pw PASSWORD ads_user@ADS-KAFKA.LOCAL" -
On the ADS side, configure the JAAS file (/tmp/client.jaas) and .properties configuration file (/tmp/client.properties) for the user as described in the corresponding sections of the Use MIT Kerberos in Kafka article.
Create a topic in ADS
Create a test topic to which ADQM will connect to read/write messages. To do this, follow the steps below on any ADS host where the Kafka service is installed:
-
Create a ticket-granting ticket (TGT) for the
ads_userprincipal:$ kinit -p ads_user@ADS-KAFKA.LOCALEnter the password specified during the principal creation — in this example,
PASSWORD. -
Export the generated client.jaas file as a JVM option for the given user using the
KAFKA_OPTSenvironment variable:$ export KAFKA_OPTS="-Djava.security.auth.login.config=/tmp/client.jaas" -
Create a topic (for example,
topic-adqm-to-kafka-kerberos) specifying the path to the created client.properties file:$ /usr/lib/kafka/bin/kafka-topics.sh \ --create --topic topic-adqm-to-kafka-kerberos \ --bootstrap-server <kafka_host1>:9092,<kafka_host2>:9092,<kafka_host3>:9092 \ --command-config /tmp/client.propertiesReplace
<kafka_host1>,<kafka_host2>,<kafka_host3>with names of ADS hosts where the topic should be created. -
Write some messages to the topic and also specify the path to the client.properties file:
$ /usr/lib/kafka/bin/kafka-console-producer.sh \ --topic topic-adqm-to-kafka-kerberos \ --bootstrap-server <kafka_host1>:9092,<kafka_host2>:9092,<kafka_host3>:9092 \ --producer.config /tmp/client.properties>1,"one" >2,"two" >3,"three"To exit the message recording mode, go to the next line after writing the last message and press
Ctrl+C.
Create a principal for connecting ADQM to Kafka
-
On the host where the MIT Kerberos KDC is deployed, create a new principal
adqm_userthat will be used by ADQM to connect to Kafka:$ sudo kadmin.local -q "add_principal -randkey adqm_user@ADS-KAFKA.LOCAL" -
Create a keytab file for this principal:
$ sudo kadmin.local -q "xst -kt /tmp/adqm_user.keytab adqm_user@ADS-KAFKA.LOCAL" -
Copy the /tmp/adqm_user.keytab file to ADQM hosts (for example, to the /tmp directory).
On an ADQM host, set
clickhouseas the owner of the keytab file and restrict access to this file for security purposes:$ sudo chown clickhouse:clickhouse /tmp/adqm_user.keytab $ sudo chmod 0600 /tmp/adqm_user.keytab
Set up ADQM
-
On the configuration page of the ADQMDB service, enable Kafka engine and enter the following parameters in the Kafka Properties field:
<security_protocol>SASL_PLAINTEXT</security_protocol>
<sasl_mechanism>GSSAPI</sasl_mechanism>
<sasl_kerberos_service_name>kafka</sasl_kerberos_service_name>
<sasl_kerberos_keytab>/tmp/adqm_user.keytab</sasl_kerberos_keytab>
<sasl_kerberos_principal>adqm_user@ADS-KAFKA.LOCAL</sasl_kerberos_principal>
Click Save and execute the Reconfig action with the Restart option for the ADQMDB service.
-
Install the following packages on an ADQM host:
$ sudo yum install krb5-libs krb5-workstation -
Also, on the ADQM host, edit the /etc/krb5.conf file and change its contents as follows (replace
<kdc_host>with the name of the host with the MIT Kerberos KDC installed):# Configuration snippets may be placed in this directory as well includedir /etc/krb5.conf.d/ [logging] default = FILE:/var/log/krb5libs.log kdc = FILE:/var/log/krb5kdc.log admin_server = FILE:/var/log/kadmind.log [libdefaults] dns_lookup_realm = false ticket_lifetime = 24h forwardable = true rdns = false pkinit_anchors = FILE:/etc/pki/tls/certs/ca-bundle.crt default_realm = ADS-KAFKA.LOCAL [realms] ADS-KAFKA.LOCAL = { admin_server = <kdc_host> kdc = <kdc_host> } [domain_realm] .ads-kafka.local = ADS-KAFKA.LOCAL ads-kafka.local = ADS-KAFKA.LOCAL
Create tables in ADQM
On an ADQM host, open clickhouse-client and create tables for integration with Kafka:
-
Table based on the Kafka engine:
CREATE TABLE adqm_to_ads_kerberos_kafka (id Int32, name String) ENGINE = Kafka ('<kafka_host1>:9092,<kafka_host2>:9092,<kafka_host3>:9092', 'topic-adqm-to-kafka-kerberos', 'clickhouse_group', 'CSV'); -
Target table to store data from Kafka:
CREATE TABLE adqm_to_ads_kerberos_data (id Int32, name String) ENGINE = MergeTree() ORDER BY id; -
Materialized view that will receive data from the Kafka table and put it into the target MergeTree table:
CREATE MATERIALIZED VIEW adqm_to_ads_kerberos_data_mv TO adqm_to_ads_kerberos_data
AS SELECT id, name FROM adqm_to_ads_kerberos_kafka;
Check the connection between ADQM and Kafka
-
Verify that the data from the Kafka topic is inserted into the ADQM target table:
SELECT * FROM adqm_to_ads_kerberos_data;┌─id─┬─name──┐ 1. │ 1 │ one │ 2. │ 2 │ two │ 3. │ 3 │ three │ └────┴───────┘
-
Insert a data row into the ADQM Kafka-engine table:
INSERT INTO adqm_to_ads_kerberos_kafka VALUES (4, 'four'); -
Check that the corresponding message has been successfully received on the ADS cluster side:
$ /usr/lib/kafka/bin/kafka-console-consumer.sh \
  --topic topic-adqm-to-kafka-kerberos \
  --from-beginning  \
  --bootstrap-server <kafka_host1>:9092,<kafka_host2>:9092,<kafka_host3>:9092  \
  --consumer.config /tmp/client.properties
1,"one" 2,"two" 3,"three" 4,"four"