

LDAP authentication
To authenticate users, ADQM can use a remote LDAP server as:
-
an external authenticator for existing ADQM users;
-
an external user directory that holds information about user accounts and their roles. This approach allows authentication of users that are not created in ADQM directly but defined on the LDAP server.
Both these approaches require you to configure ADQM settings that manage connection to the LDAP server.
Configure connection to the LDAP server
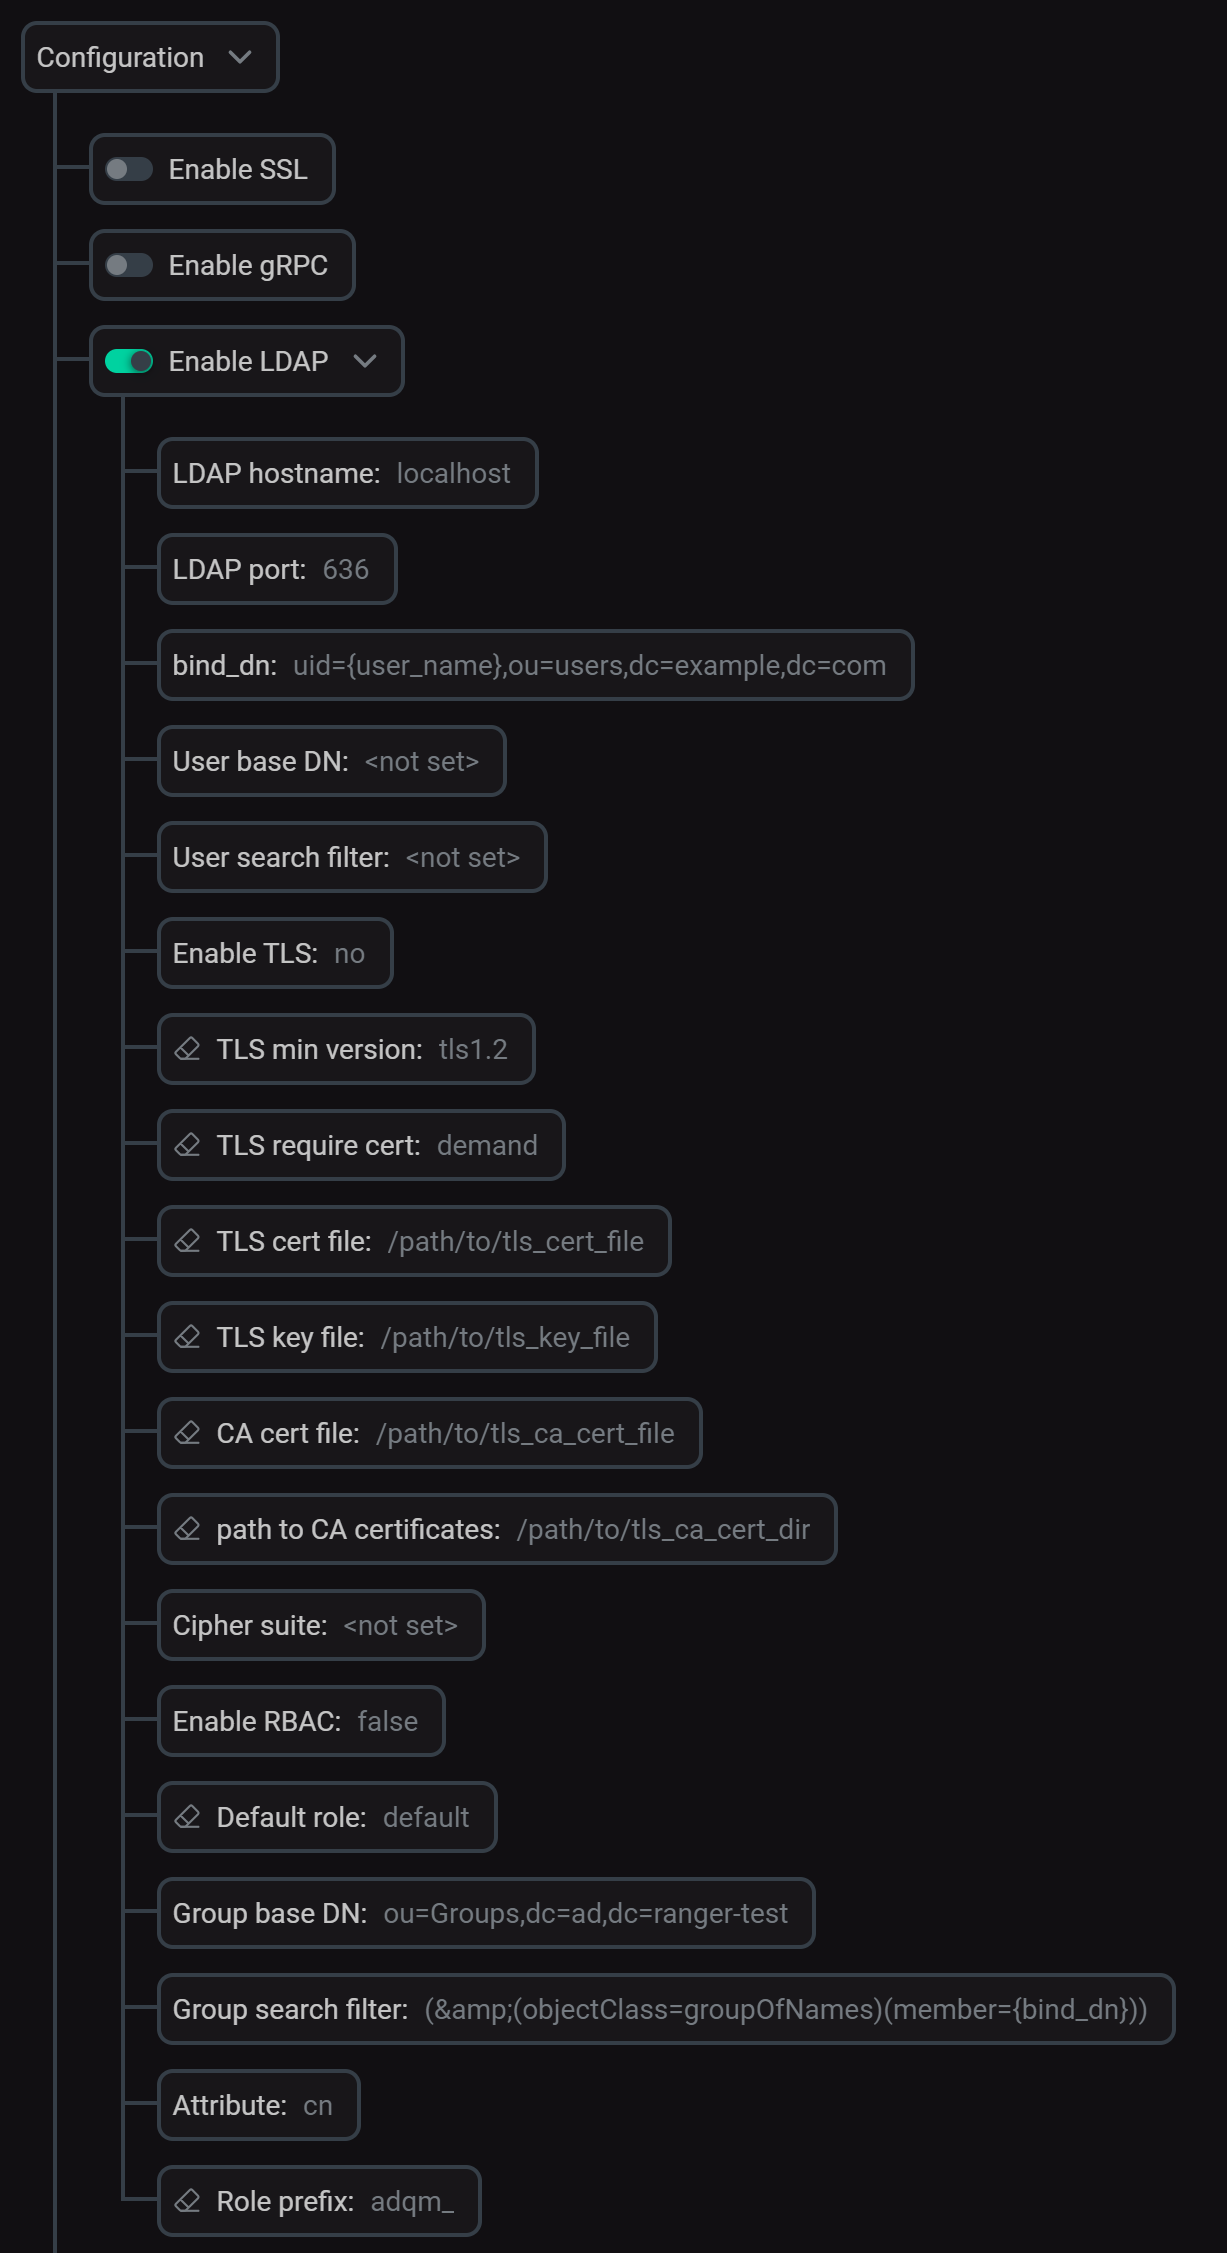
In the ADCM interface, open the configuration page for the ADQMDB service (ADQM cluster → Services → ADQMDB → Primary Configuration) and activate the Configuration → Enable LDAP option. In the expanded section, configure the following parameters:
-
name — name of the LDAP server connection configuration.
-
ldap_hostname — hostname or IP of the LDAP server.
-
ldap_port — port of the LDAP server (if the enable_tls setting is set to
yes, the default port is636, otherwise —389). -
bind_dn — template used to construct the DN to bind to. The resulting DN will be constructed by replacing all
{user_name}substrings of the template with the actual username during each authentication attempt. -
base_dn and search_filter — LDAP search parameters for detecting the actual DN of the bound user (it is mainly used in search filters for further role mapping when the server is Active Directory — the resulting user DN will replace
{user_dn}substrings). -
If secure connection to the LDAP server is required, enable the enable_tls option and specify paths to the key and SSL/TLS certificates using the corresponding parameters (for more details, see Configuration parameters).
After you’ve specified all parameters for connecting to the LDAP server, click Save and execute the Reconfig action with the Restart option for the ADQMDB service to apply the changes. The config.xml file will get the <ldap_servers> section with the specified LDAP server configuration under the name you have assigned to it (for example, ldap_server for the configuration in the image above). The next section explains how to use this name for creating ADQM users to be authenticated via LDAP.
Use LDAP to authenticate ADQM users
A remote LDAP server can be used to store and manage passwords of users defined locally in ADQM (created with a CREATE USER query or defined in the users.xml file). This allows you not to specify a password when creating a user in ADQM, but use the LDAP server to verify the password entered during authentication. To use this approach, specify the LDAP server configuration when defining an ADQM user in one of the following ways (the examples below use ldap_server as the LDAP server configuration name).
-
Use the
IDENTIFIED WITH ldap SERVERclause in aCREATE USERquery:CREATE USER <ldap_user> IDENTIFIED WITH ldap SERVER 'ldap_server'; -
Specify the
ldapelement for the user in the users.xml configuration file:<users> <ldap_user> <ldap> <server>ldap_server</server> </ldap> <!- ... --> </ldap_user> </users>
where <ldap_user> is an ADQM user name (it should match the username defined on the LDAP server — a string between auth_dn_prefix and auth_dn_suffix in an entry like dn: auth_dn_prefix{user_name}auth_dn_suffix).
The ldap_user user will then be able to connect to ADQM with the password specified in LDAP.
Use LDAP to store usernames and permissions
An LDAP server can also be used as an external user directory for ADQM. In other words, you can not create users in ADQM locally, but allow user authentication by information from the LDAP directory.
On each user login, ADQM tries to find the local definition of the user and authenticate the user as specified. If the user does not exist in ADQM, it is assumed that the user is defined in an external LDAP directory. In this case, ADQM tries to bind to DN (defined by the LDAP server connection parameters) with provided login credentials. If successful, the user is considered existing and authenticated.
For users authenticated by information from the LDAP directory, it is required to assign roles as described below.
-
Create one or more roles in ADQM that will be assigned to authenticated users. To do this, use a
CREATE ROLEquery:CREATE ROLE <ldap_user_role>; -
On the ADQMDB service configuration page (the Configuration → Enable LDAP section), enable the rbac_enable option (role-based access control) within the LDAP server settings and set the parameters below depending on how roles should be assigned to users authenticated via the LDAP directory. There are two ways to set user roles.
-
Set a default role for all authenticated users. Pass the role created earlier with the
CREATE ROLEquery to the rbac_default_role parameter. -
Map roles from the LDAP directory to ADQM roles. Specify the following parameters:
-
rbac_base_dn — base path to start a search for groups with a user.
-
rbac_scope — scope of the LDAP search (possible values are
base,one_level,children,subtree). -
rbac_search_filter — LDAP search filter to identify groups for mapping users. The filter template can include the
{user_name},{bind_dn},{user_dn}, and{base_dn}substrings that will be replaced with the actual username, bind DN, user DN, and base DN in the resulting filter during each LDAP search. -
rbac_attribute — name of the attribute whose values the LDAP search should return (these values will be mapped to ADQM roles).
-
rbac_role_prefix — prefix of attribute values that the LDAP search should return. The specified prefix will be removed from the found attribute values, and the resulting strings will be treated as names of ADQM local roles — these roles will be assigned to an authenticated user.
-
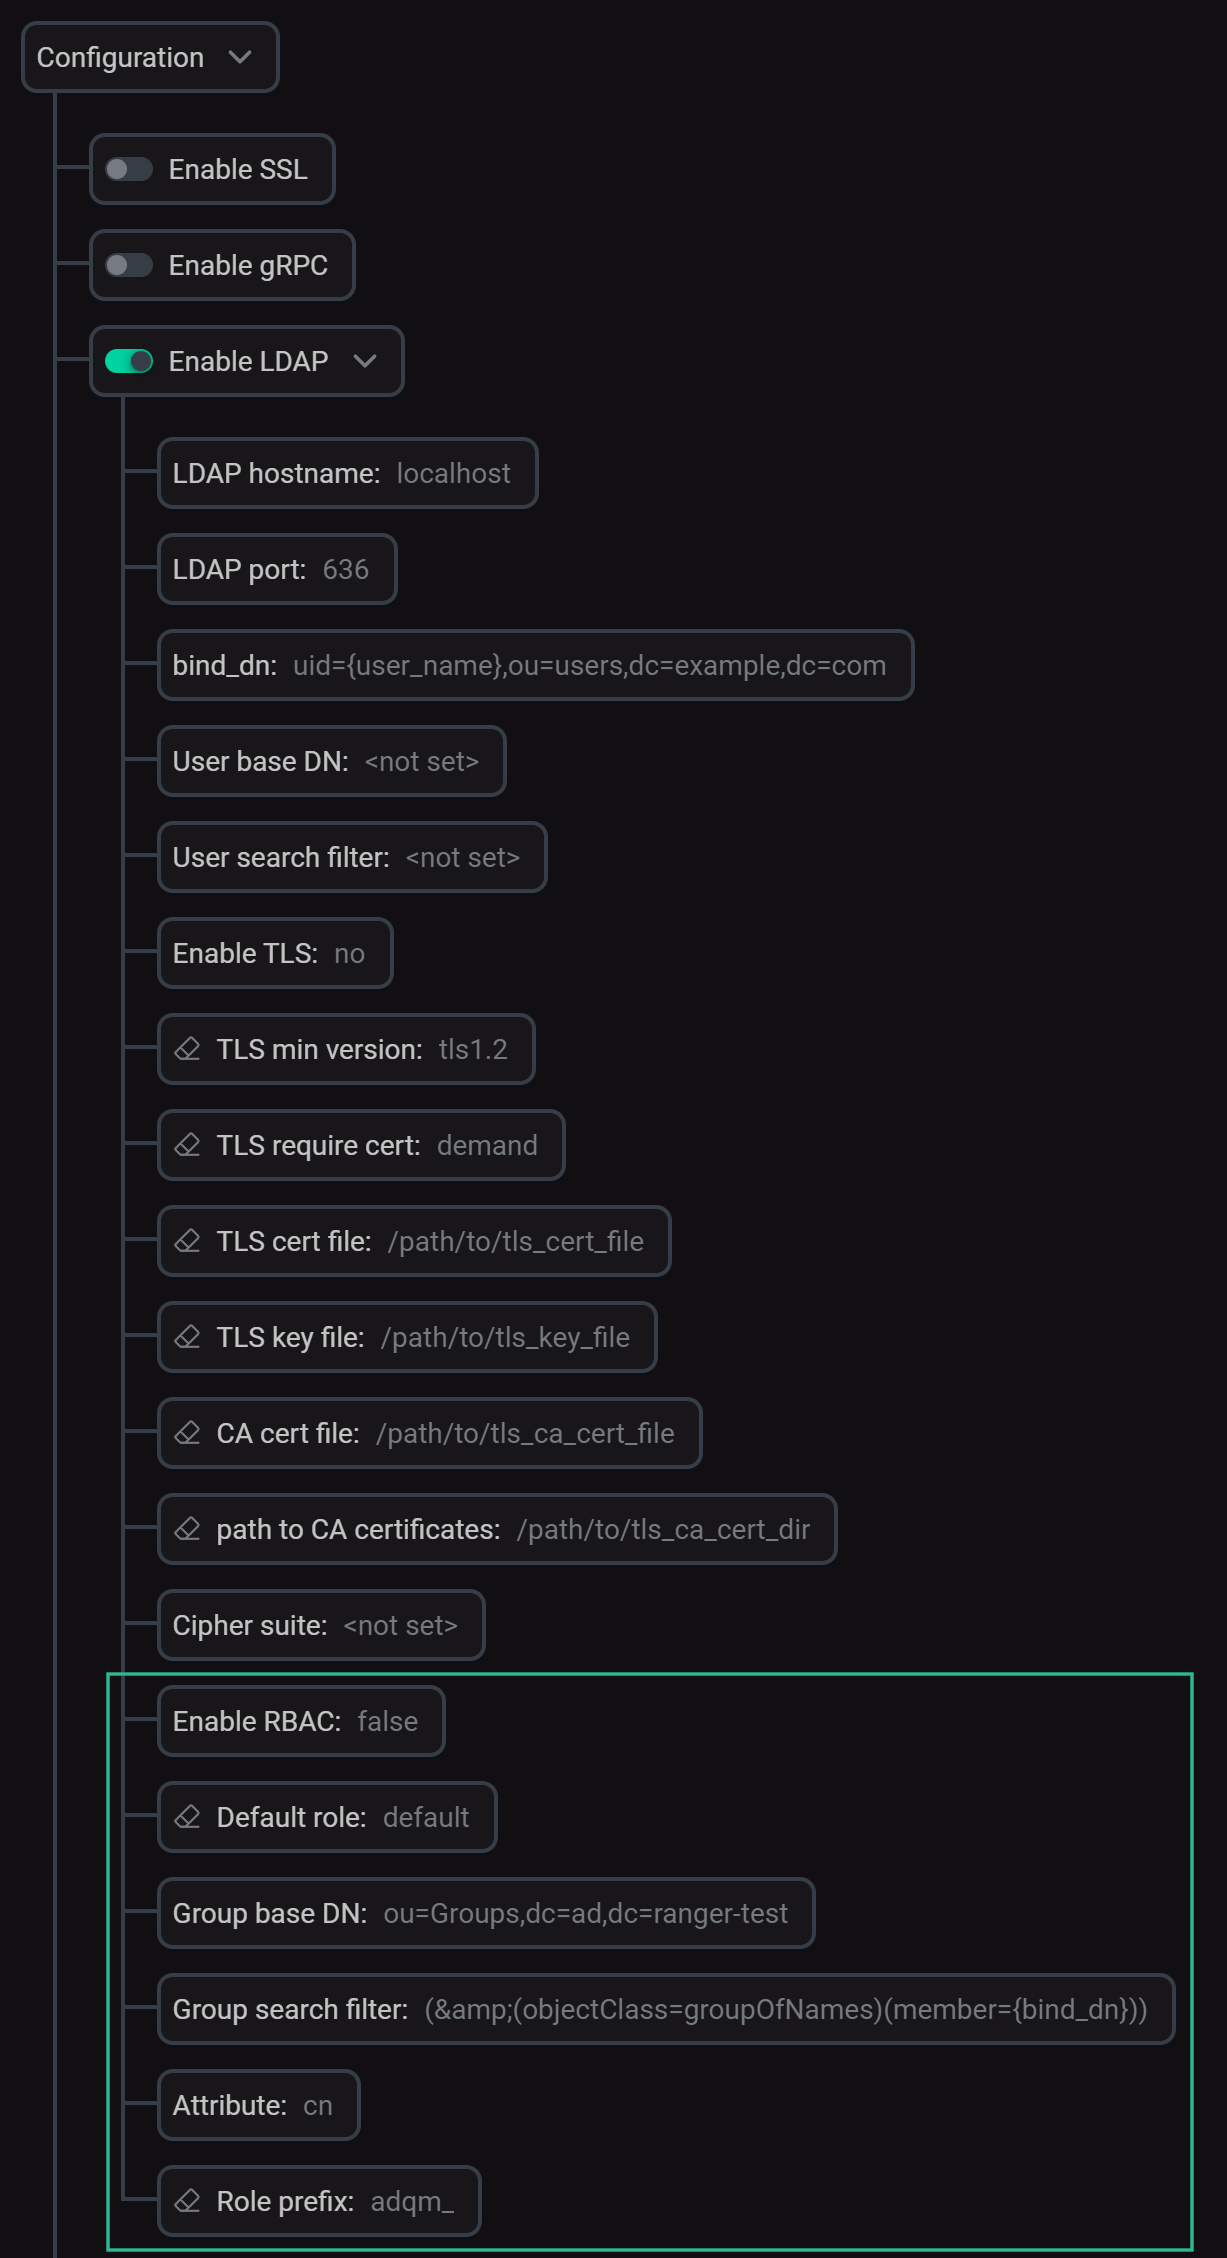 RBAC-related settings for LDAP authentication
To complete parameter configuration and apply all changes, click Save and execute Reconfig for the ADQMDB service. The specified values will be written to the
roles(default role) androle_mapping(parameters for searching roles in the LDAP directory to map to ADQM roles) sections inside theuser_directories/ldapsection of the config.xml configuration file. -
You can use one or both of the described methods to assign roles to users. An authenticated user gets a default role (Default role). If the role mapping is also configured, the LDAP search results are converted to role names and the corresponding ADQM roles are also assigned to the user. If none of the role assignment methods is configured, users will not be able to perform any actions after authentication.