

Authorization
The ADQM database access control system based on the Role-based access control (RBAC) concept includes the following objects:
You can create and configure these objects using SQL queries (recommended) or configuration files (users.xml and config.xml). This article explains the basics of SQL-driven access control and account management. It describes syntax and provides examples of queries to create ADQM users and roles with specific permissions and restrictions for working with databases, tables, columns, and data rows.
To reproduce the examples below, first create a sample table (test_table) in the current database and a new database (test_database):
CREATE TABLE test_table (x Int32, y String, z Int32) ENGINE = MergeTree ORDER BY x;CREATE DATABASE test_database;Configure authorization for a new cluster
The SQL access control mode is enabled if a user’s access_management parameter value is set to 1 in the users.xml file.
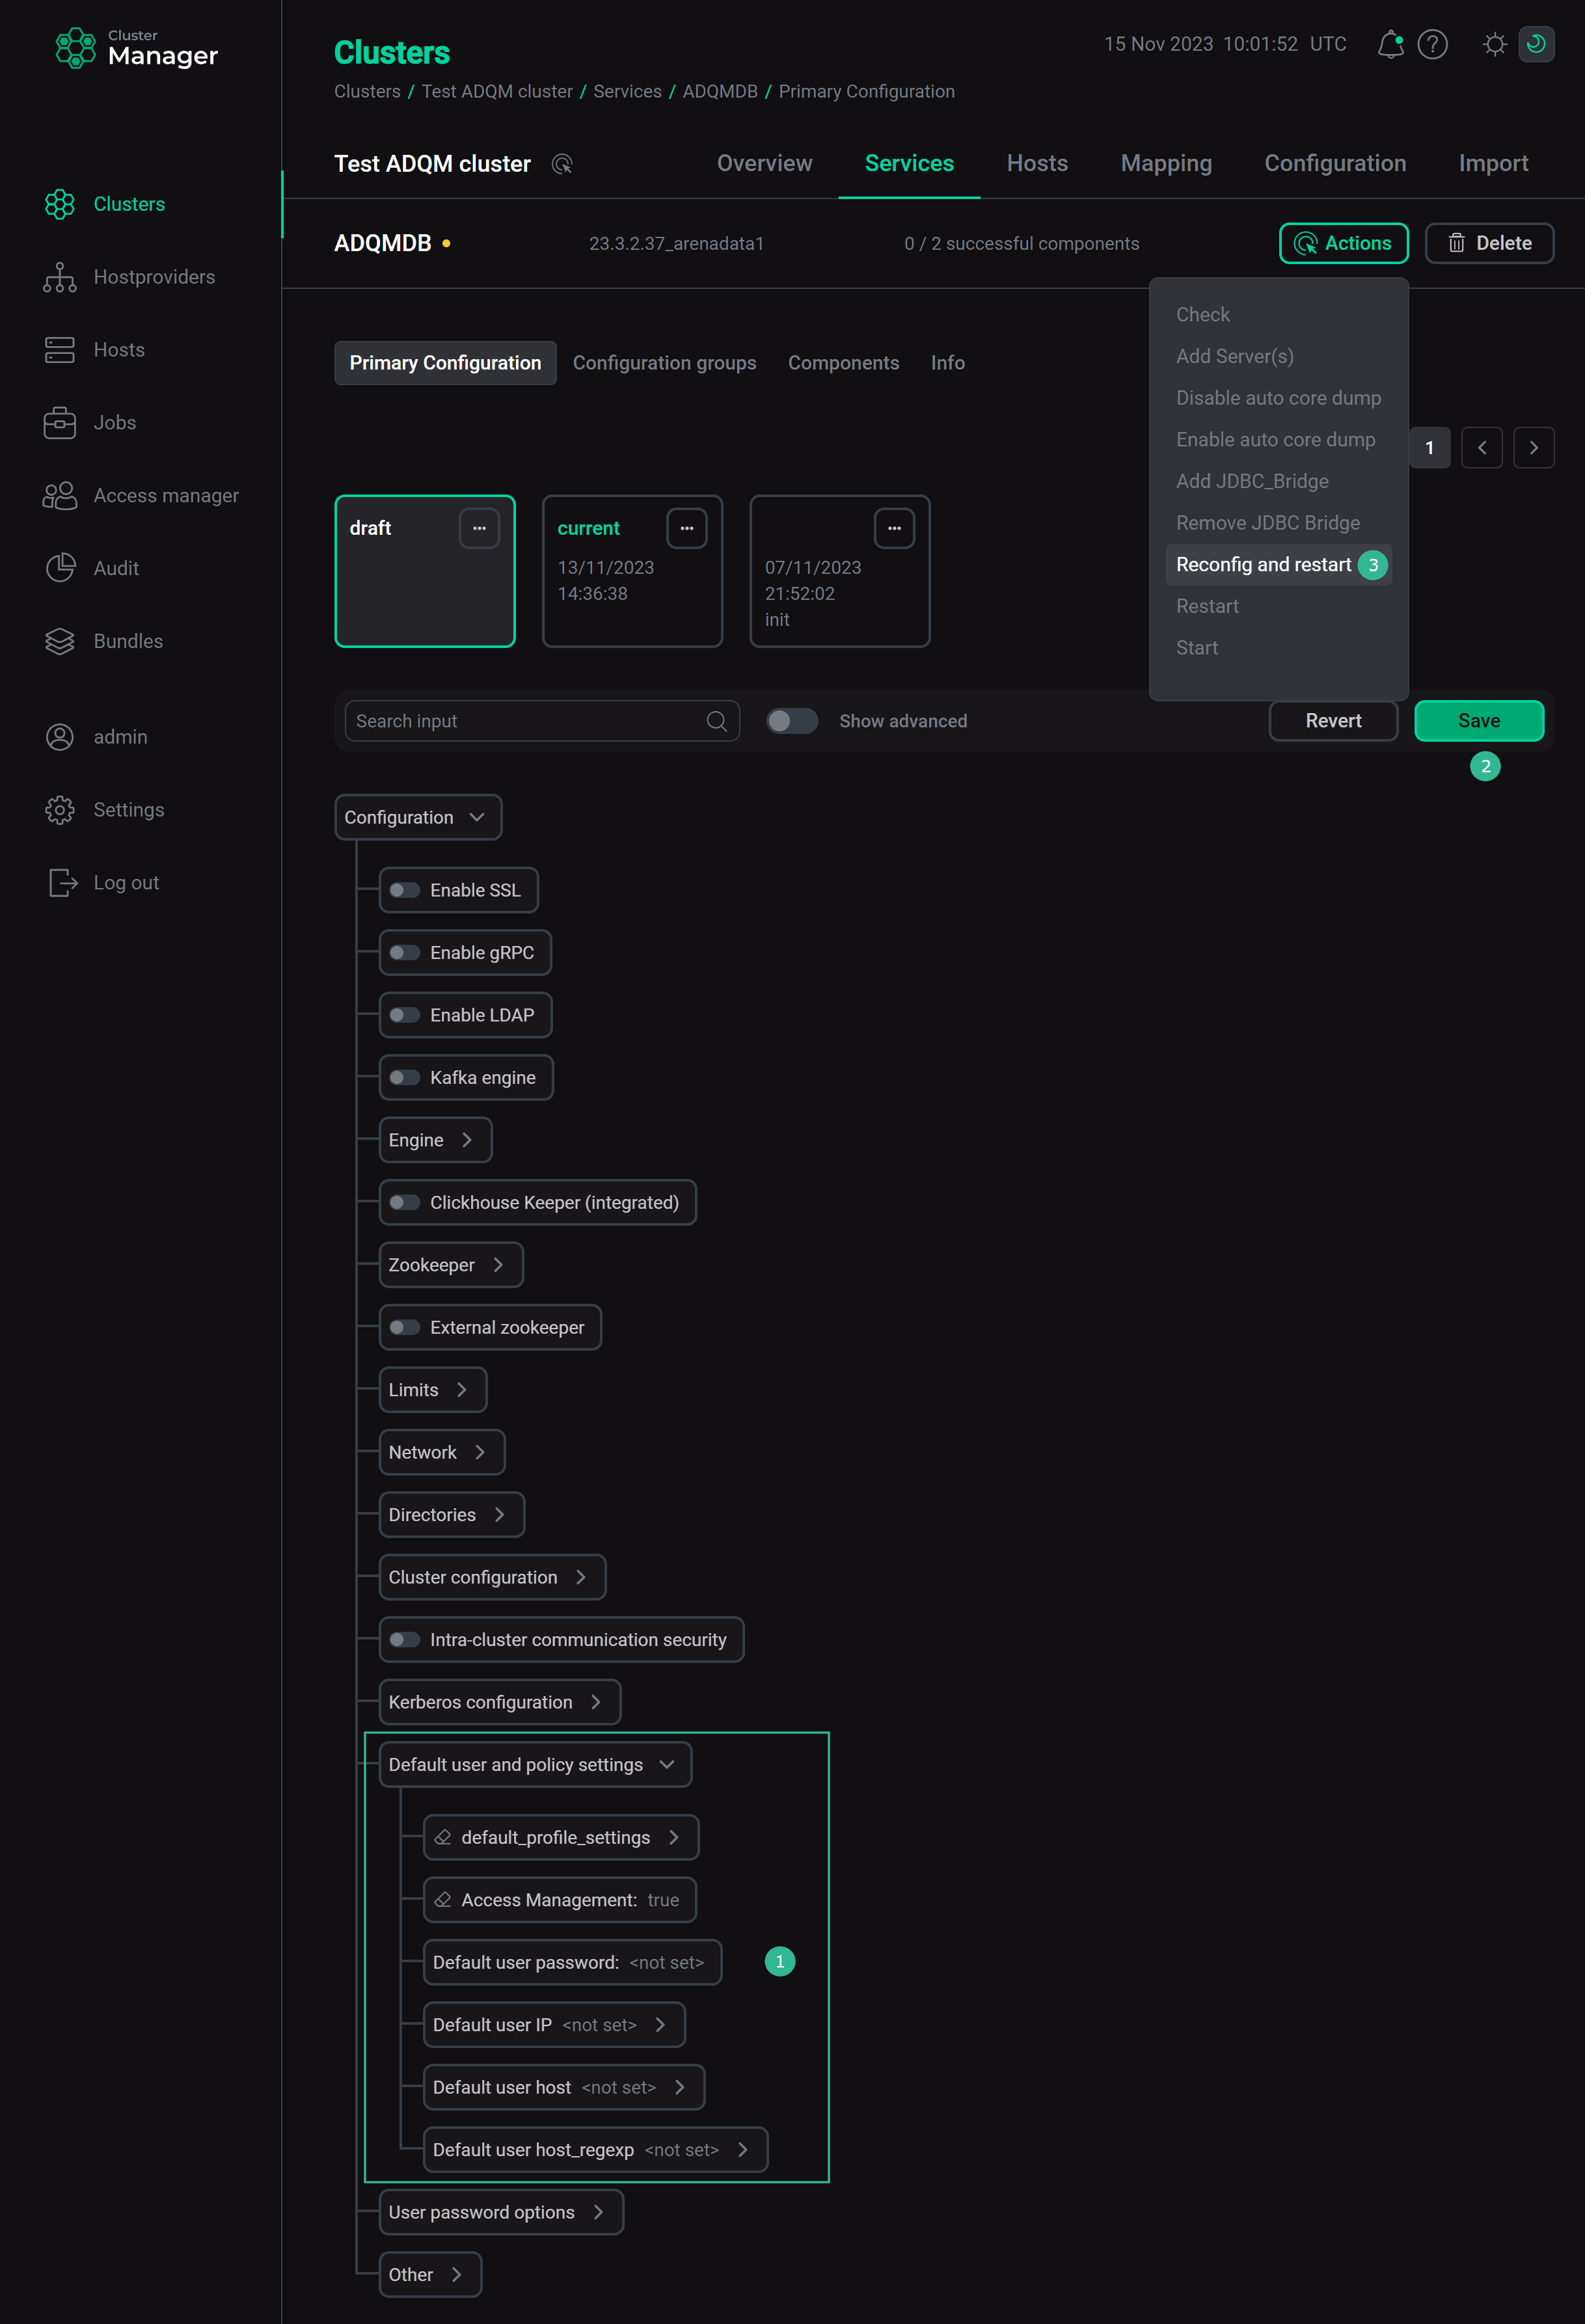
When creating a new cluster, ADQM provides the default user account (without a password by default) with the access_management option enabled and all access rights and permissions. This account is used in any case when a username is not defined (for example, when connecting to ADQM from a client or processing distributed queries). You can change the default user settings (for example, set a password to login to ADQM) in the ADCM interface: ADQM cluster → Services → ADQMDB → Primary Configuration → Default user and policy settings.
Use the default user account to set up secure access to the ADQM database right after creating a cluster. To do this, follow these steps:
-
Connect to ADQM as the
defaultuser (for example, via the clickhouse-client command-line client). -
Create user accounts required for further work in ADQM, including administrator account.
-
Restrict permissions for the
defaultuser and disable SQL-based access control and account management for it (the Access Management option in the ADCM interface).
User account
A user account (user) is an access system object used to authorize a user connecting to ADQM. This object contains the following information:
-
user identification information;
-
privileges that define which queries the user is allowed to execute;
-
hosts allowed to connect to ADQM servers;
-
roles assigned to the user and default roles;
-
settings applied when the user logs in the system.
Create a user account
To create a new user account, use the CREATE USER query:
CREATE USER [IF NOT EXISTS | OR REPLACE] <user_name1> [ON CLUSTER <cluster_name1>]
    [, <user_name2> [ON CLUSTER <cluster_name2>] ...]
    [NOT IDENTIFIED | IDENTIFIED {[WITH {no_password | plaintext_password | sha256_password | sha256_hash | double_sha1_password | double_sha1_hash}] BY {'password' | 'hash'}} | {WITH ldap SERVER 'ldap_server'} | {WITH ssl_certificate CN '<certificate_CN>'} | {WITH kerberos [REALM 'realm']}]
    [HOST {LOCAL | NAME '<fqdn>' | REGEXP '<name_regexp>' | IP '<ip_address>' | LIKE '<pattern>'} [,...] | ANY | NONE]
    [DEFAULT ROLE <role_name> [,...] | ALL | ALL EXCEPT <role_name> [,...] ]
    [DEFAULT DATABASE <database_name> | NONE]
    [GRANTEES {<user_name> | <role_name> | ANY | NONE} [,...] [EXCEPT {<user_name> | <role_name>} [,...]]]
[SETTINGS <setting_name> [= <value>] [MIN [=] <min_value>] [MAX [=] <max_value>] [READONLY | WRITABLE] | PROFILE '<profile_name>'] [,...];ON CLUSTER |
By default, the created user can connect only to the server on which the |
NOT IDENTIFIED | IDENTIFIED |
User authentication method: by a password, via an LDAP server, by an SSL certificate or by the Kerberos protocol |
HOST |
Host from which the user can connect to an ADQM server |
DEFAULT ROLE |
Default role that is automatically activated when the user logs in ADQM |
DEFAULT DATABASE |
Database that will be a current database when the user logs in ADQM |
GRANTEES |
Users or roles that are allowed to receive privileges from the user being created, if this user is granted the corresponding permission via WITH GRANT OPTION |
SETTINGS |
Values of settings and their restrictions that are applied when the user logs in. In addition to settings explicitly defined via the |
Example
Create the john user that can connect to any server of the default_cluster cluster using the qwerty password:
CREATE USER john ON CLUSTER default_cluster IDENTIFIED WITH sha256_password BY 'qwerty';Change an existing user account
You can change settings of an existing user with the ALTER USER query:
ALTER USER [IF EXISTS] <user_name1> [ON CLUSTER <cluster_name1>] [RENAME TO <new_user_name1>]
    [, <user_name2> [ON CLUSTER <cluster_name2>] [RENAME TO <new_user_name2>] ...]
    [NOT IDENTIFIED | IDENTIFIED {[WITH {no_password | plaintext_password | sha256_password | sha256_hash | double_sha1_password | double_sha1_hash}] BY {'password' | 'hash'}} | {WITH ldap SERVER 'ldap_server'} | {WITH ssl_certificate CN '<certificate_CN>'} | {WITH kerberos [REALM 'realm']}]
    [[ADD | DROP] HOST {LOCAL | NAME '<fqdn>' | REGEXP '<name_regexp>' | IP '<ip_address>' | LIKE '<pattern>'} [,...] | ANY | NONE]
    [DEFAULT ROLE <role_name> [,...] | ALL | ALL EXCEPT <role_name> [,...] ]
    [GRANTEES {<user_name> | <role_name> | ANY | NONE} [,...] [EXCEPT {<user_name> | <role_name>} [,...]]]
    [SETTINGS <setting_name> [= <value>] [MIN [=] <min_value>] [MAX [=] <max_value>] [READONLY | WRITABLE] | PROFILE '<profile_name>'] [,...]
Example
The following query reconfigures the previously created user account so that it can be used for connection from the specified IP address only:
ALTER USER john HOST IP '10.92.17.140';View user account settings
To view current settings of a user account (parameters specified when creating the user and all subsequent modifications made via ALTER USER) run the SHOW CREATE USER query:
SHOW CREATE USER [<user_name1> [, <user_name2> ...] | CURRENT_USER];Example
Run the following query to see settings of the john user:
SHOW CREATE USER john;The output:
--CREATE USER john---------------------------------------------------------
│ CREATE USER john IDENTIFIED WITH sha256_password HOST IP '10.92.17.140' │
---------------------------------------------------------------------------
Manage user privileges
To define access rights for a user, you need to grant privileges to the corresponding user account. A privilege is a permission to execute certain types of queries.
Grant privileges
There are two ways to assign privileges to a user account:
-
assign a role (a set of privileges) to the user account;
-
run the GRANT query to grant privileges to the user account directly:
GRANT [ON CLUSTER <cluster_name>] <privilege>[(<column_name> [,...])] [,...]
    ON {<db_name>.<table_name> | <db_name>.* | *.* | <table_name> | *} TO {<user_name> | CURRENT_USER} [,...] [WITH GRANT OPTION] [WITH REPLACE OPTION];
Query parameters and clauses<privilege>
Privilege type
<column_name>
Name of a column for which the user is allowed to execute queries defined by the privilege
<db_name>.<table_name>
Database name and table name defining the privilege scope
<user_name>
Name of a user account to which the privilege is granted
WITH GRANT OPTION
Allows granting user privileges of the same scope (or less) to other users and roles specified as
GRANTEESin the CREATE USER / ALTER USER queriesWITH REPLACE OPTION
All old user privileges are replaced with new privileges (if the clause is not used in the query, new privileges are added to the user account)
Examples:-
Allow the
johnuser to executeSELECTqueries for thexandycolumns of thetest_tabletable in the current database:GRANT SELECT(x,y) ON test_table TO john; -
Create a new
adminuser account and grant it with full administrator rights:CREATE USER admin IDENTIFIED BY 'admin';GRANT ALL ON *.* TO admin WITH GRANT OPTION;
-
View user privileges
A set of user privileges includes privileges granted to the user account directly and privileges of assigned roles. Use the SHOW GRANTS query to see a list of user privileges (if no user is specified, the query returnes the current user’s privileges):
SHOW GRANTS [FOR <user_name>];A sample query:
SHOW GRANTS FOR john;--GRANTS FOR john---------------------------------- │ GRANT SELECT(x,y) ON default.test_table TO john │ ---------------------------------------------------
You can also view the access rights to database objects granted to a user in the system.grants system table. For example:
SELECT access_type, database, table, column FROM system.grants WHERE user_name='john';--access_type---database---table--------column-- │ SELECT │ default │ test_table │ x │ │ SELECT │ default │ test_table │ y │ ------------------------------------------------
Revoke user privileges
To revoke privileges from users, use the REVOKE query:
REVOKE [ON CLUSTER <cluster_name>] <privilege>[(<column_name> [,...])] [,...]
    ON {<db_name>.<table_name> | <db_name>.* | *.* | <table_name> | *}
    FROM {<user_name> | CURRENT_USER} [,...] | ALL | ALL EXCEPT {<user_name> | CURRENT_USER} [,...];
For example, the following query revokes the privilege to execute SELECT queries for the y column of the test_table table from the john user:
REVOKE SELECT(y) ON test_table FROM john;Roles
A role is a set of privileges that a user gets if this role is assigned to the user account.
Manage roles
The table below lists queries that you can use to manage ADQM roles.
| Query | Description | Syntax |
|---|---|---|
CREATE ROLE |
Creates a new role in ADQM |
|
ALTER ROLE |
Changes settings of an existing role |
|
SHOW CREATE ROLE |
Displays parameters used to configure a role |
|
DROP ROLE |
Removes a role. A removed role is revoked from all objects of the access system to which it was assigned |
|
Specify role privileges
To specify privileges that a role will grant when assigned to a user, use the GRANT query:
GRANT [ON CLUSTER <cluster_name>] <privilege>[(<column_name> [,...])] [,...] ON {<db_name>.<table_name> | <db_name>.* | *.* | <table_name> | *}
TO <role_name> [,...] [WITH GRANT OPTION] [WITH REPLACE OPTION];<privilege> |
Privilege type |
<column_name> |
Name of a column for which execution of queries defined by the specified privilege is allowed |
<db_name>.<table_name> |
Database name and table name defining the privilege scope |
<role_name> |
Name of a role to which the privilege is granted |
WITH GRANT OPTION |
Allows granting other users with privileges of the same scope (or less) |
WITH REPLACE OPTION |
All old role privileges are replaced with new privileges (if the clause is not used in the query, new privileges are added to the role) |
Example
Create a role and grant it with permission to read all tables in the test_database database:
CREATE ROLE reader;GRANT SELECT ON test_database.* TO reader;View role privileges
You can view a role’s access rights to ADQM objects in the system.grants system table:
SELECT access_type, database, table, column FROM system.grants WHERE role_name='reader';--access_type---database--------table---column-- │ SELECT │ test_database │ ᴺᵁᴸᴸ │ ᴺᵁᴸᴸ │ ------------------------------------------------
Assign a role to a user
You can assign multiple roles to one user account. A role can also be assigned to other roles. Use the following queries to assign and revoke roles:
| Query | Description | Syntax |
|---|---|---|
GRANT |
Assigns a role to a user or another role.
|
|
REVOKE |
Revokes a role from a user or another role |
|
Example
Assign the reader role to the john user:
GRANT reader TO john;Make sure the reader role has been added to the previously assigned user privilege:
SHOW GRANTS FOR john;--GRANTS FOR john---------------------------------- │ GRANT SELECT(x,y) ON default.test_table TO john │ │ GRANT reader TO john │ ---------------------------------------------------
Roles assigned to a user (or to another role) can also be viewed in the system.role_grants system table. For example:
SELECT user_name, granted_role_name, granted_role_is_default, with_admin_option FROM system.role_grants WHERE user_name='john';--user_name---granted_role_name---granted_role_is_default---with_admin_option-- │ john │ reader │ 1 │ 0 │ -------------------------------------------------------------------------------
Apply a user role
Users can apply (activate) their assigned roles in arbitrary combinations using the SET ROLE and SET DEFAULT ROLE queries. The final scope of user privileges is the combination of privileges assigned to the user account directly and privileges granted by the user’s active roles.
| Query | Description | Syntax |
|---|---|---|
SET ROLE |
Activates roles for the current user |
|
SET DEFAULT ROLE |
Sets default roles for a user. Default roles are automatically activated when a user logs in ADQM. Only roles assigned to the user can be set as default roles. Another way to set default roles for a user is to use the |
|
Example
After the john user has been granted with the reader role (see the example above), he can apply this role and execute queries this role allows:
SET ROLE reader;SELECT * FROM test_database.*;Row policy
Row policy is a table-specific filter that defines which rows of the table are available to the specified user or role.
Create a row policy
To create a row policy, use the CREATE ROW POLICY query:
CREATE [ROW] POLICY [IF NOT EXISTS | OR REPLACE] <policy_name1> [ON CLUSTER <cluster_name1>] ON [<db_name1>.]<table_name1>
        [, <policy_name2> [ON CLUSTER <cluster_name2>] ON [<db_name2>.]<table_name2> ...]
    [AS {PERMISSIVE | RESTRICTIVE}]
    [FOR SELECT] USING <filter_condition>
[TO {<user_name> | <role_name> [,...] | ALL | ALL EXCEPT <user_name> | <role_name> [,...]}];AS |
Defines how to combine policies if more than one policy is active at the same time for the same table and the same user. Possible values:
In other words, a table row will be available to the user if the following condition is met: For example, if the following policies are set, the |
USING |
Condition to filter table rows — a user will see only rows for which the specified |
TO |
Users and roles for which the row policy should apply |
If no row policy is specified for a table, any user can access all rows of the table. If you create at least one policy for a table, this policy will control access to rows of this table for all users (including users for whom the policy is not specified explicitly).
For example, if you create the policy:
CREATE ROW POLICY policy_1 ON test_table USING x=1 TO mary, john;then:
-
the
maryandjohnusers will only be able to see rows for which thex=1condition is met; -
all other users will not have access to rows of the
test_tabletable at all.
To fix this behavior and grant permissions for other users to still have access to all rows, add one more row policy for these users. For example, create the following policy for the admin user:
CREATE ROW POLICY allow_admin_filter ON test_table USING 1 TO admin;Modify a row policy
The ALTER ROW POLICY query allows you to change settings of an existing row policy:
ALTER [ROW] POLICY [IF EXISTS] <policy_name1> [ON CLUSTER <cluster_name1>] ON [<db_name1>.]<table_name1> [RENAME TO <new_policy_name1>]
        [, <policy_name2> [ON CLUSTER <cluster_name2>] ON [<db_name2>.]<table_name2> [RENAME TO <new_policy_name2>] ...]
    [AS {PERMISSIVE | RESTRICTIVE}]
    [FOR SELECT]
    [USING {<filter_condition> | NONE}][,...]
[TO {<user_name> | <role_name> [,...] | ALL | ALL EXCEPT <user_name> | <role_name> [,...]}];Settings profile
Settings profile is a set of settings with the specified values and/or constraints to be assigned to a user account (or role) and applied when the user logs in.
Create a settings profile
Use the CREATE SETTINGS PROFILE query to create a settings profile. Query syntax:
CREATE SETTINGS PROFILE [IF NOT EXISTS | OR REPLACE] <profile_name1> [ON CLUSTER <cluster_name1>]
    [, <profile_name2> [ON CLUSTER <cluster_name2>] ...]
    [SETTINGS <setting_name> [= <value>] [MIN [=] <min_value>] [MAX [=] <max_value>] [CONST|READONLY|WRITABLE|CHANGEABLE_IN_READONLY] | INHERIT '<profile_name>'] [,...]
    [TO {<role_name> | <user_name> | CURRENT_USER} [,...] | ALL | ALL EXCEPT {<role_name> | <user_name> | CURRENT_USER} [,...]];
Example
Create the my_profile settings profile that contains a value of the max_memory_usage parameter and prohibits changing this variable, and assign this profile to the john user. You can do this in several ways.
-
Run the
CREATE SETTINGS PROFILEquery and use theTOclause to specify the user:CREATE SETTINGS PROFILE my_profile SETTINGS max_memory_usage = 100000000 READONLY TO john; -
Create a settings profile and then assign it to a user with the
SETTINGS PROFILEclause in theCREATE USERorALTER USERquery:CREATE SETTINGS PROFILE my_profile SETTINGS max_memory_usage = 100000000 READONLY;ALTER USER john SETTINGS PROFILE my_profile; -
You can also assign a settings profile to a role, which in turn is assigned to a user:
ALTER ROLE reader SETTINGS PROFILE my_profile;
Modify a settings profile
If you need to change an existing settings profile, use the ALTER SETTINGS PROFILE query:
ALTER SETTINGS PROFILE [IF EXISTS] TO <profile_name1> [ON CLUSTER <cluster_name1>] [RENAME TO <new_profile_name1>]
    [, <profile_name2> [ON CLUSTER <cluster_name2>] [RENAME TO <new_profile_name2>] ...]
    [SETTINGS <setting_name> [= <value>] [MIN [=] <min_value>] [MAX [=] <max_value>] [CONST|READONLY|WRITABLE|CHANGEABLE_IN_READONLY] | INHERIT '<profile_name>'] [,...]
[TO {<role_name> | <user_name> | CURRENT_USER} [,...] | ALL | ALL EXCEPT {<role_name> | <user_name> | CURRENT_USER} [,...]];Quota
A quota is assigned to a user or role and allows you to track or limit the use of resources (for example, the number of processed queries, read rows and bytes) over the specified period of time for that user or role:
-
Track parameter values over a period of time. During the specified time interval, parameter values are counted after each query execution and stored in the server log. When the interval ends, all collected values are reset and the quota calculation starts again for the next interval.
-
Limit parameter values per a period of time. If a parameter value exceeds its limit during the specified time interval, an exception is thrown with information about which parameter value has been exceeded, and when a new interval starts to allow sending queries again. For one quota, you can set multiple intervals with different restrictions.
When processing a distributed query, ADQM takes into account resources spent on all remote servers. Accumulated values are stored on the server initiated the query (if the user goes to another server, the quota will "start over" there).
Create a quota
Use the CREATE QUOTA query to create a quota and assign it to a user or role:
CREATE QUOTA [IF NOT EXISTS | OR REPLACE] <quota_name> [ON CLUSTER <cluster_name>]
    [KEYED BY {user_name | ip_address | client_key | client_key, user_name | client_key, ip_address} | NOT KEYED]
    [FOR [RANDOMIZED] INTERVAL <number> {second | minute | hour | day | week | month | quarter | year}
        {MAX { {queries | query_selects | query_inserts | errors | result_rows | result_bytes | read_rows | read_bytes | execution_time} = <max_value> } [,...] |
        NO LIMITS | TRACKING ONLY} [,...]]
[TO {<role_name> | <user_name> | CURRENT_USER} [,...] | ALL | ALL EXCEPT {<role_name> | <user_name> | CURRENT_USER} [,...]];KEYED BY |
Key that specifies how the quota should be shared. Resource accounting for each quota key value is maintained independently. In other words, connections with the same quota and key share the same amount of resources. The |
FOR INTERVAL |
Time interval per which the use of resources is tracked or limited. You can restrict values of the following parameters that correspond to the system.quotas_usage table fields: |
TO |
Users/roles for which the quota is allocated |
Example
Create a quota that limits the maximum number of queries the john user can execute — no more than 10 queries every 15 minutes:
CREATE QUOTA my_quota FOR INTERVAL 15 minute MAX queries = 10 TO john;If the user has executed 10 queries before 15 minutes have elapsed from the start of the quota, the following message will appear on the eleventh query execution:
Code: 201. DB::Exception: Received from localhost:9000.
DB::Exception: Quota for user `john` for 900s has been exceeded: queries = 11/10.
Interval will end at 2023-02-08 07:15:00. Name of quota template: `my_quota`. (QUOTA_EXCEEDED)
Modify a quota
You can change the settings of an existing quota with the ALTER QUOTA query:
ALTER QUOTA [IF EXISTS] <quota_name> [ON CLUSTER <cluster_name>]
    [RENAME TO <new_quota_name>]
    [KEYED BY {user_name | ip_address | client_key | client_key, user_name | client_key, ip_address} | NOT KEYED]
    [FOR [RANDOMIZED] INTERVAL <number> {second | minute | hour | day | week | month | quarter | year}
        {MAX { {queries | query_selects | query_inserts | errors | result_rows | result_bytes | read_rows | read_bytes | execution_time} = <max_value> } [,...] |
        NO LIMITS | TRACKING ONLY} [,...]]
    [TO {<role_name> | <user_name> | CURRENT_USER} [,...] | ALL | ALL EXCEPT {<role_name> | <user_name> | CURRENT_USER} [,...]];
View information on quotas
-
List of quota names. Execute the
SHOW QUOTASquery to get names of all existing quotas:SHOW QUOTAS; -
Current settings of a quota. You can obtain quota parameters (with changes, if the
ALTER QUOTAquery was executed for the quota) in one of the following ways:-
use the
SHOW CREATE QUOTAquery:SHOW CREATE QUOTA [<quota_name> [, ...] | CURRENT]; -
read values from the system.quotas system table:
SELECT * FROM system.quotas [WHERE name = '<quota_name>'] [FORMAT <format_name>];
-
-
Information about quota usage. To find out how many resources have been used and how much is left, you can:
-
run the
SHOW QUOTAquery (quota usage by all users or by the current user):SHOW [CURRENT] QUOTA; -
read values from the system.quotas_usage system table (quota usage by all users):
SELECT * FROM system.quotas_usage [WHERE quota_name = '<quota_name>'] [FORMAT <format_name>]; -
read values from the system.quota_usage system table (quota usage by the current user):
SELECT * FROM system.quota_usage [WHERE quota_name = '<quota_name>'] [FORMAT <format_name>];
-