

Enable SSL encryption
ADP supports SSL encryption of incoming traffic for all services in an ADP cluster. To use this feature in an ADP cluster, it is necessary to obtain certificates and enable SSL via ADCM UI.
For test purposes, you can use self-signed certificates. Their creation is described in the Create self-signed SSL certificates section.
When SSL is enabled, all services of an ADP cluster, including an external Etcd cluster, use SSL encryption and the HTTPS protocol instead of HTTP.
|
IMPORTANT
|
Enable SSL via ADCM
To enable SSL, follow the steps below:
-
On the Clusters page, run the Manage SSL action.
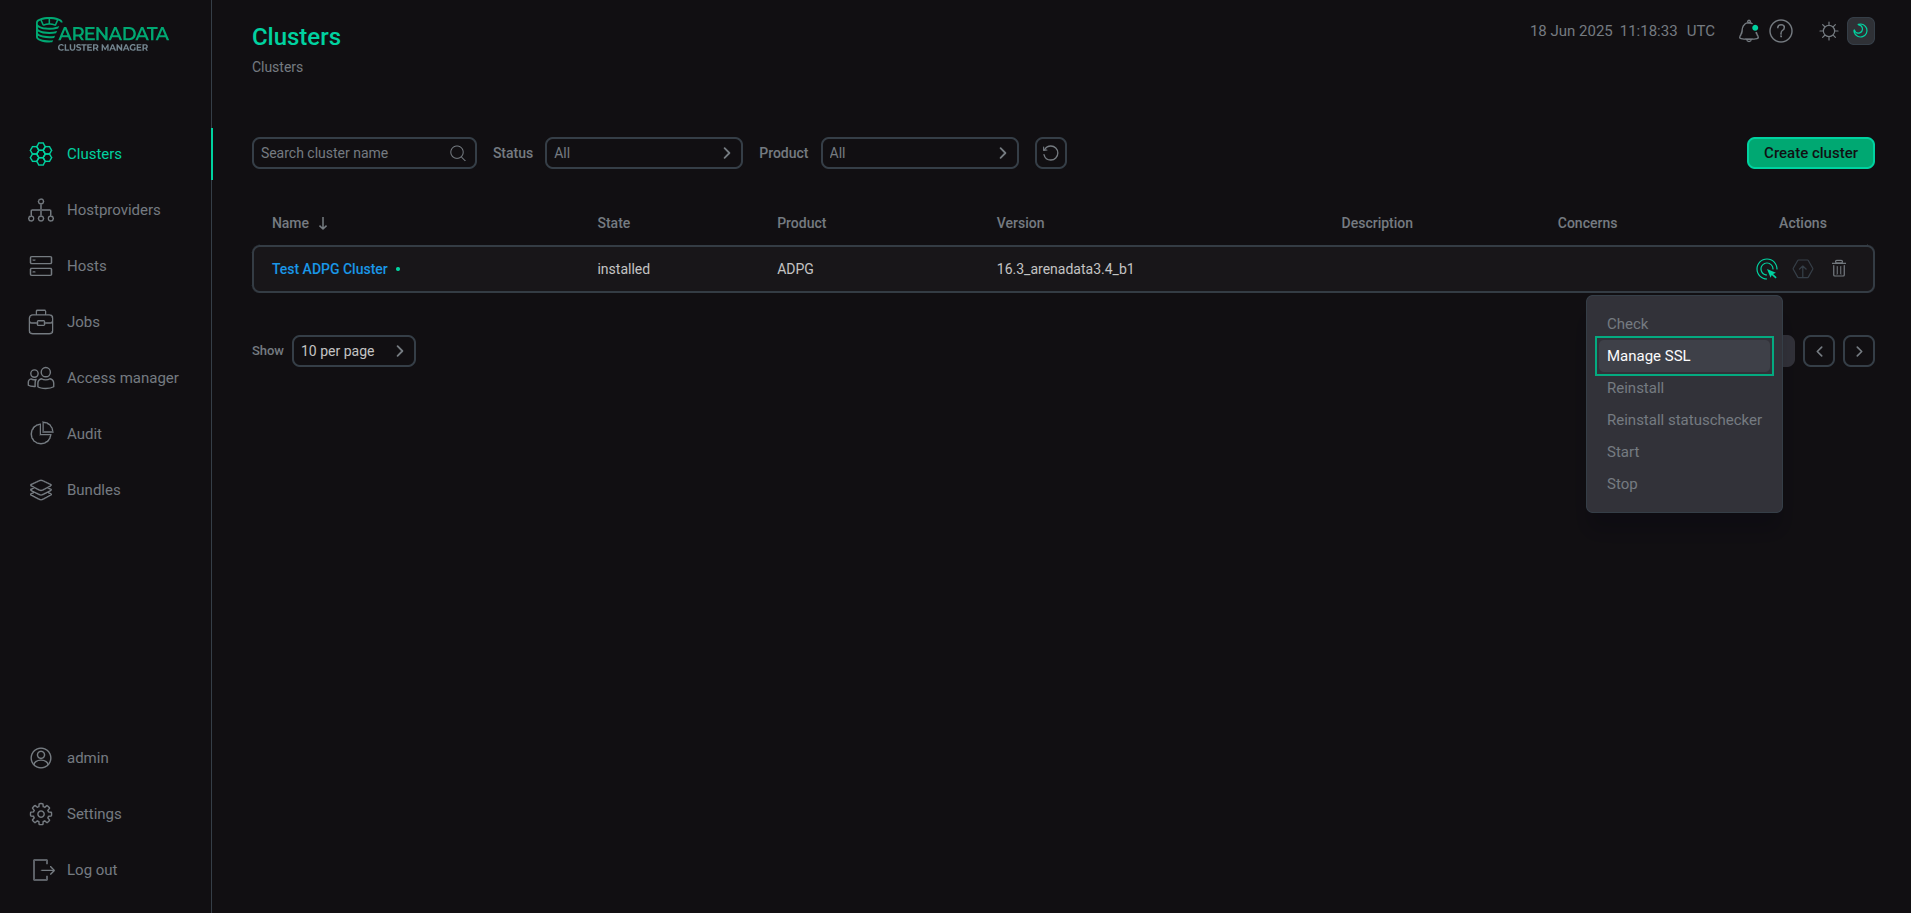 Run the "Manage SSL" action
 -
In the window that opens, switch on the Enable SSL toggle button.
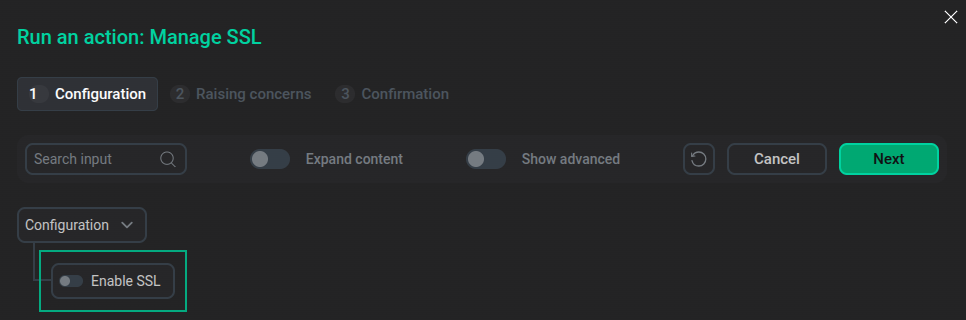 The "Run an action: Manage SSL" window
SSL settings are displayed below the Enable SSL toggle button. Parameters highlighted in red are required.
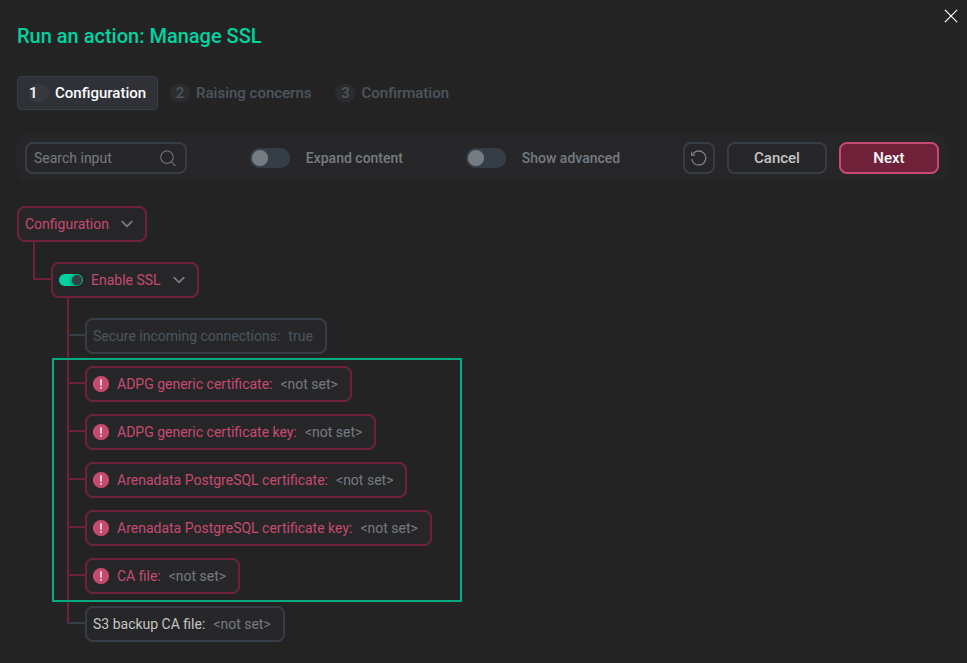 SSL parameters
 -
Specify SSL settings according to your environment. All paths to certificates and keys should be specified as absolute. It is not recommended to save certificate and key files in the ADPG data directory (the default path is /pg_data1/adpg16), since the data directory name will be changed during a major upgrade.
The table below lists SSL parameters available for editing. The File location column describes on which cluster hosts a file should be stored at the specified path.
Parameter Description File location ADP generic certificate
Path to a generic ADP certificate that meets the requirements for all ADP services
On each cluster host where the ADPG, Balancer, Etcd, or Monitoring services are installed
ADP generic certificate key
Path to a generic ADP certificate key that meets the requirements for all ADP services. The permissions for the generic ADPG certificate key file should be set to
0644— the file owner has read and write permissions, while the group and other users can only read the file. If the Balancer service (HAProxy) is used, the file name should end with the following extension: .crt.key, for example, generic.crt.keyOn each cluster host where the ADPG, Balancer, Etcd, or Monitoring services are installed
Arenadata PostgreSQL certificate
Path to a separate certificate with special rights for the ADPG service (PostgreSQL). It is equivalent to the
ssl_cert_fileparameter from the postgresql.conf file. Thepostgresuser should have the owner permissions on the certificate fileOn each cluster host where the ADPG service is installed
Arenadata PostgreSQL certificate key
Path to a key of a separate certificate for the ADPG service (PostgreSQL). It is equivalent to the
ssl_key_fileparameter from the postgresql.conf file. The permissions for the PostgreSQL certificate key file should be set to0600— the file owner has read and write permissions, while the group and other users do not have any permissions. Thepostgresuser should have the owner permissions on the certificate key fileOn each cluster host where the ADPG service is installed
CA file
Path to a file containing the SSL server certificate authority (CA) for verifying incoming connections
On each cluster host where the ADPG, Balancer, Etcd, or Monitoring services are installed
S3 backup CA file
Path to a file containing the SSL server certificate authority (CA) for an S3 repository storage. Specify this parameter if backups are created in an S3 storage
On each cluster host where the ADPG service is installed
-
After you specify SSL parameters, click Next.
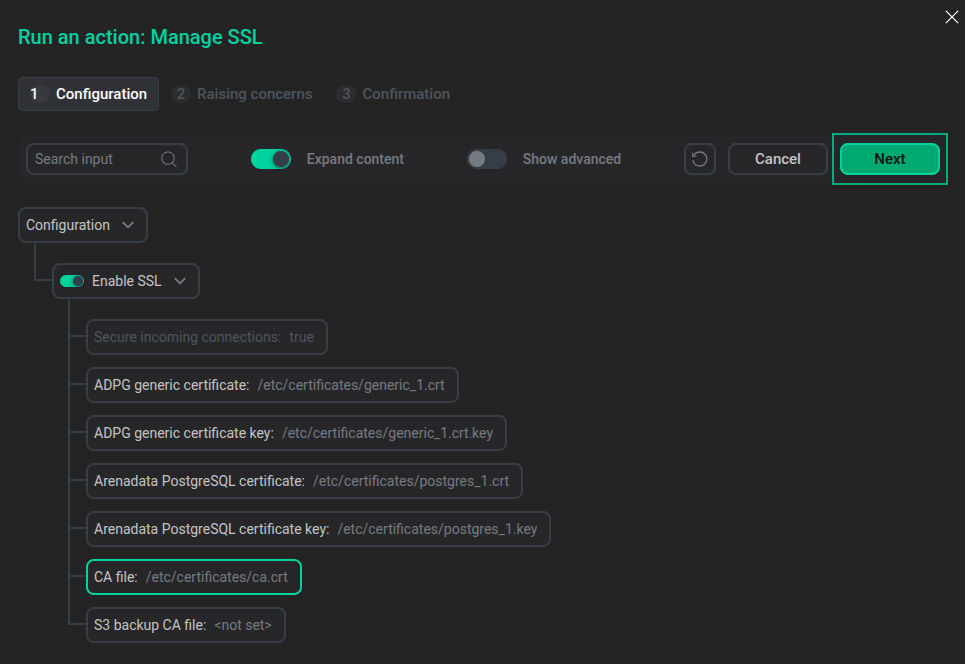 The "Run an action: Manage SSL" window with specified SSL settings
 -
On the Confirmation tab, click Run to execute the Manage SSL action.
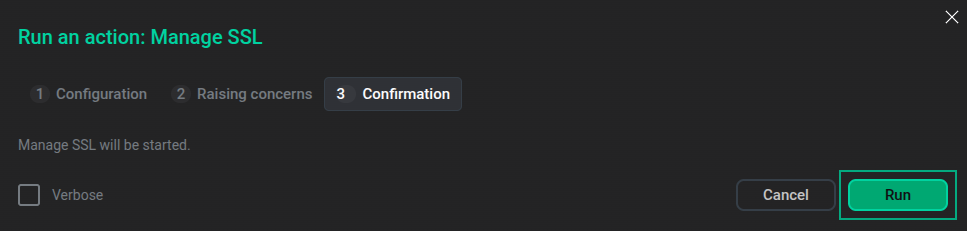 The "Confirmation" tab
After the Manage SSL action is executed, SSL settings are added to the SSL configuration section of the ADPG service configuration. It contains the following fields:
-
Enable SSL — a read-only field that is set to
trueif SSL is enabled. -
postgresql.conf — a read-only field that contains SSL settings.
-
PG_HBA — a field to specify rules for SSL connections.
-
-
After the Manage SSL action is finished, it is necessary to allow SSL connections for the ADPG server. To do this, open the Primary configuration tab of the ADPG service, expand the SSL configuration section in the Configuration tree, and click the PG_HBA field.
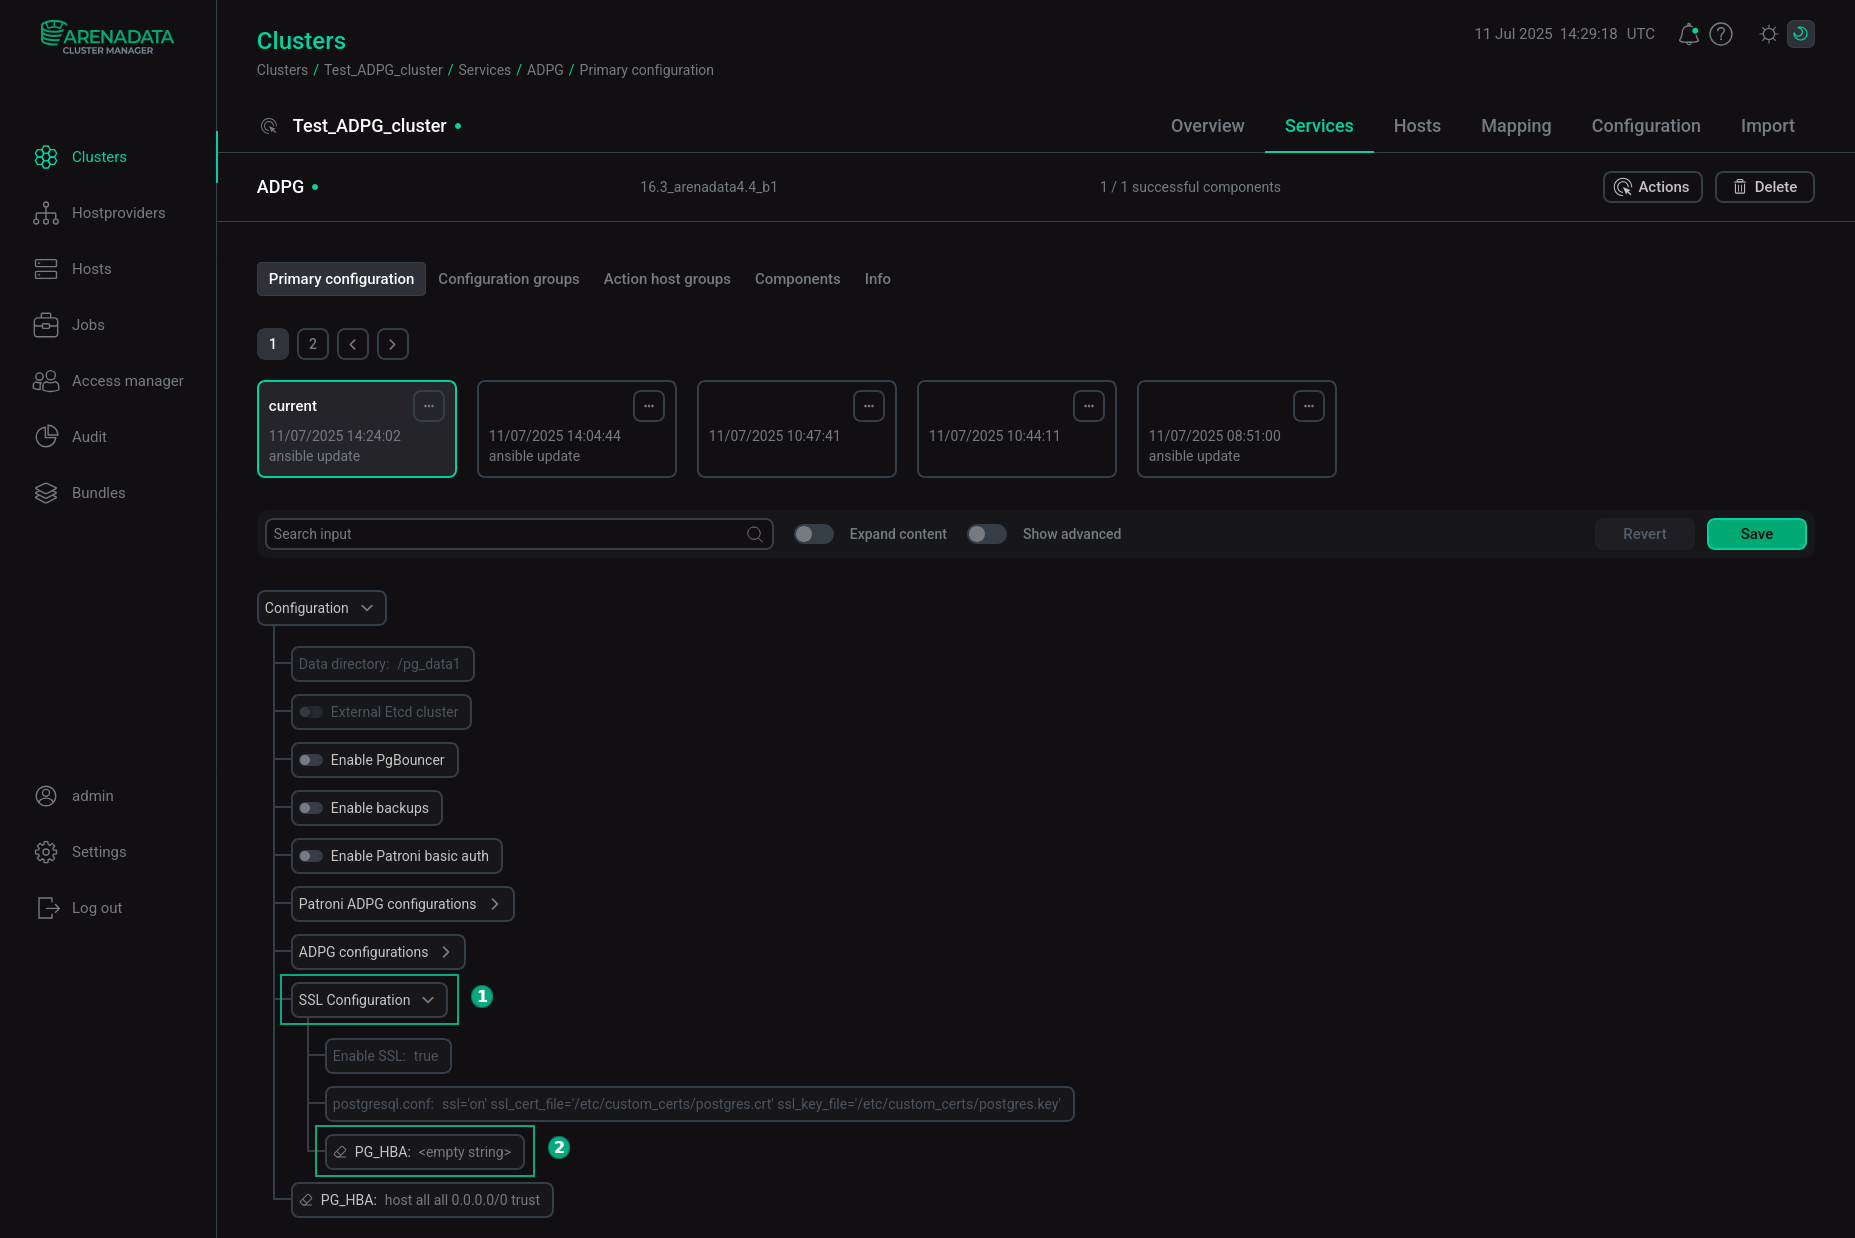 The "SSL configuration" section
Add a new record to allow SSL connections to the PG_HBA field of the SSL configuration section. For example:
hostssl all all 0.0.0.0/0 cert
 The "PG_HBA" field
This record allows all users (
all) to utilize SSL connections (hostssl) to all databases (all) from all IPv4 addresses (0.0.0.0/0). Authentication is performed using SSL client certificates (cert). See Overview of PG_HBA configuration for details. -
Save the changes and run the Reconfigure & Restart action to apply new settings.
|
NOTE
The Manage SSL action overrides SSL parameters specified in the postgresql.conf and Custom postgresql.conf sections located in the Configuration tree of the ADPG service. Note that if you disable SSL using the Manage SSL action, the SSL settings from these sections will be applied. To avoid ambiguous situations, it is recommended to remove the SSL settings from these sections before you enable SSL via the Manage SSL cluster action. |
Use client certificates
For a hostssl record in the PG_HBA section, you can add the clientcert=verify-ca or clientcert=verify-full authentication option.
For a hostssl entry with clientcert=verify-ca, the server verifies that the client’s certificate is signed by one of the trusted certificate authorities. If clientcert=verify-full is used, the server does not only verify the certificate chain, but it also checks whether the user name or its mapping matches cn (Common Name) of the provided certificate. Note that certificate chain validation is always ensured when the cert authentication method is used.
Intermediate certificates that chain up to existing root certificates can also be included in the file specified by the CA file parameter if you wish to avoid storing them on clients. Certificate Revocation List (CRL) entries are also checked if the ssl_crl_file or ssl_crl_dir parameter is set via ADCM in the postgresql.conf field.
The clientcert authentication option is available for all authentication methods, but only in PG_HBA records specified as hostssl. When clientcert is not used, the server verifies the client certificate against its CA file only if a client certificate is provided and the CA is configured.
There are two approaches to ensuring that users provide a certificate when logging in:
-
Use the
certauthentication method forhostsslentries in the PG_HBA records. The certificate will be used for both authentication and security of the SSL connection. See Certificate authentication. (It is not necessary to specify anyclientcertoptions explicitly when using thecertauthentication method.) In this case,cn(Common Name) provided in the certificate is checked against the user name or an applicable mapping. -
Use any authentication method for
hostsslentries with the verification of client certificates by setting theclientcertauthentication option toverify-caorverify-full. The former option only enforces that the certificate is valid, while the latter also ensures thatcn(Common Name) in the certificate matches the user name or an applicable mapping.
For information on how to set up certificates on the client, see SSL Support.
Create self-signed SSL certificates
Instead of CA certificates, you can also create your own self-signed certificates, which can be used for development and testing, but are not recommended for use in a production environment.
Generate certificates for an ADP cluster
The test ADP cluster for which the certificates will be created includes three hosts with the services described in the table below.
| Host | IP | FQDN | Service |
|---|---|---|---|
eek-host-1 |
10.92.41.39 |
eek-host-1.ru-central1.internal |
ADPG |
eek-host-2 |
10.92.40.233 |
eek-host-2.ru-central1.internal |
Etcd |
eek-host-3 |
10.92.41.52 |
eek-host-3.ru-central1.internal |
Balancer |
In this example, certificates are created on the eek-host-1 host with the ADPG service.
For the ADP cluster, it is necessary to generate SSL certificates with the SAN (Subject Alternative Names) option. To do this, create a temporary configuration file with the alt_names section corresponding to the cluster topology. For example, you can place it at the following path: /tmp/san.cnf. For the test ADP cluster, the file looks like this:
[ req ]
default_bits = 4096
prompt = no
default_md = sha256
x509_extensions = v3_req
distinguished_name = dn

[ dn ]
C = RU
L = Moscow
O = Arenadata
CN = Common Name

[ v3_req ]
basicConstraints = CA:FALSE
keyUsage = digitalSignature, keyEncipherment
extendedKeyUsage = serverAuth, clientAuth
subjectAltName = @alt_names

[ alt_names ]
IP.1 = 127.0.0.1
IP.2 = 10.92.41.39
IP.3 = 10.92.40.233
IP.4 = 10.92.41.52
DNS.1 = localhost
DNS.2 = eek-host-1.ru-central1.internal
DNS.3 = eek-host-2.ru-central1.internal
DNS.4 = eek-host-3.ru-central1.internal
DNS.5 = eek-host-1
DNS.6 = eek-host-2
DNS.7 = eek-host-3
To generate SSL certificates, follow the steps below:
-
Create a directory where you want to generate certificates, grant full permissions, and navigate to it. For example:
$ sudo mkdir /etc/certificates $ sudo chmod 777 /etc/certificates $ cd /etc/certificates -
To create a server certificate that clients can verify, create a certificate request (Certificate Signing Request, CSR) and public/private key files. Replace
<root.yourdomain.com>with the desired value, for example,CN=eek-host-1. It is also necessary to set the required permissions:$ openssl req -new -nodes -text -out root.csr -keyout root.crt.key -subj "/CN=<root.yourdomain.com>" $ chmod 600 root.crt.key -
Sign the request with the key to create a root certificate authority. Note that the path to the openssl.cnf file (/etc/ssl/openssl.cnf) can be different in your environment:
$ openssl x509 -req -in root.csr -text -days 3650 \
  -extfile /etc/ssl/openssl.cnf -extensions v3_ca \
  -signkey root.crt.key -out root.crt
Set the required permissions for the root.crt file:
$ chmod 644 root.crtAs a result, the following files are created: root.crt, root.csr, and root.crt.key.
-
Create the ADP generic certificate signed by the new root certificate authority and grant the required permissions:
$ openssl req -new -nodes -text -out generic_1.csr -keyout generic_1.crt.key -subj "/CN=$(hostname)" -config /tmp/san.cnf
$ chmod 644 generic_1.crt.key
$ openssl x509 -req -in generic_1.csr -text -days 365 -CA root.crt -CAkey root.crt.key -CAcreateserial -out generic_1.crt -extfile /tmp/san.cnf -extensions v3_req
The following files are created: generic_1.csr, generic_1.crt, and generic_1.crt.key.
-
Create the Arenadata PostgreSQL certificate signed by the new root certificate authority:
$ openssl req -new -nodes -text -out postgres_1.csr -keyout postgres_1.crt.key -subj "/CN=$(hostname)" -config /tmp/san.cnf
$ openssl x509 -req -in postgres_1.csr -text -days 365 -CA root.crt -CAkey root.crt.key -CAcreateserial -out postgres_1.crt -extfile /tmp/san.cnf -extensions v3_req
The following files are created: postgres_1.csr, postgres_1.crt, and postgres_1.crt.key.
-
Verify certificates. The commands below should return
OK:$ openssl verify -CAfile root.crt generic_1.crt $ openssl verify -CAfile root.crt postgres_1.crt -
Change permissions for Arenadata PostgreSQL certificate and its key:
$ sudo chown postgres:postgres /etc/certificates/postgres_1.* -
Copy the CA certificates to the standard directory for storing CA certificates (by default, this directory is /usr/local/share/ca-certificates/) and run the
update-ca-certificatescommand to update the trusted certificate cache. This step should be performed on all hosts with the ADPG service after you copy the certificates to them.$ sudo cp generic_1.crt /usr/local/share/ca-certificates/ $ sudo cp postgres_1.crt /usr/local/share/ca-certificates/ $ sudo cp root.crt /usr/local/share/ca-certificates/ $ sudo update-ca-certificates -
Copy the generic_1.crt and generic_1.crt.key files to other cluster hosts using the same path (in this example — /etc/certificates) and set the permissions for generic_1.crt.key:
$ sudo chmod 644 generic_1.crt.keyPaths to these files should also be specified in the ADP generic certificate key and ADP generic certificate parameters of the Manage SSL action.
-
Copy the postgres_1.crt and postgres_1.crt.key files to other cluster hosts with the ADPG service using the same path (in this example, /etc/certificates) and set the permissions for the files:
sudo chown postgres:postgres /etc/certificates/postgres_1.*Paths to these files should also be specified in the Arenadata PostgreSQL certificate and Arenadata PostgreSQL certificate key parameters of the Manage SSL action.
-
Copy the root.crt file to other cluster hosts using the same path (in this example, /etc/certificates) and set the permissions for root.crt:
$ chmod 644 root.crtThe path to this file should be specified in the CA file parameter of the Manage SSL action.
-
Perform step 5 on all hosts with the ADPG service.
Generate an SSL certificate for PostgreSQL clients
Create a certificate request (CSR) where CN is a database user name:
$ openssl req -days 3650 -new -nodes -subj "/CN=<database_username>" -keyout client.key -out client.csrFor example:
$ openssl req -new -nodes -subj "/CN=postgres" -keyout client.key -out client.csrSet the following permissions for client.key:
$ chmod 600 client.keyCreate a signed certificate for the client using the root certificate generated in the example above:
$ openssl x509 -days 3650 -req -CAcreateserial -in client.csr -CA root.crt -CAkey root.key -out client.crtRemove the CSR file:
$ rm client.csrThe client.crt and client.key files should be stored on a client. See SSL client file usage.
After certificates are generated and placed on cluster hosts, specify the required ADPG service settings via ADCM UI:
-
Add a record that allows SSL connections to the PG_HBA field of the SSL configuration section. For example:
hostssl all all 0.0.0.0/0 cert clientcert=1
-
Set the
ssl_ca_fileparameter in the postgresql.conf field of the ADPG configurations section. In this example, it has the following value:ssl_ca_file='/etc/certificates/root.crt' -
Execute the Reconfigure & Restart action of the ADPG service.