

Installation and configuration
A typical installation sequence for the CROC Cloud hostprovider includes the following steps.
Step 1. Download a hostprovider bundle
Hostprovider distributions for ADCM come in bundles. Regarding the CROC Cloud hostprovider, a bundle is a regular archive that includes a description and logic to interact with CROC Cloud. The steps for downloading a bundle are given below:
-
Go to https://network.arenadata.io/ and select Arenadata Cluster Manager.
-
Navigate to Infrastructure bundles and select the required bundle from the table.
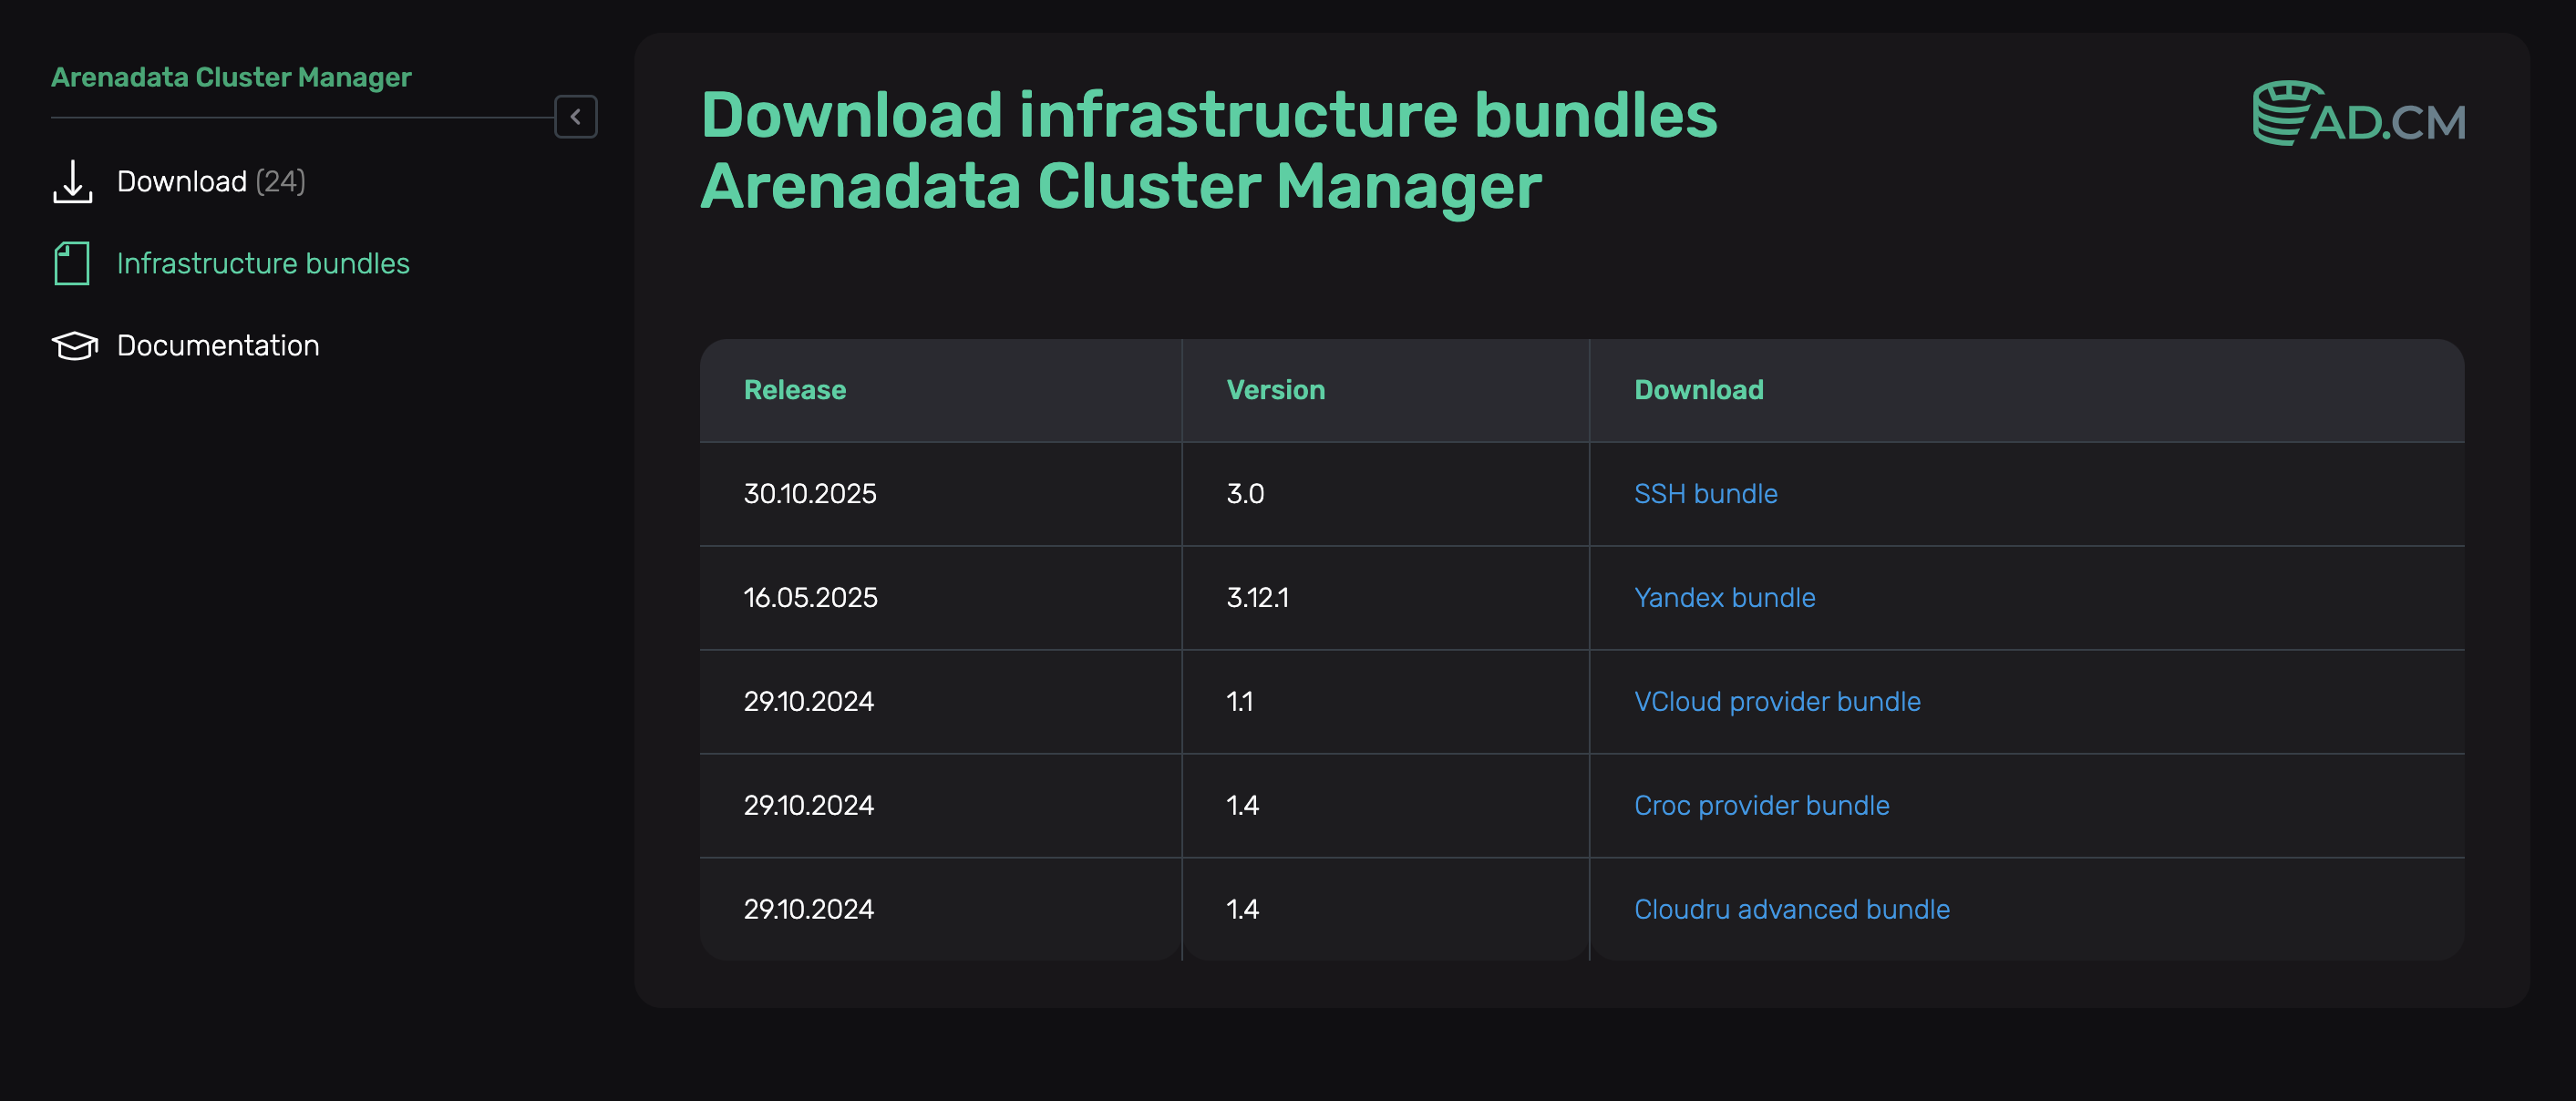 Infrastructure bundles page for ADCM
The CROC Cloud hostprovider bundle is called Croc provider bundle.
Step 2. Upload a hostprovider bundle to ADCM
To upload a bundle to ADCM, follow the steps:
-
Select the Bundles item in the left navigation menu and click Upload bundle.
-
Select a bundle in the Open File Dialog.
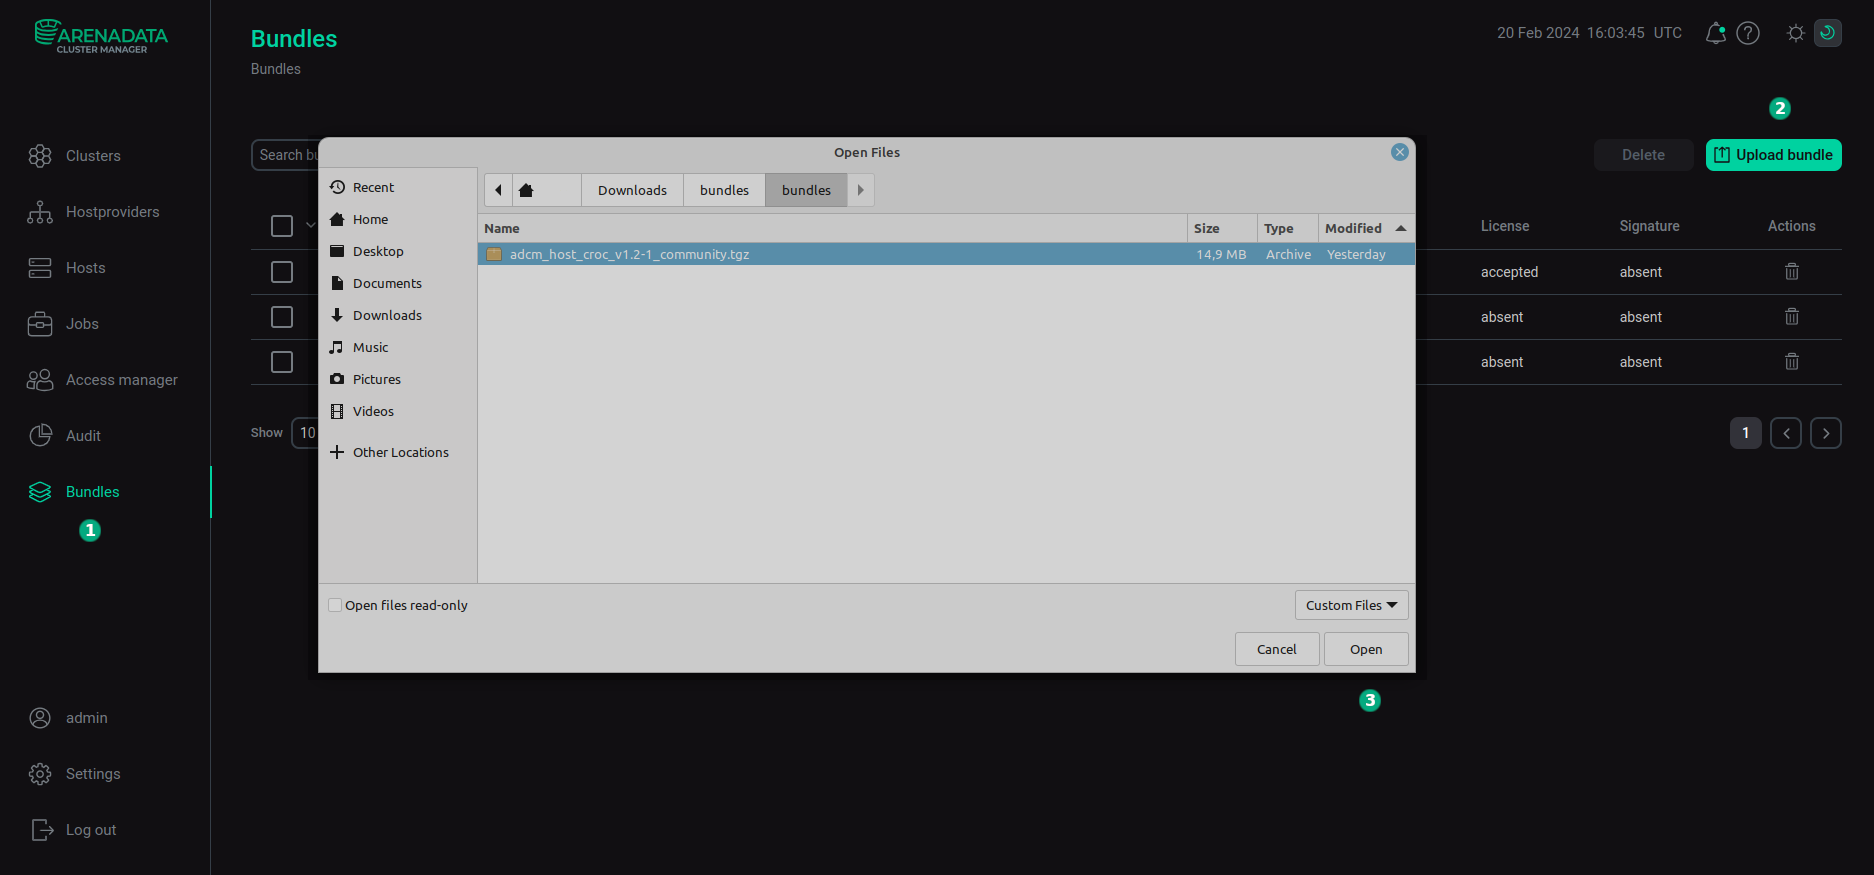 Upload a bundle
 Upload a bundle
 -
As a result of the performed actions, a bundle is displayed on the Bundles page.
 The result of successful uploading a bundle
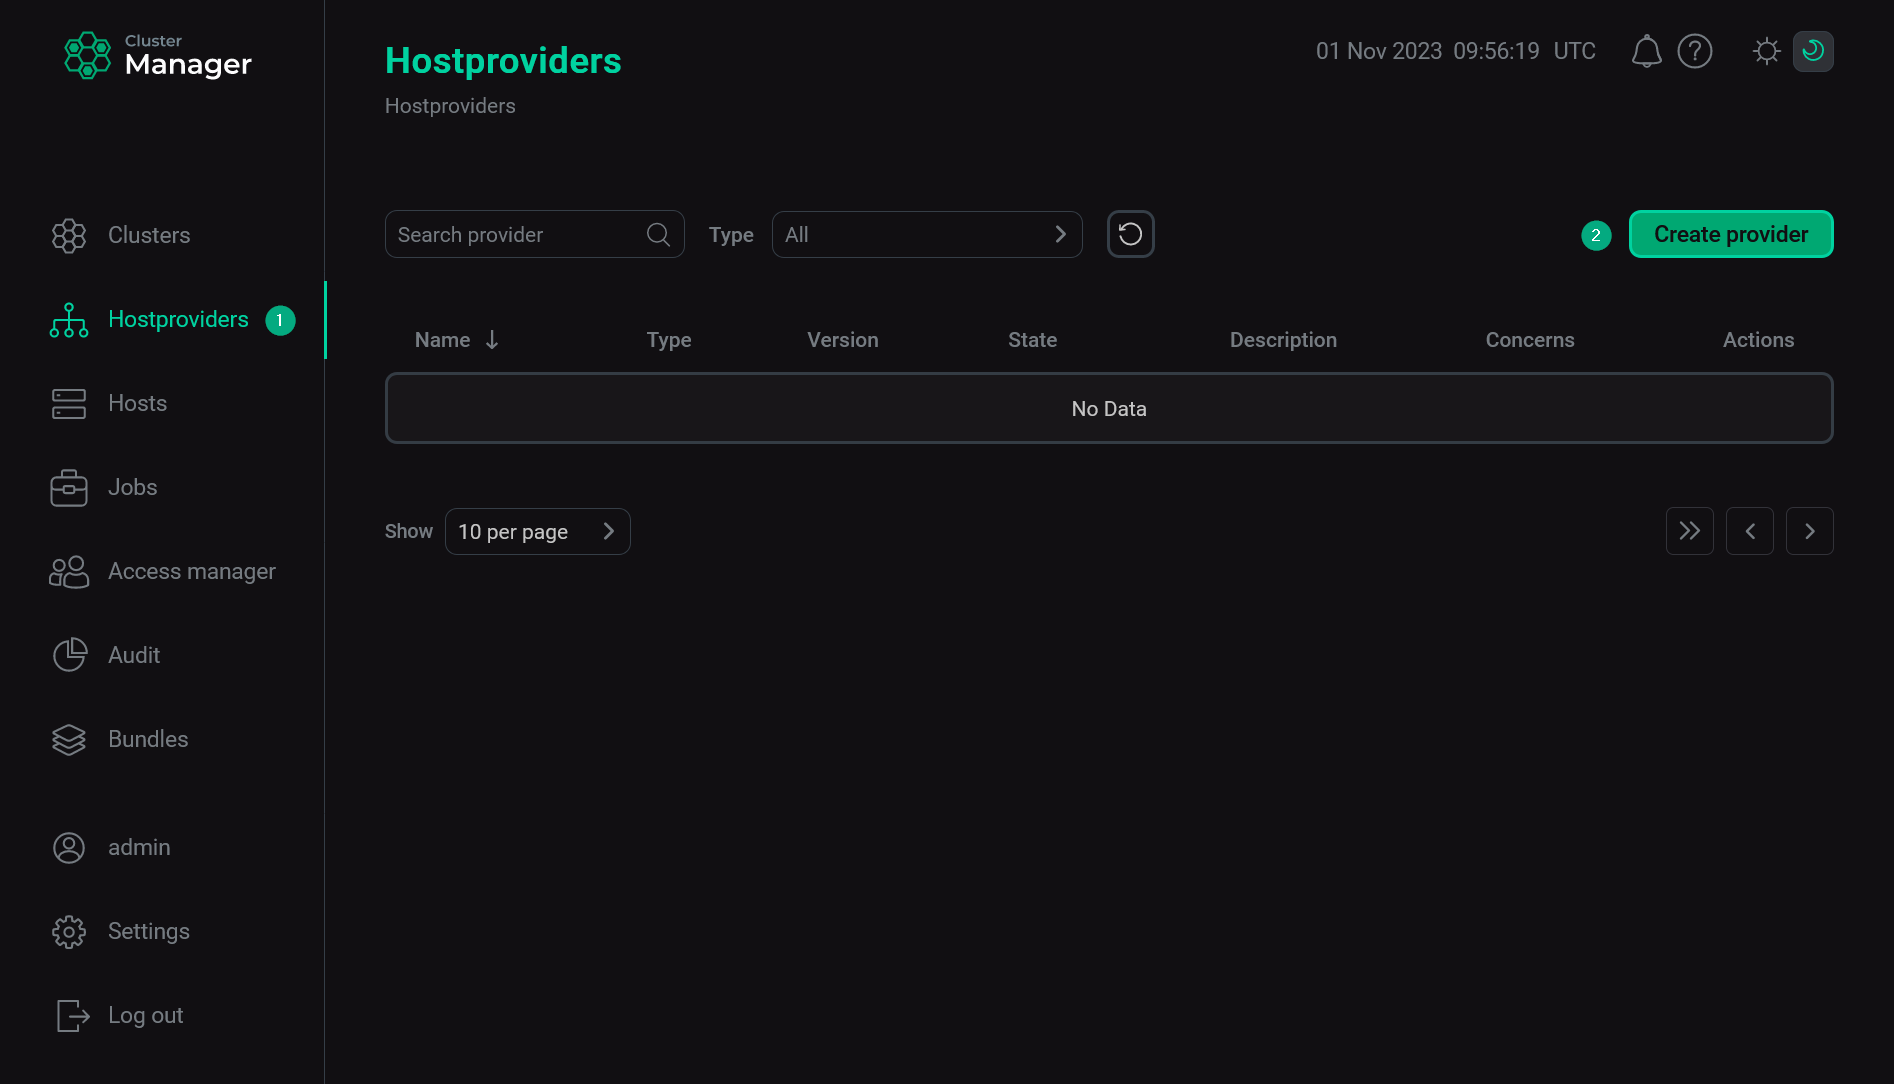
Step 3. Create a hostprovider based on the uploaded bundle
To add a new hostprovider to ADCM on the base of the uploaded bundle, follow the steps:
-
Select the Hostproviders item in the left navigation menu and click Create provider.
 Create a new hostprovider
 -
In the opened window:
-
Select an uploaded bundle in the Type field.
-
Select a bundle version in the Version field. Several versions become available in the case of different versions of the same bundle being uploaded.
-
Enter a hostprovider name in the Name field.
-
Enter a hostprovider description in the Description field if necessary.
-
Click Create.
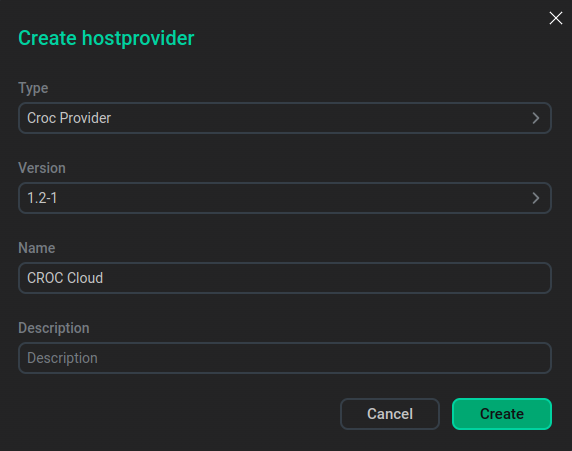 Fill in hostprovider parameters
 -
-
As a result of the performed actions, the created hostprovider is displayed on the Hostproviders page.
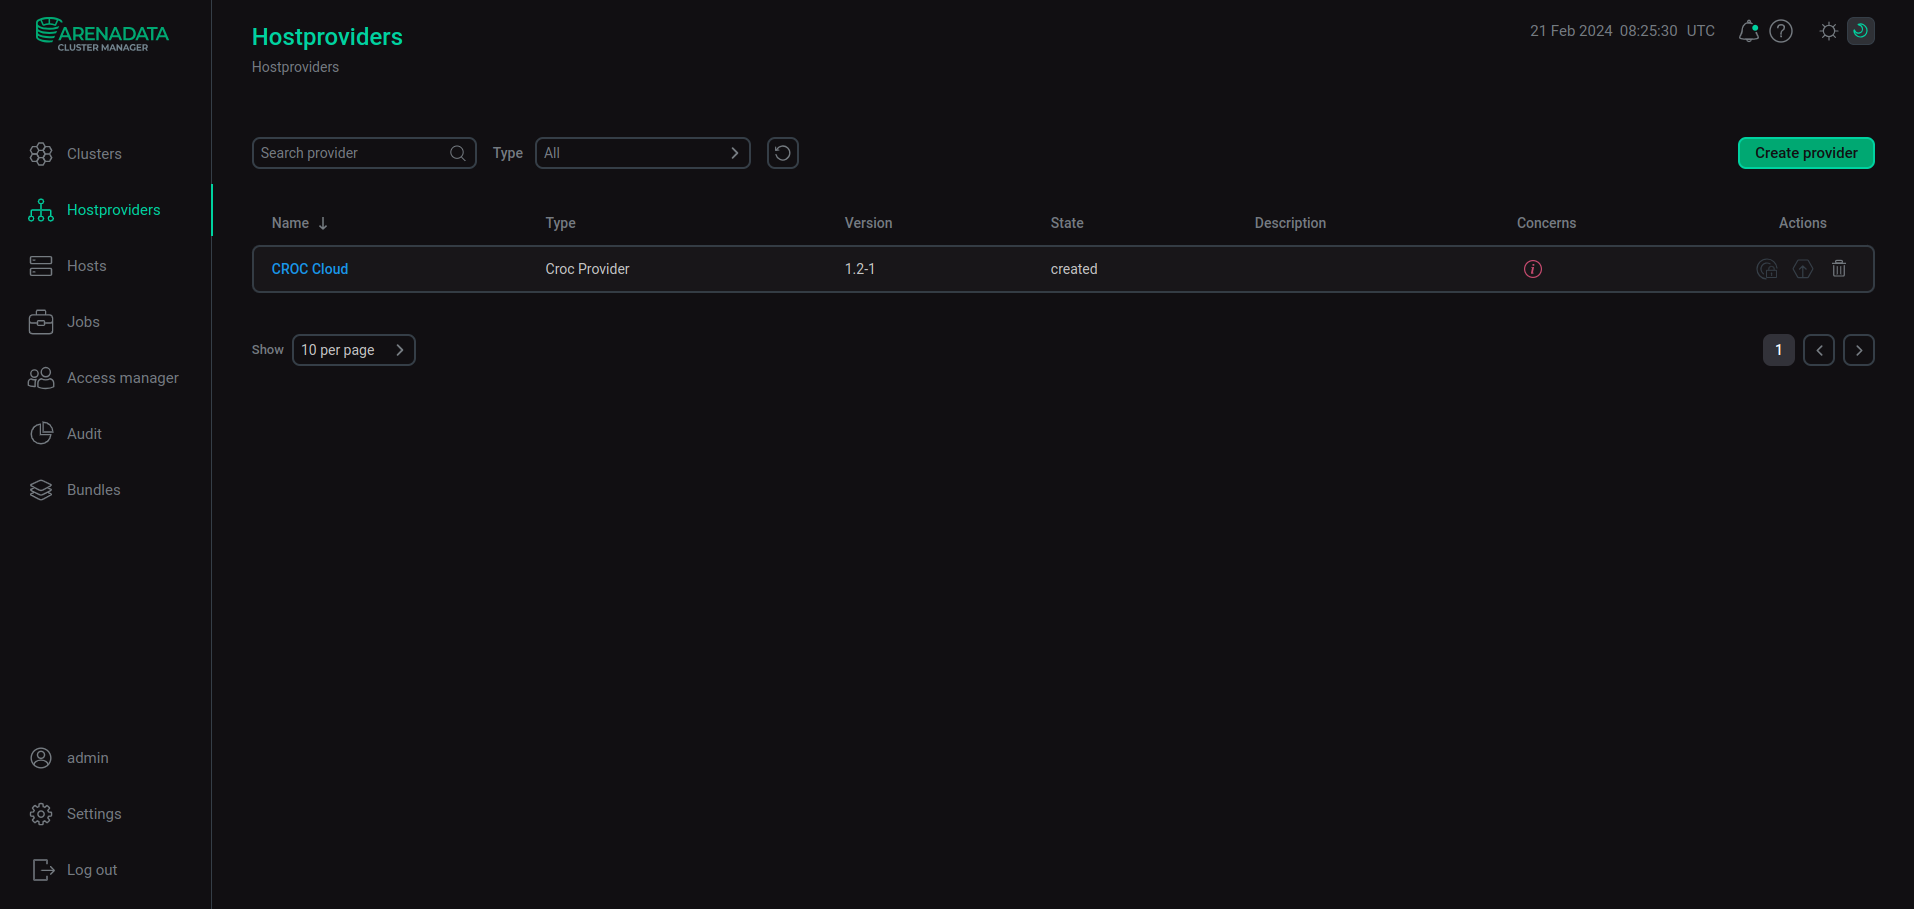 The result of adding a hostprovider successfully
Step 4. Configure a hostprovider
In order to configure the access to the cloud, follow the steps:
-
Select a hostprovider on the Hostproviders page. To do this, click a hostprovider name in the Name column. Alternatively, you can hover over the

 icon in the Concerns column and follow the link in the pop-up window that opens. The icon indicates the presence of critical errors in the current hostprovider configuration (e.g. mandatory fields).
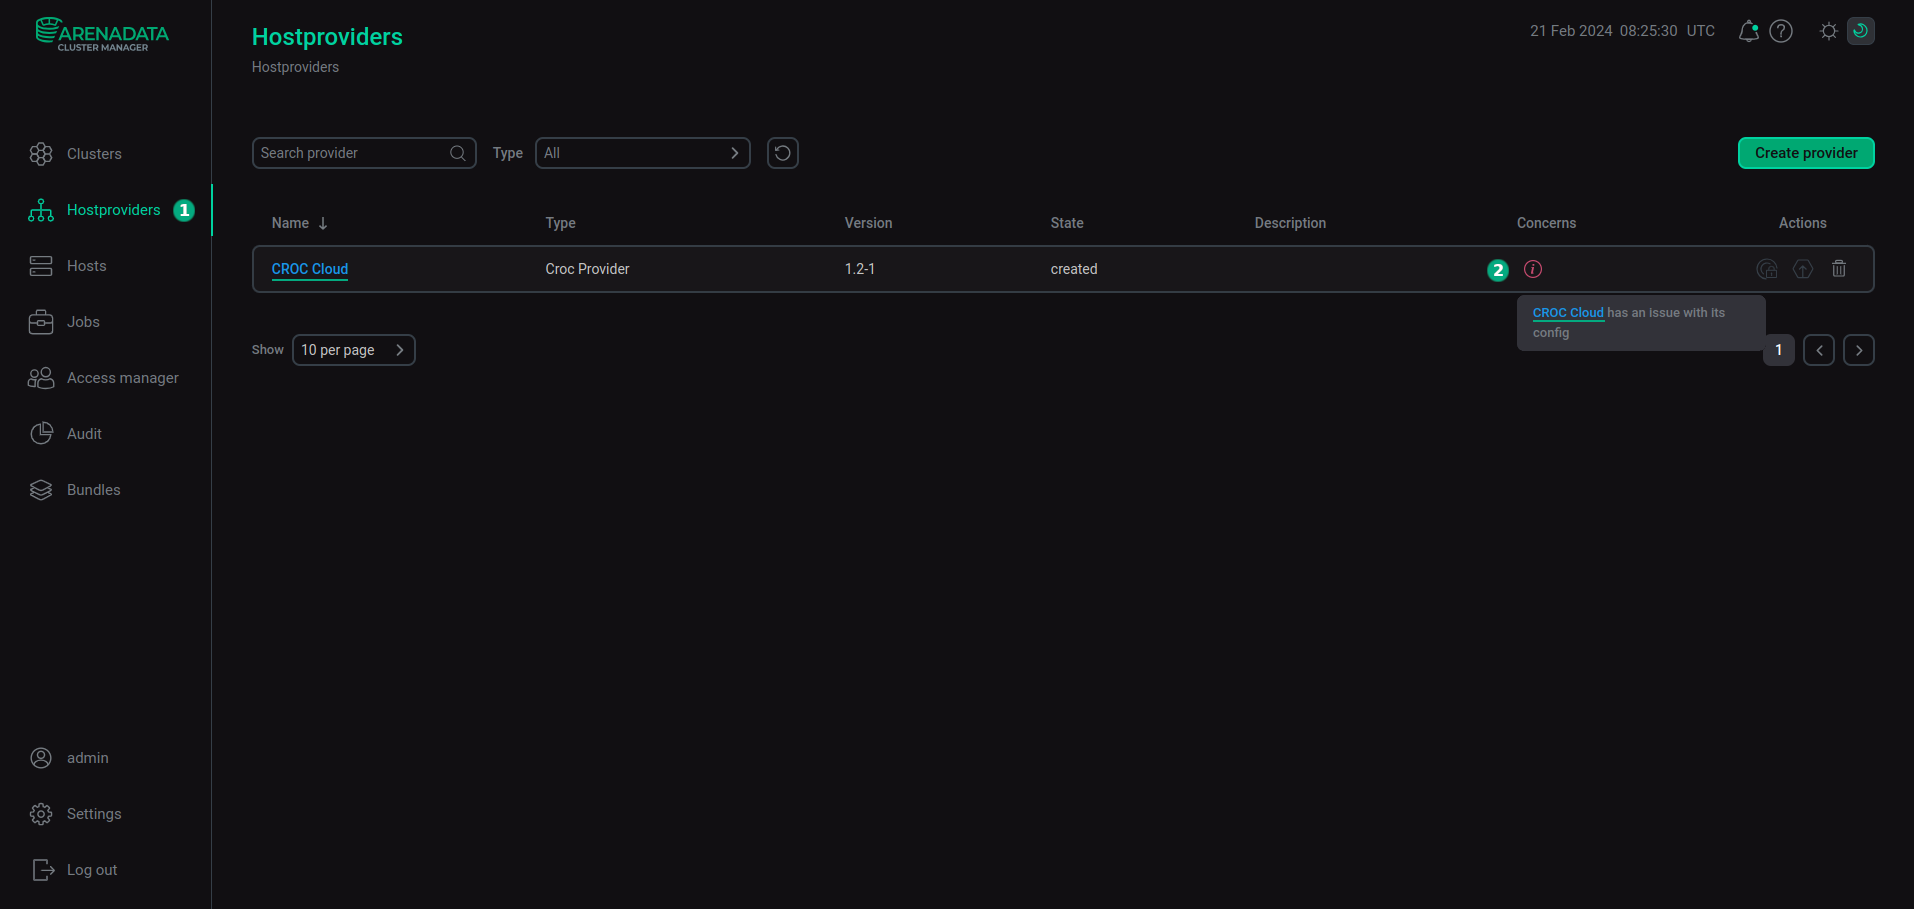 Go to configuring a hostprovider
 -
In the next window, switch on the Show advanced toggle, fill in hostprovider parameters, and click Save. The fields highlighted in red are mandatory.
 Configure a hostprovider
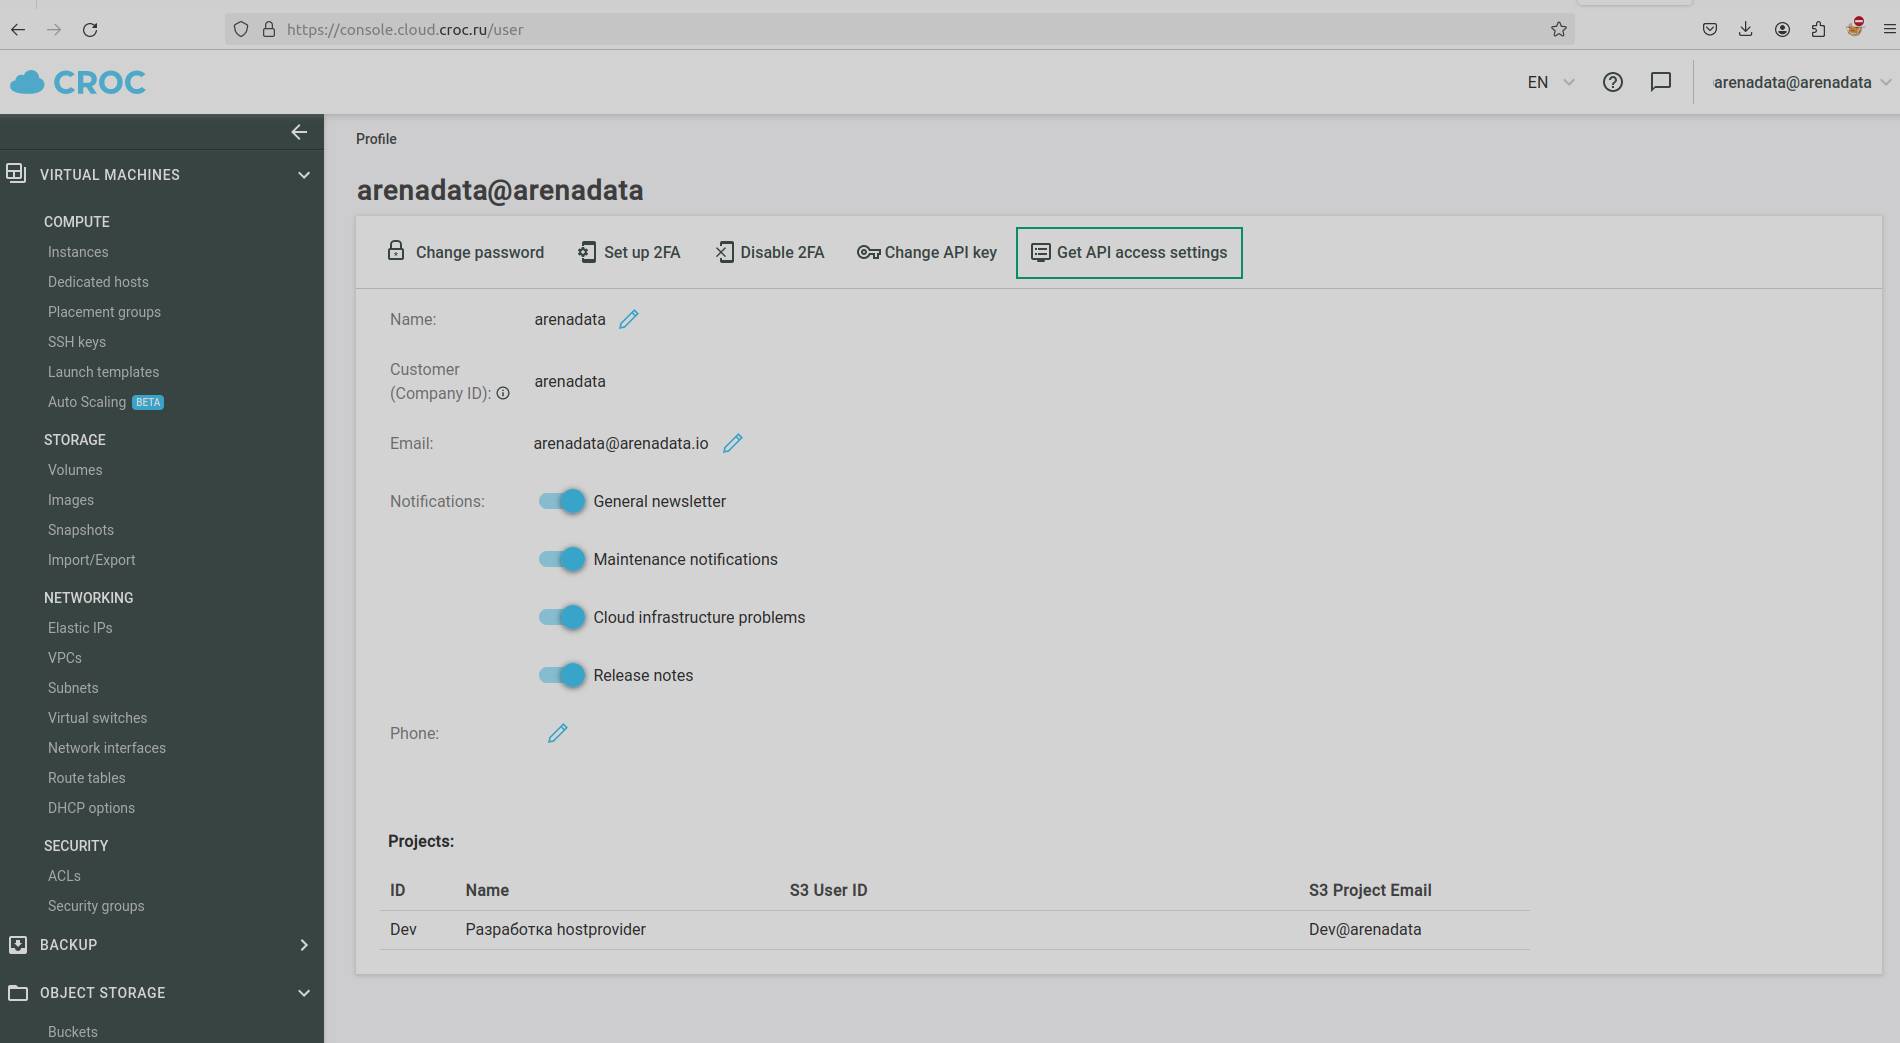
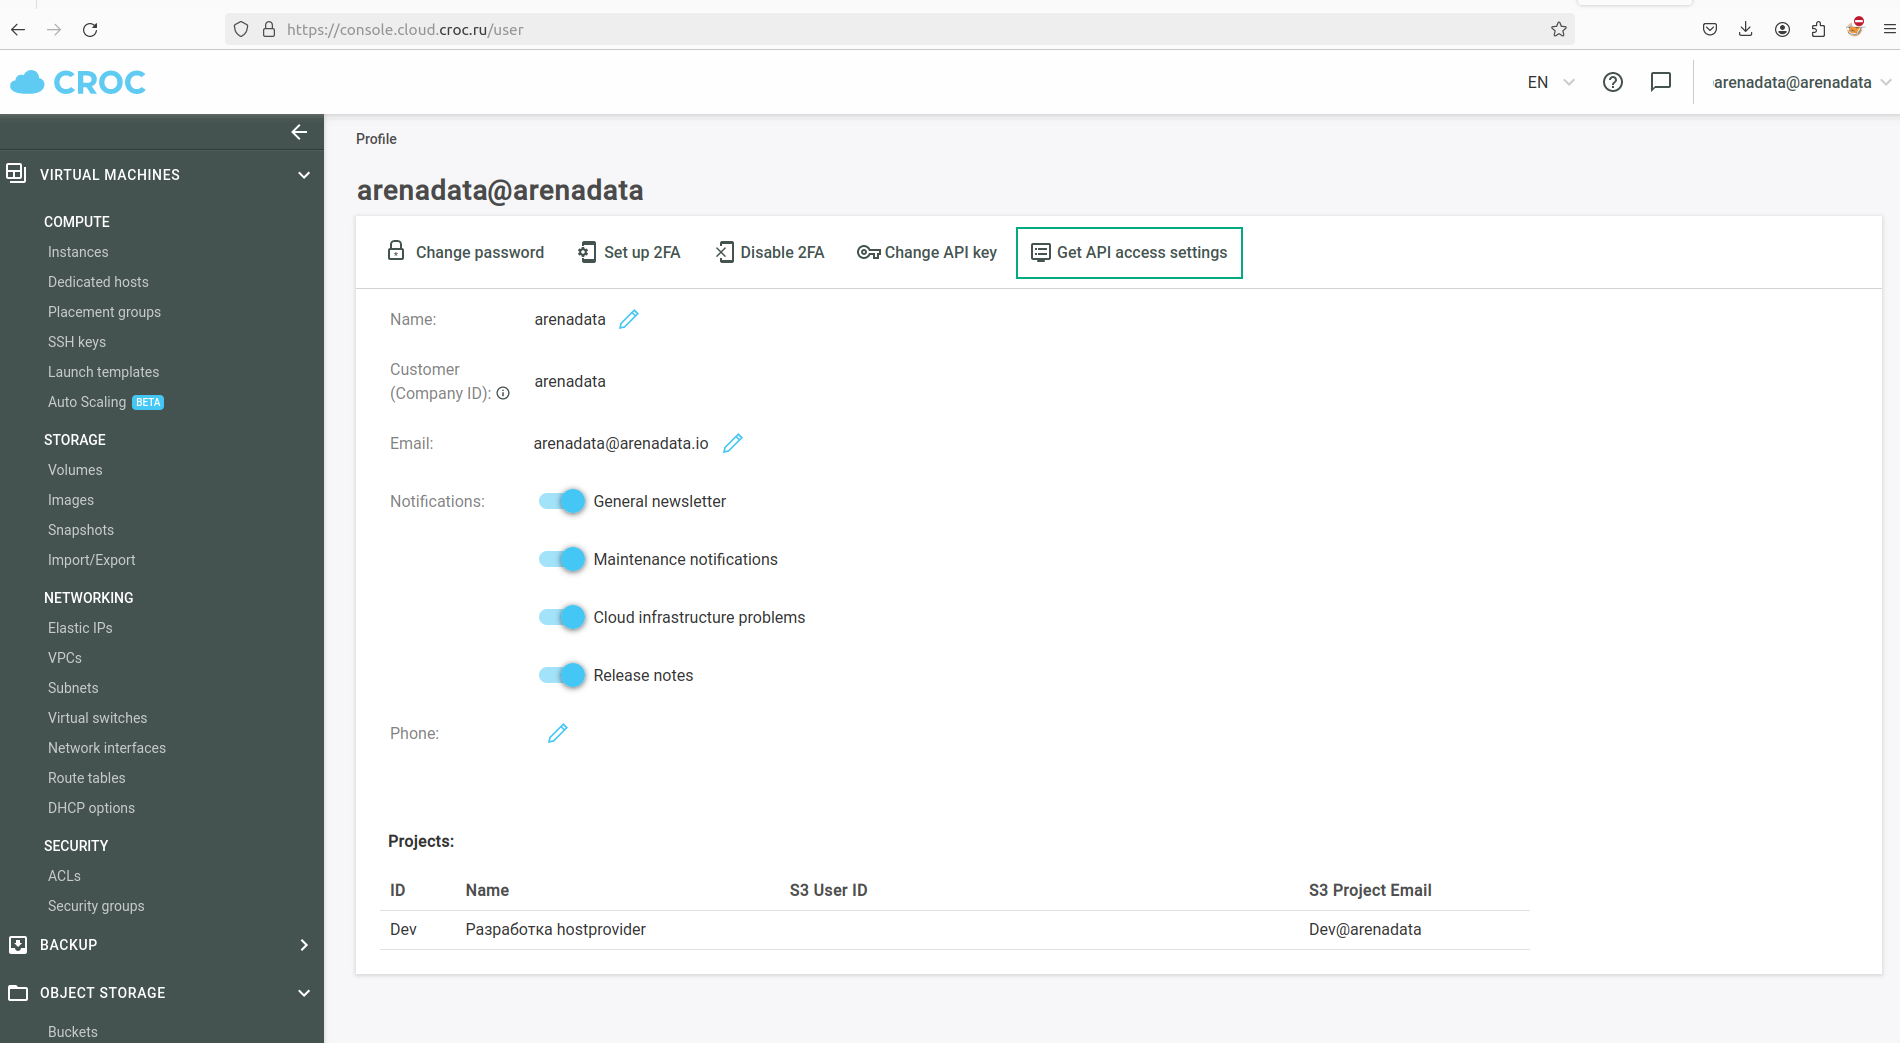
To specify CROC Cloud parameters, you need to get access settings. You can obtain them in the CROC Cloud management console. Click the user login in the top right corner, select Profile → Get API access settings. The c2rc.sh file with access settings will be loaded. You can open it as a text file and copy required parameters. For more information on the CROC Cloud settings, refer to the CROC tutorials.
The following settings are available in ADCM:
-
Croc endpoint — a URL where you can access CROC Cloud. The default value is
https://api.cloud.croc.ru. -
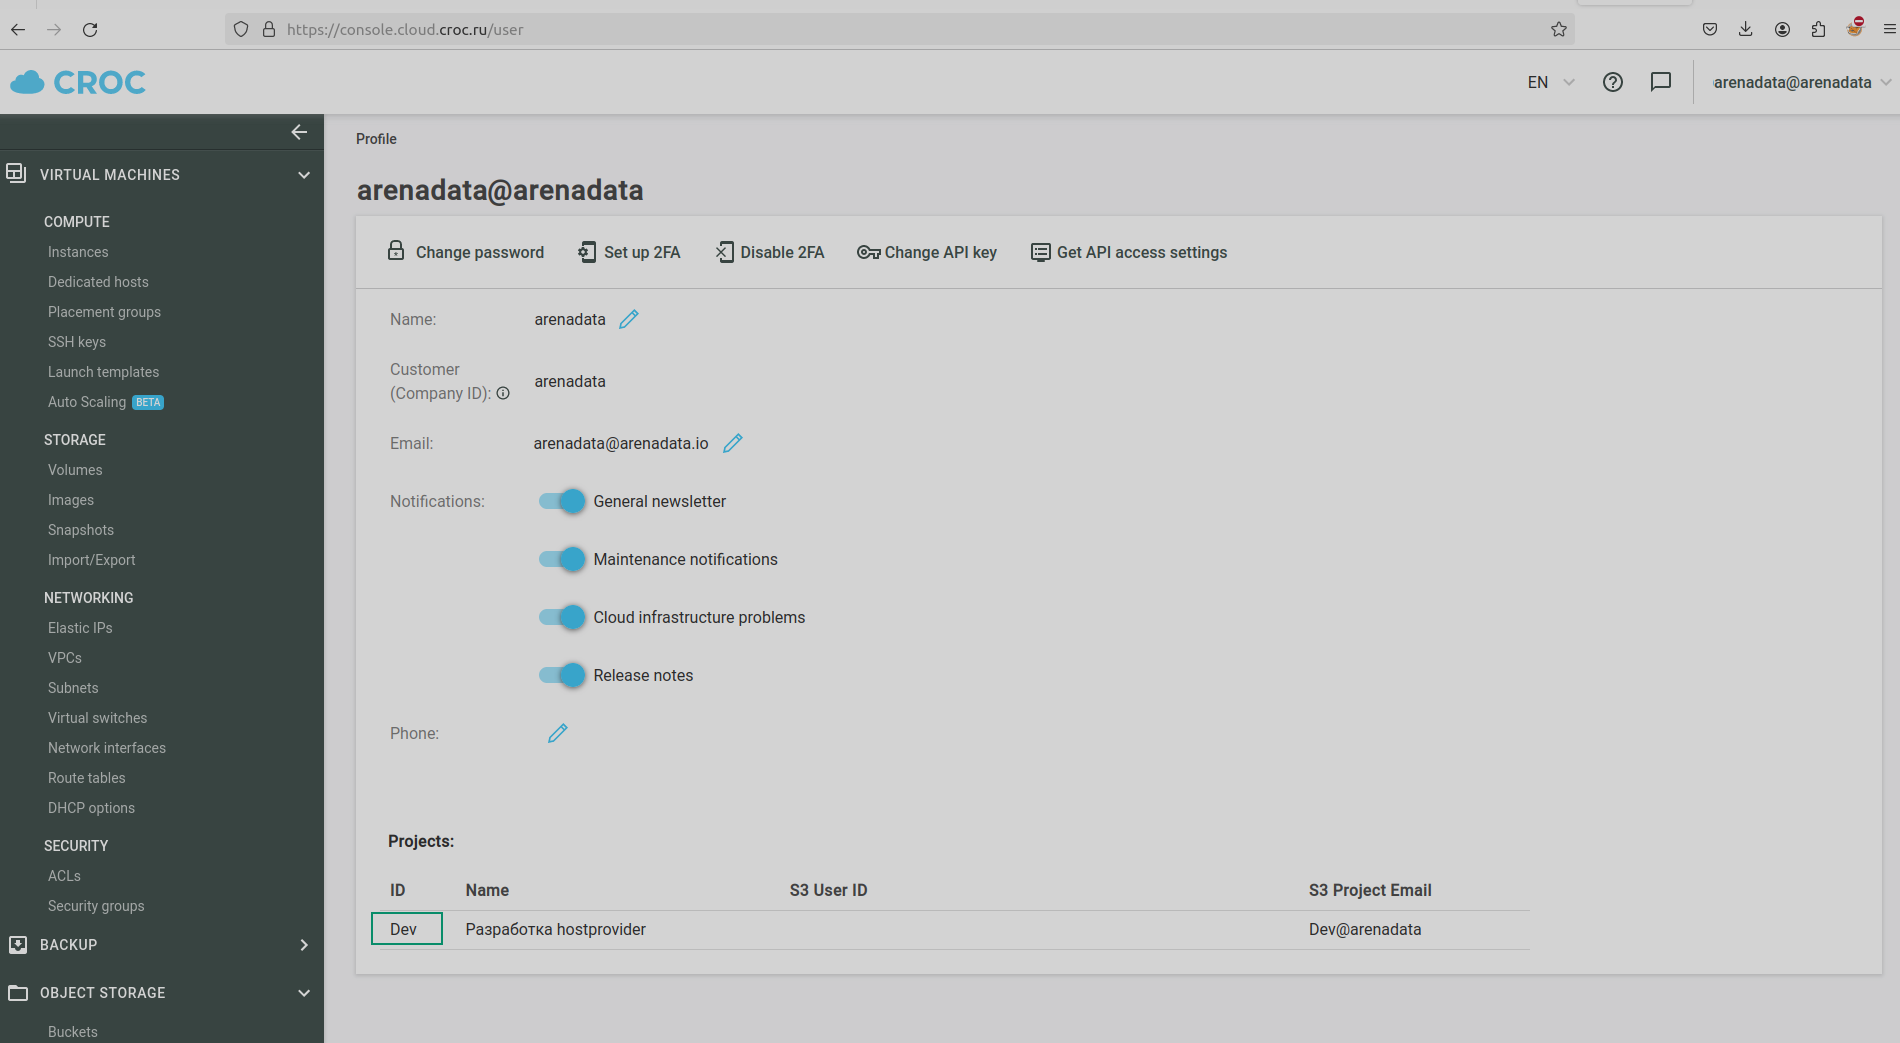
Project ID — ID of the project where you manage cloud resources. You can find the project ID in the CROC Cloud management console. Click the user login in the top right corner and select Profile. The project ID is located in the project table at the bottom of the page.
 Project ID
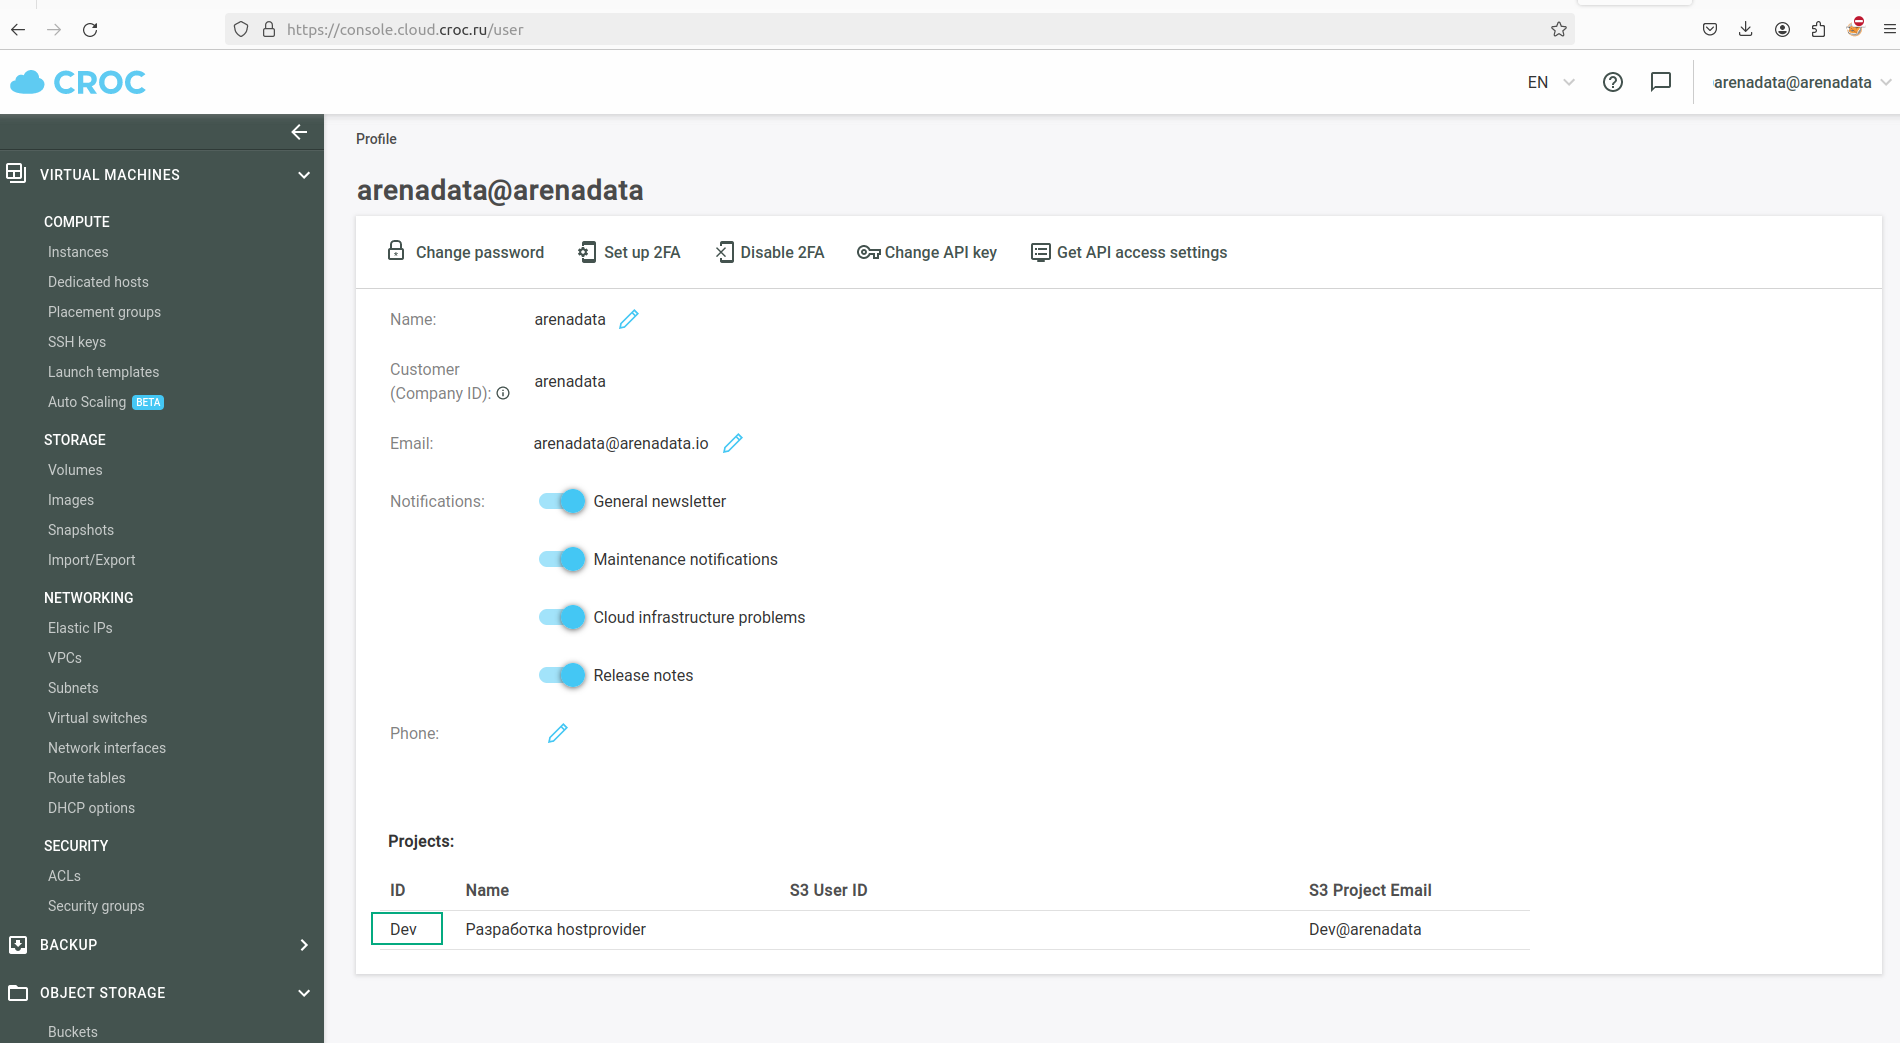 Project ID
 -
Access Key and Secret Access Key are authentication keys from the c2rc.sh file.
-
Region — an availability zone. CROC Cloud resides in three geographically distributed CROC data centers. Each data center has an infrastructure dedicated to CROC Cloud that is called an availability zone. See Availability Zones.
-
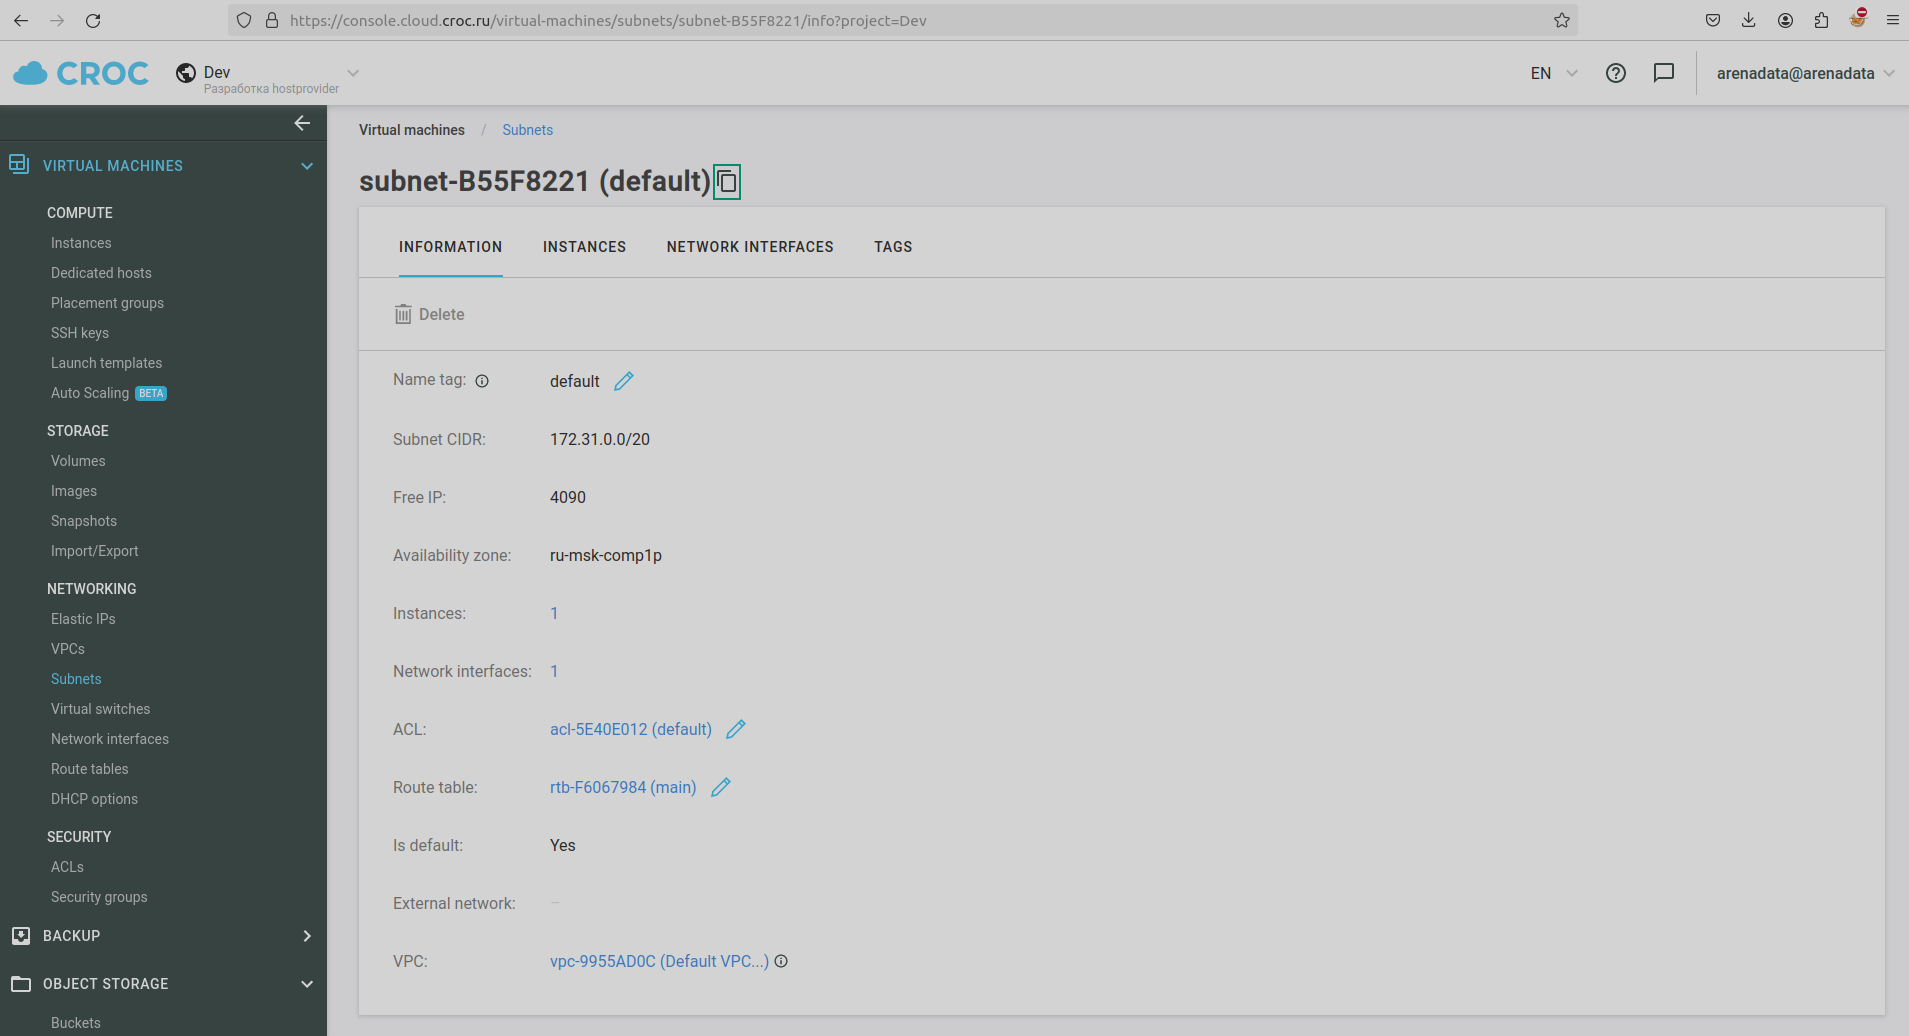
Subnet ID — the subnet ID from the CROC cloud settings. To find it, go to the Subnets page in the VIRTUAL MACHINES → NETWORKING section and click the necessary subnet.
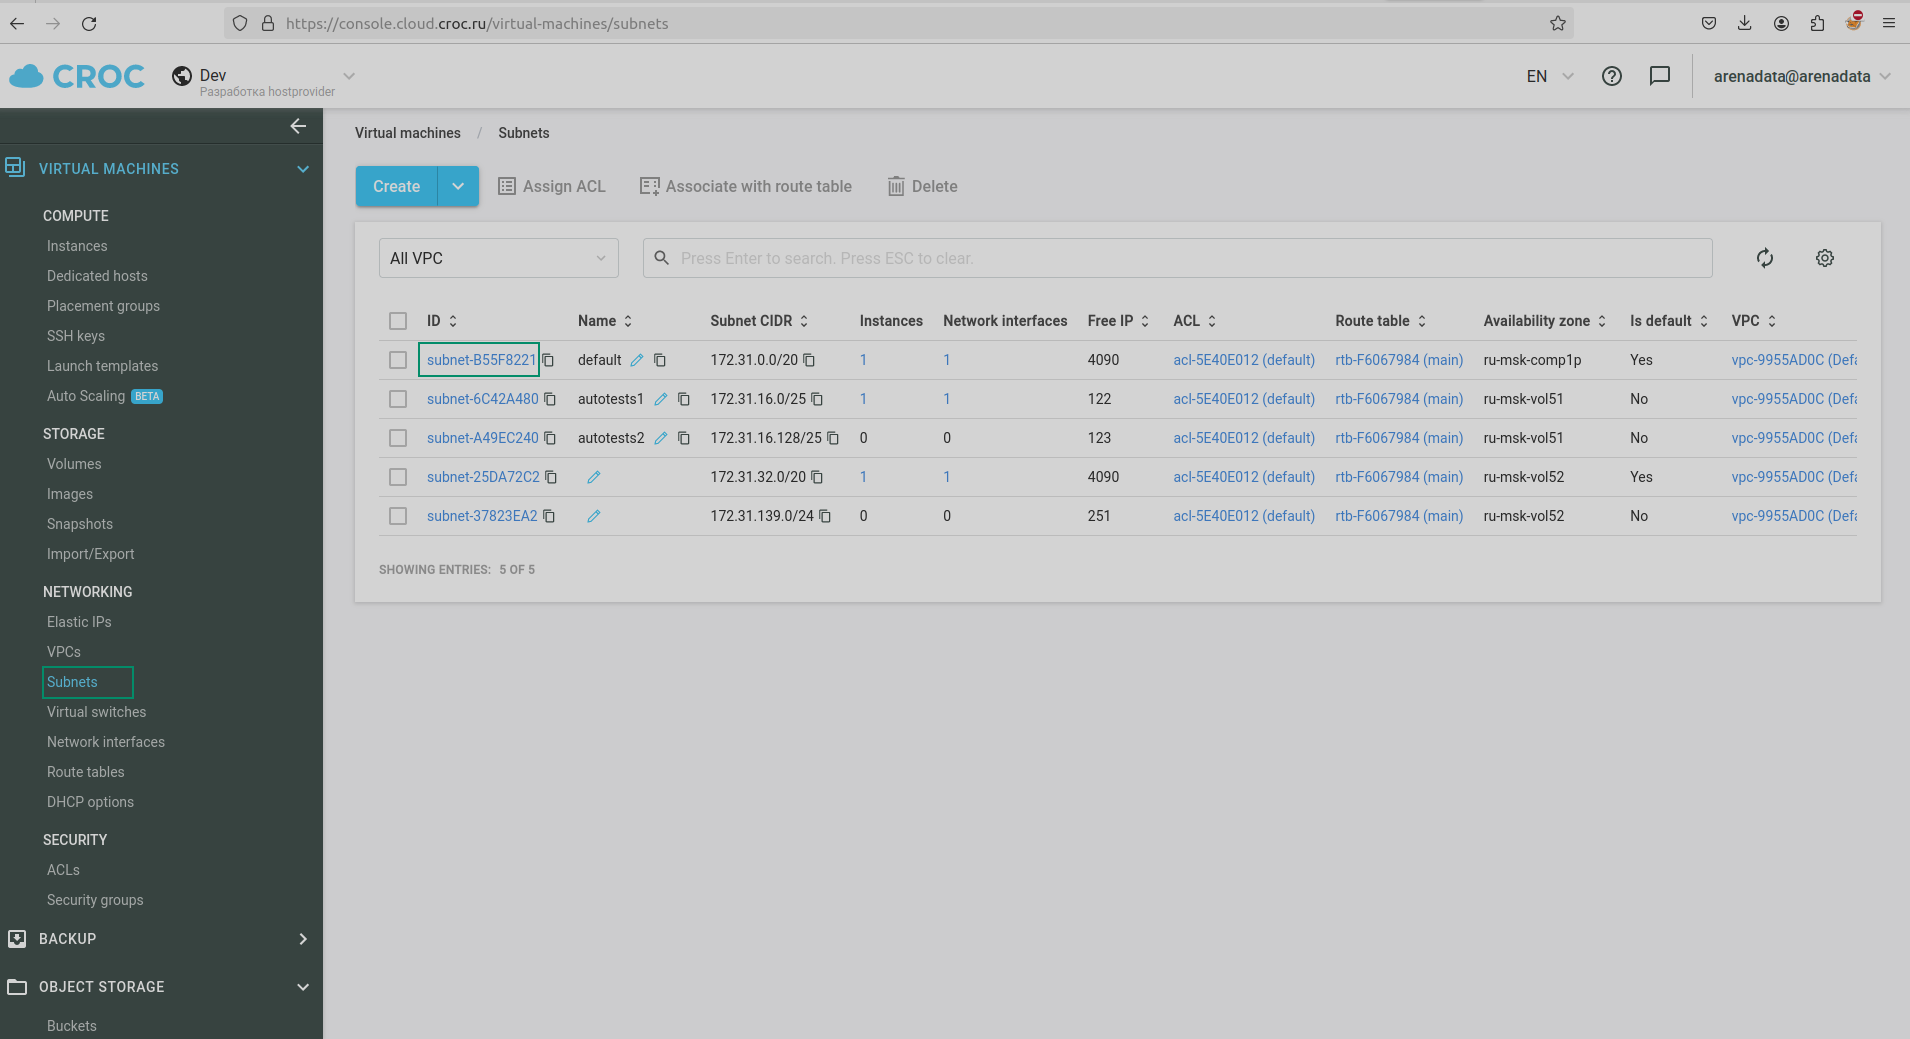 The "Subnets" page in the CROC UI
 The "Subnets" page in the CROC UI
Subnet ID can be copied by clicking on the icon next to the name.
 The subnet page
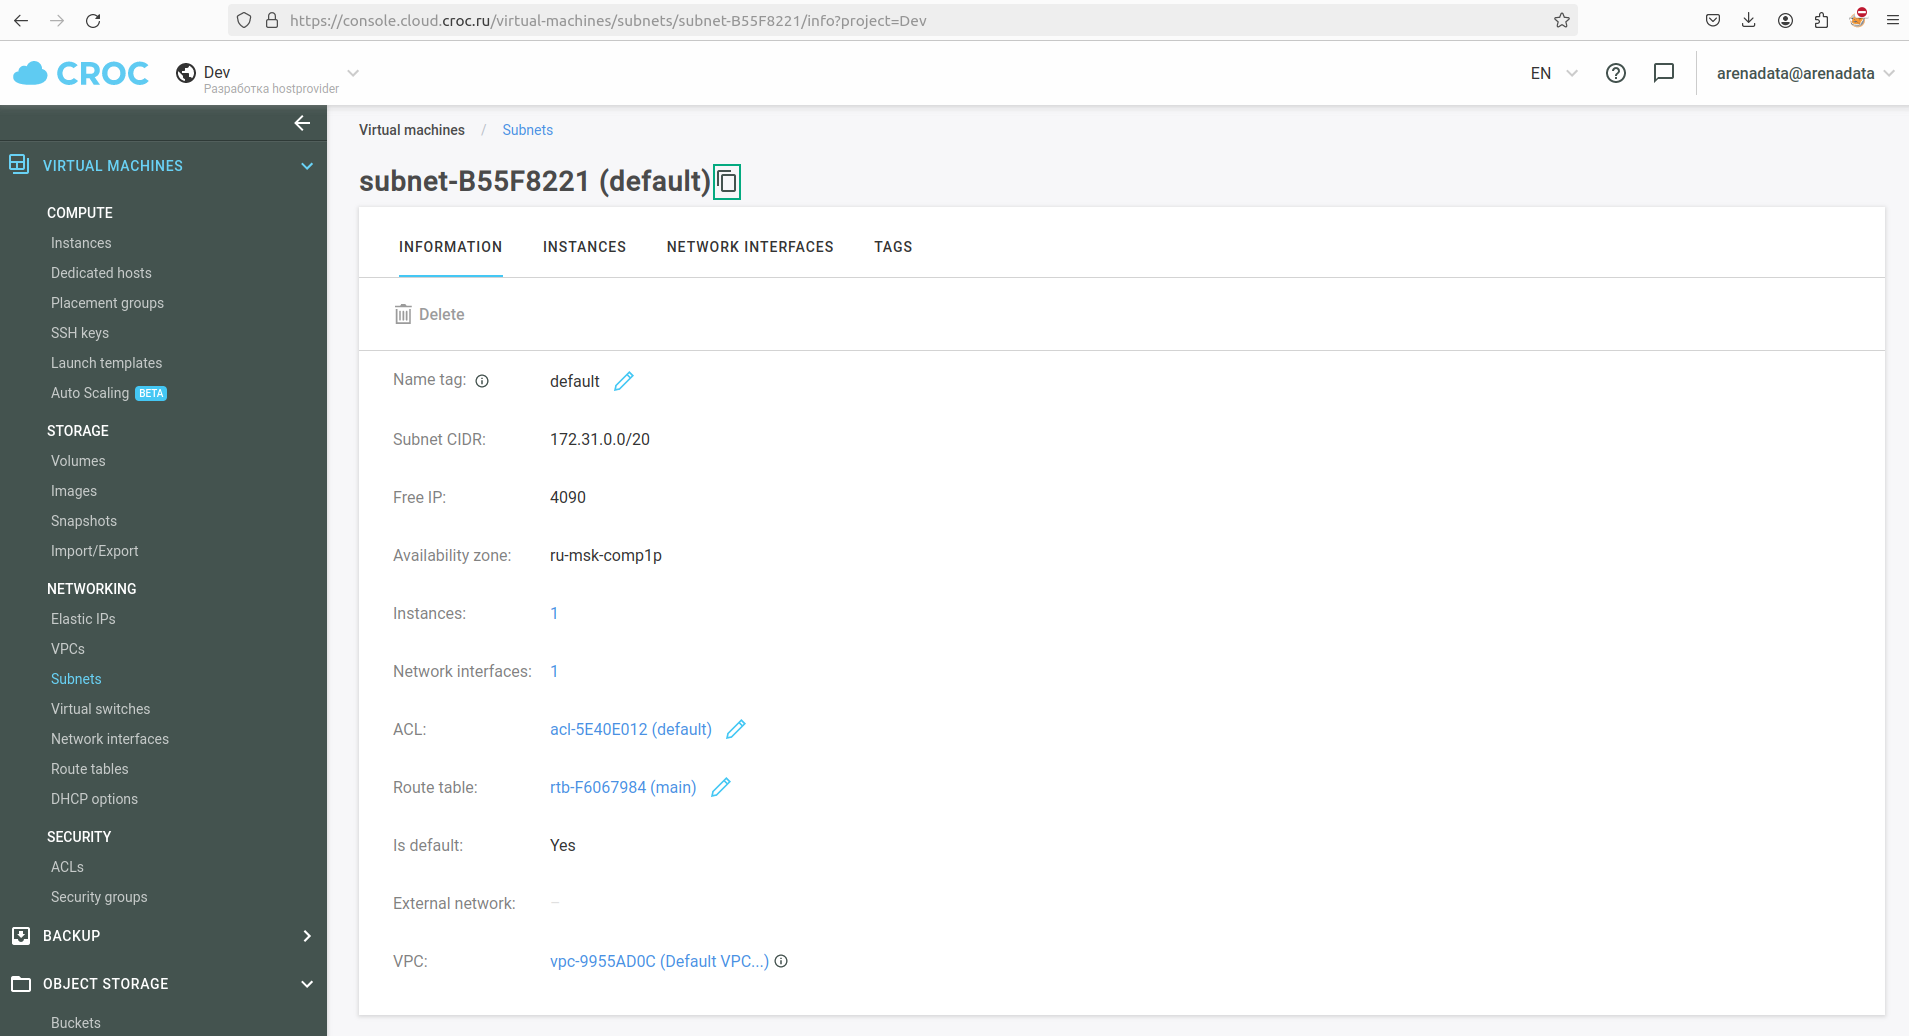 The subnet page
 -
Secondary network ID — an additional IP address that is assigned to a network interface in the selected subnet. To add a second network interface, you must explicitly specify the Subnet ID, and set the Assign secondary NIC checkbox checked in the configuration settings of the Create hosts action. Assign secondary NIC is available in the instance group when Show advanced toggle button is enabled.
-
default_host_settings — a group with the default host settings that include the following parameters:
-
Labels — an optional parameter that sets default label values for all created VMs. If Labels in the hostprovider settings and Labels in the settings specified when creating a virtual machine are set simultaneously, the last one has higher priority .
-
Security Group IDs — an optional parameter that sets the default Security Group ID value for all created VMs. If Security Group IDs in the hostprovider settings and Security Group IDs in the settings specified when creating a virtual machine are set simultaneously, the last one has higher priority .
-
-
matadata — a configuration group with data that you can use to configure or manage the running VM instances. It contains the following options:
-
Ssh-keys — user SSH keys that are created when initializing a virtual machine. Typically, a public SSH key consists of a mandatory part (key) and an optional part (
usernameorusername@hostnamethat is specified after a space).
-