

Manage an SSH hostprovider
Overview
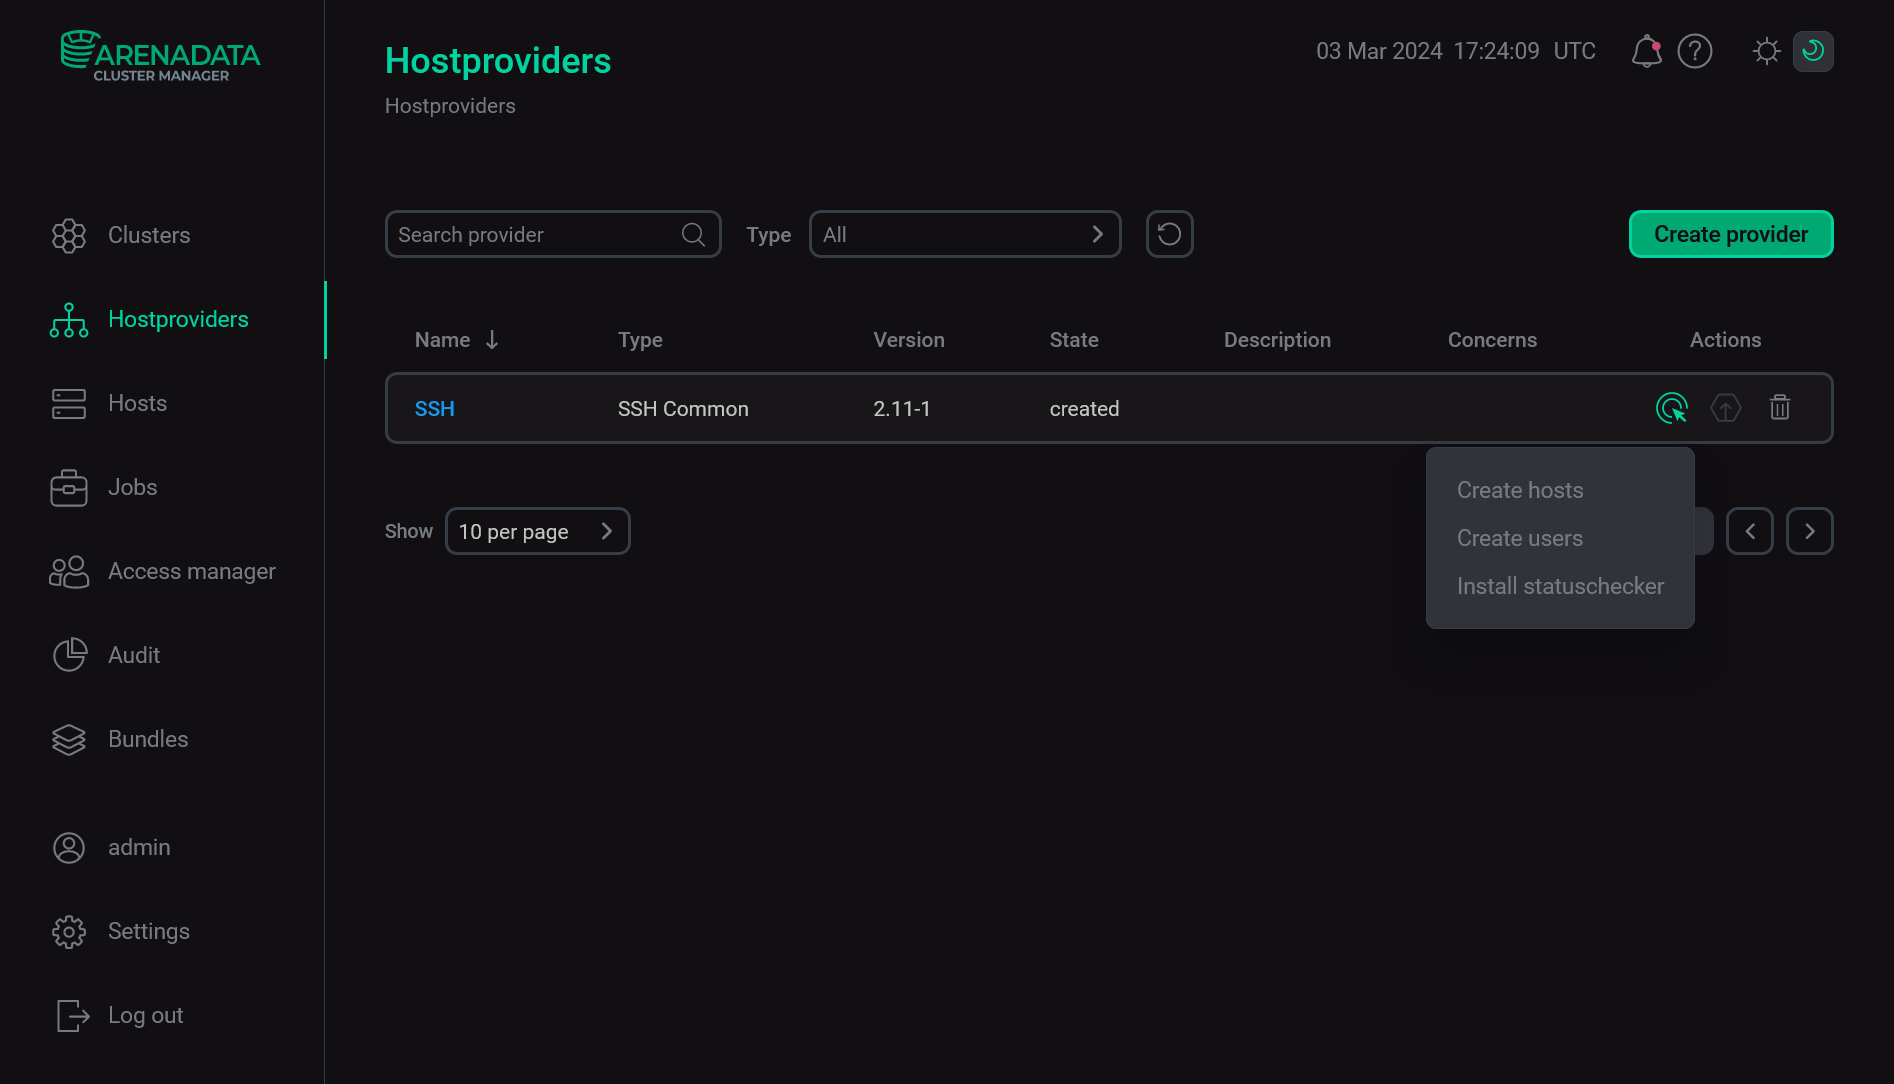
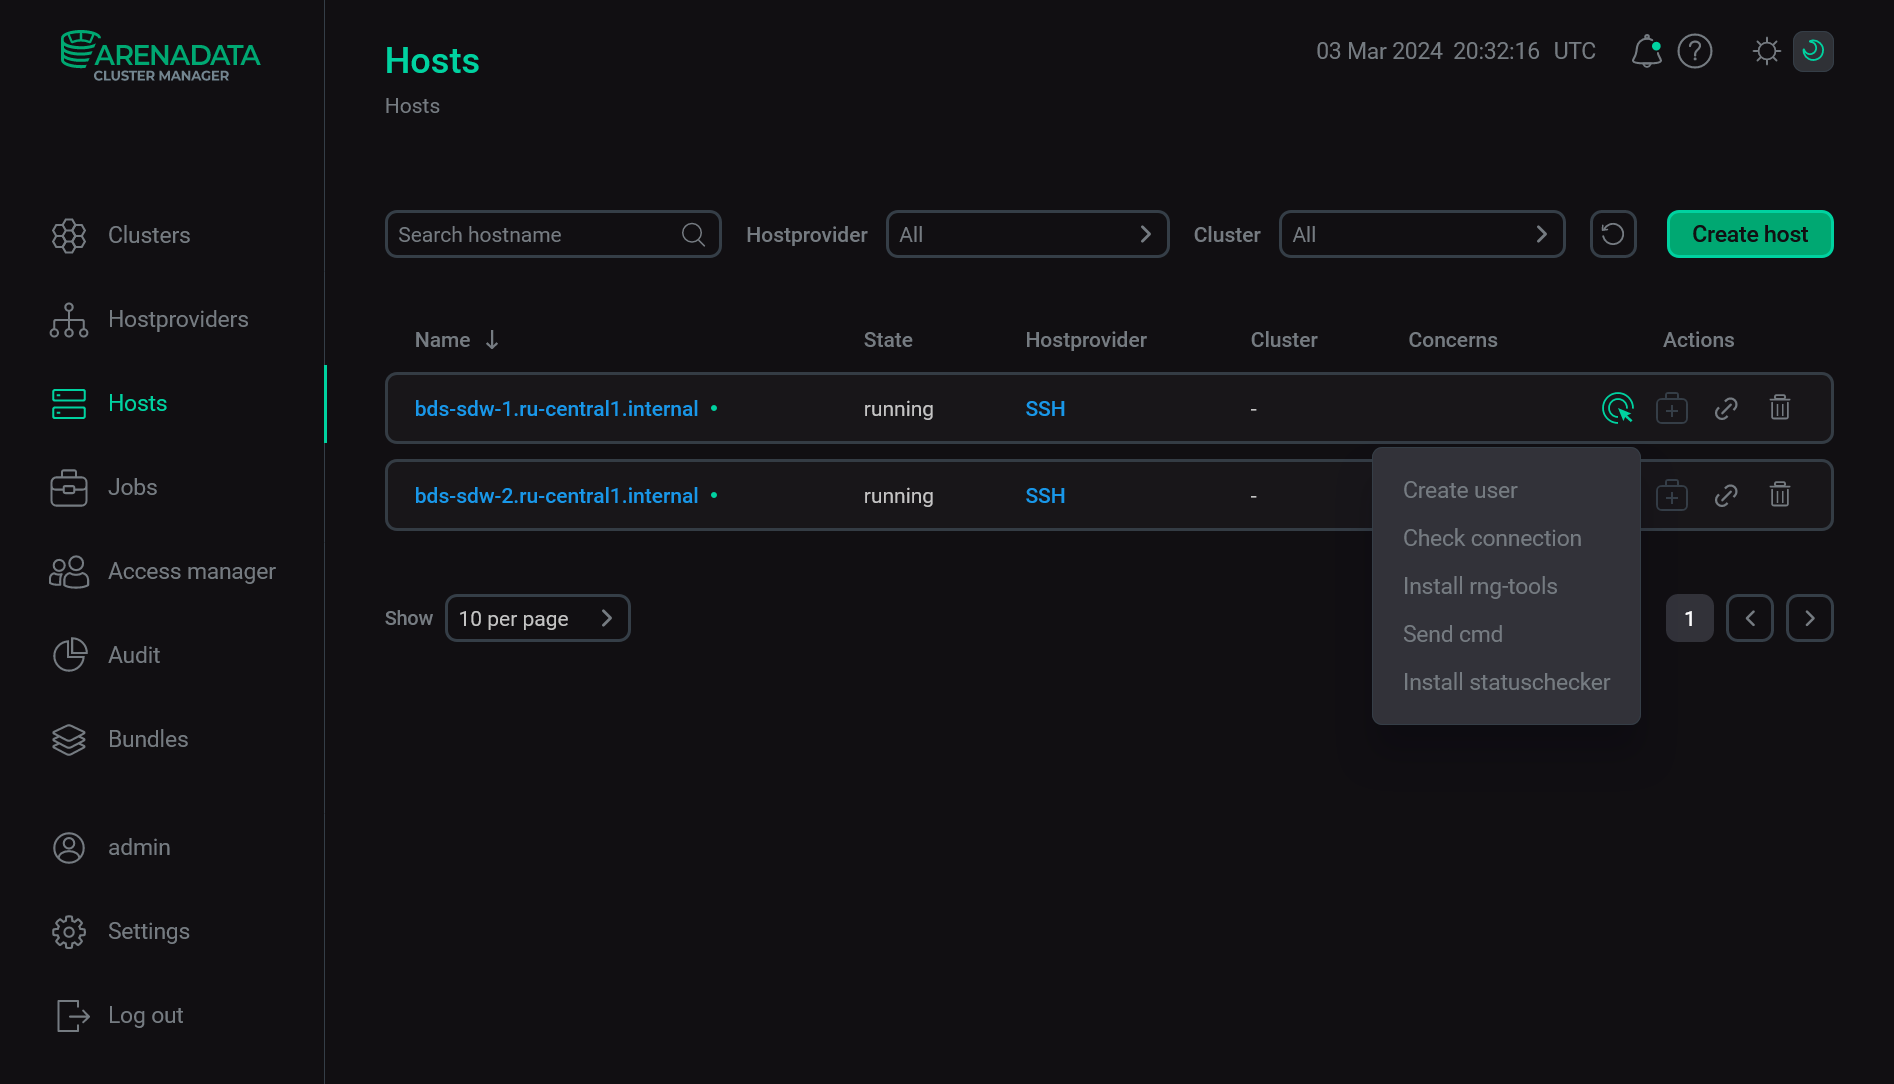
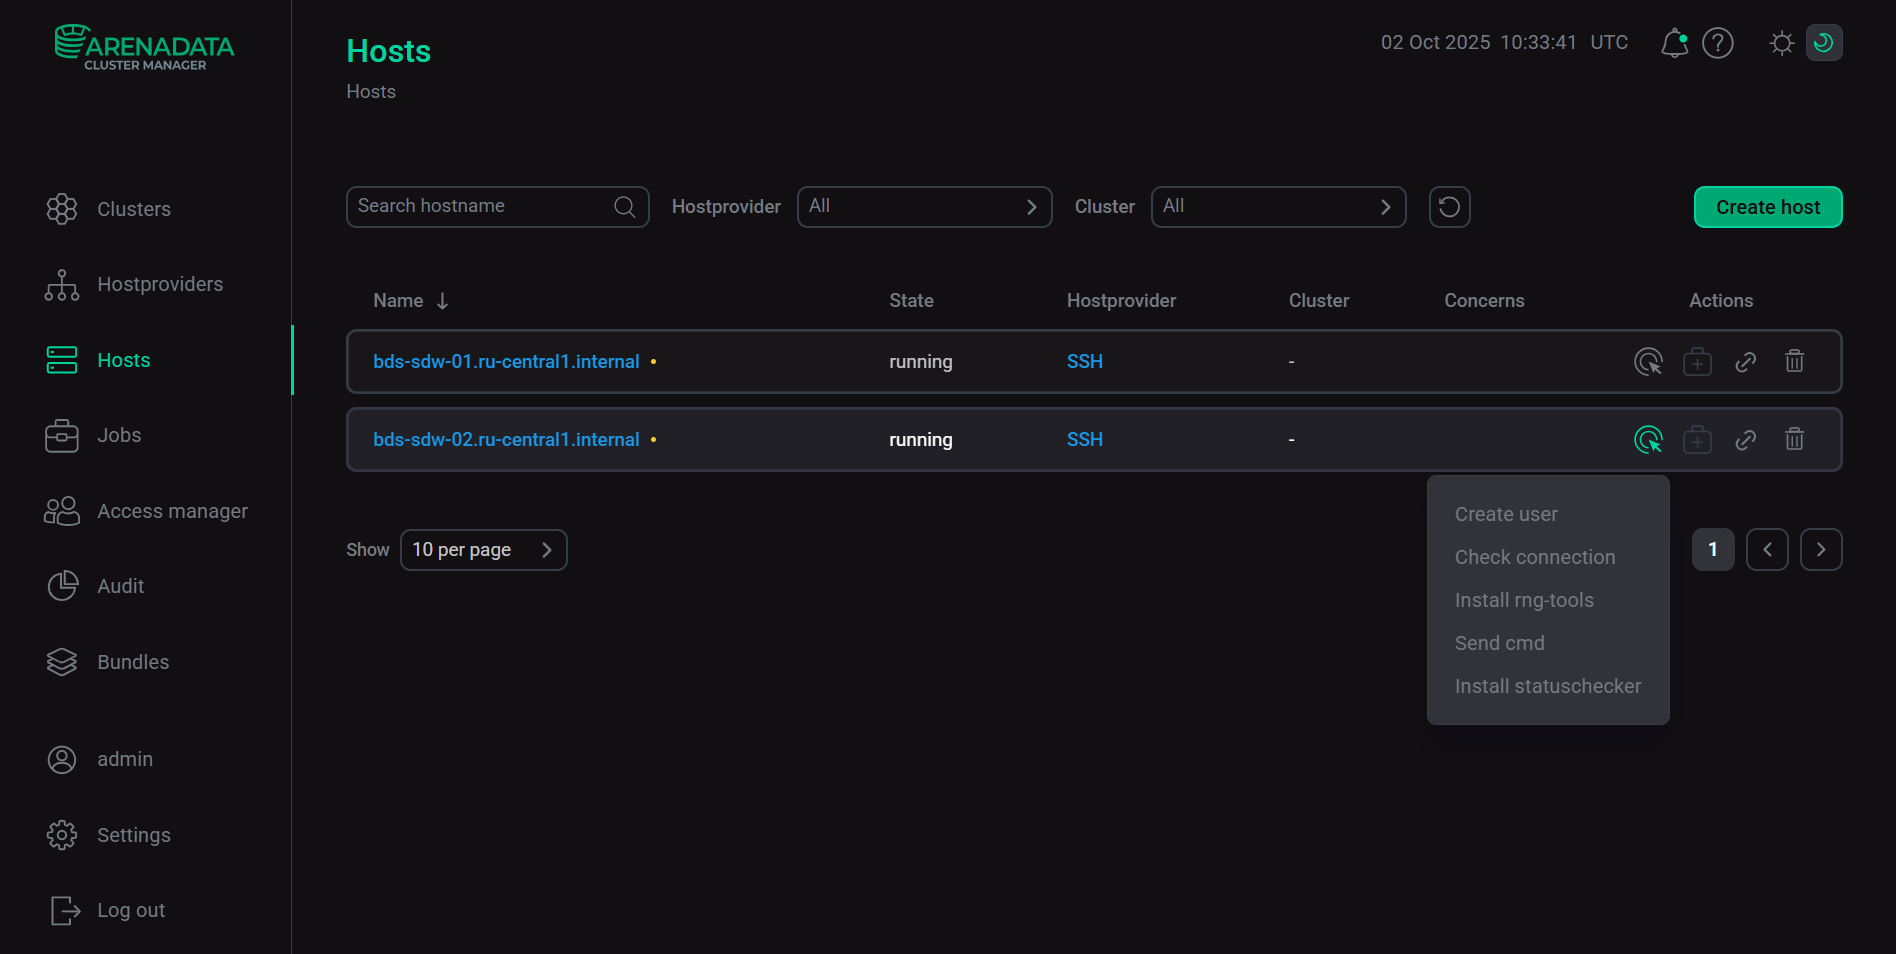
After you create and configure an SSH hostprovider, you can manage it on the Hostproviders page of the ADCM web interface. To see available hostprovider actions, click the ![]()
![]() icon in the Actions column.
icon in the Actions column.
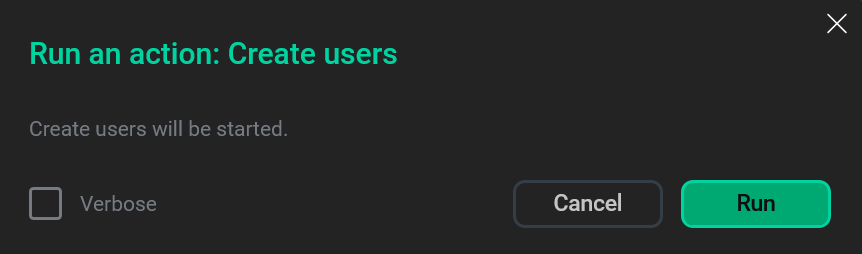
When you choose an action, ADCM displays a dialog window to confirm your choice. In this dialog window, you can select the Verbose checkbox to see additional execution details on the Jobs page. For some actions, you should first fill in additional options in a separate window.
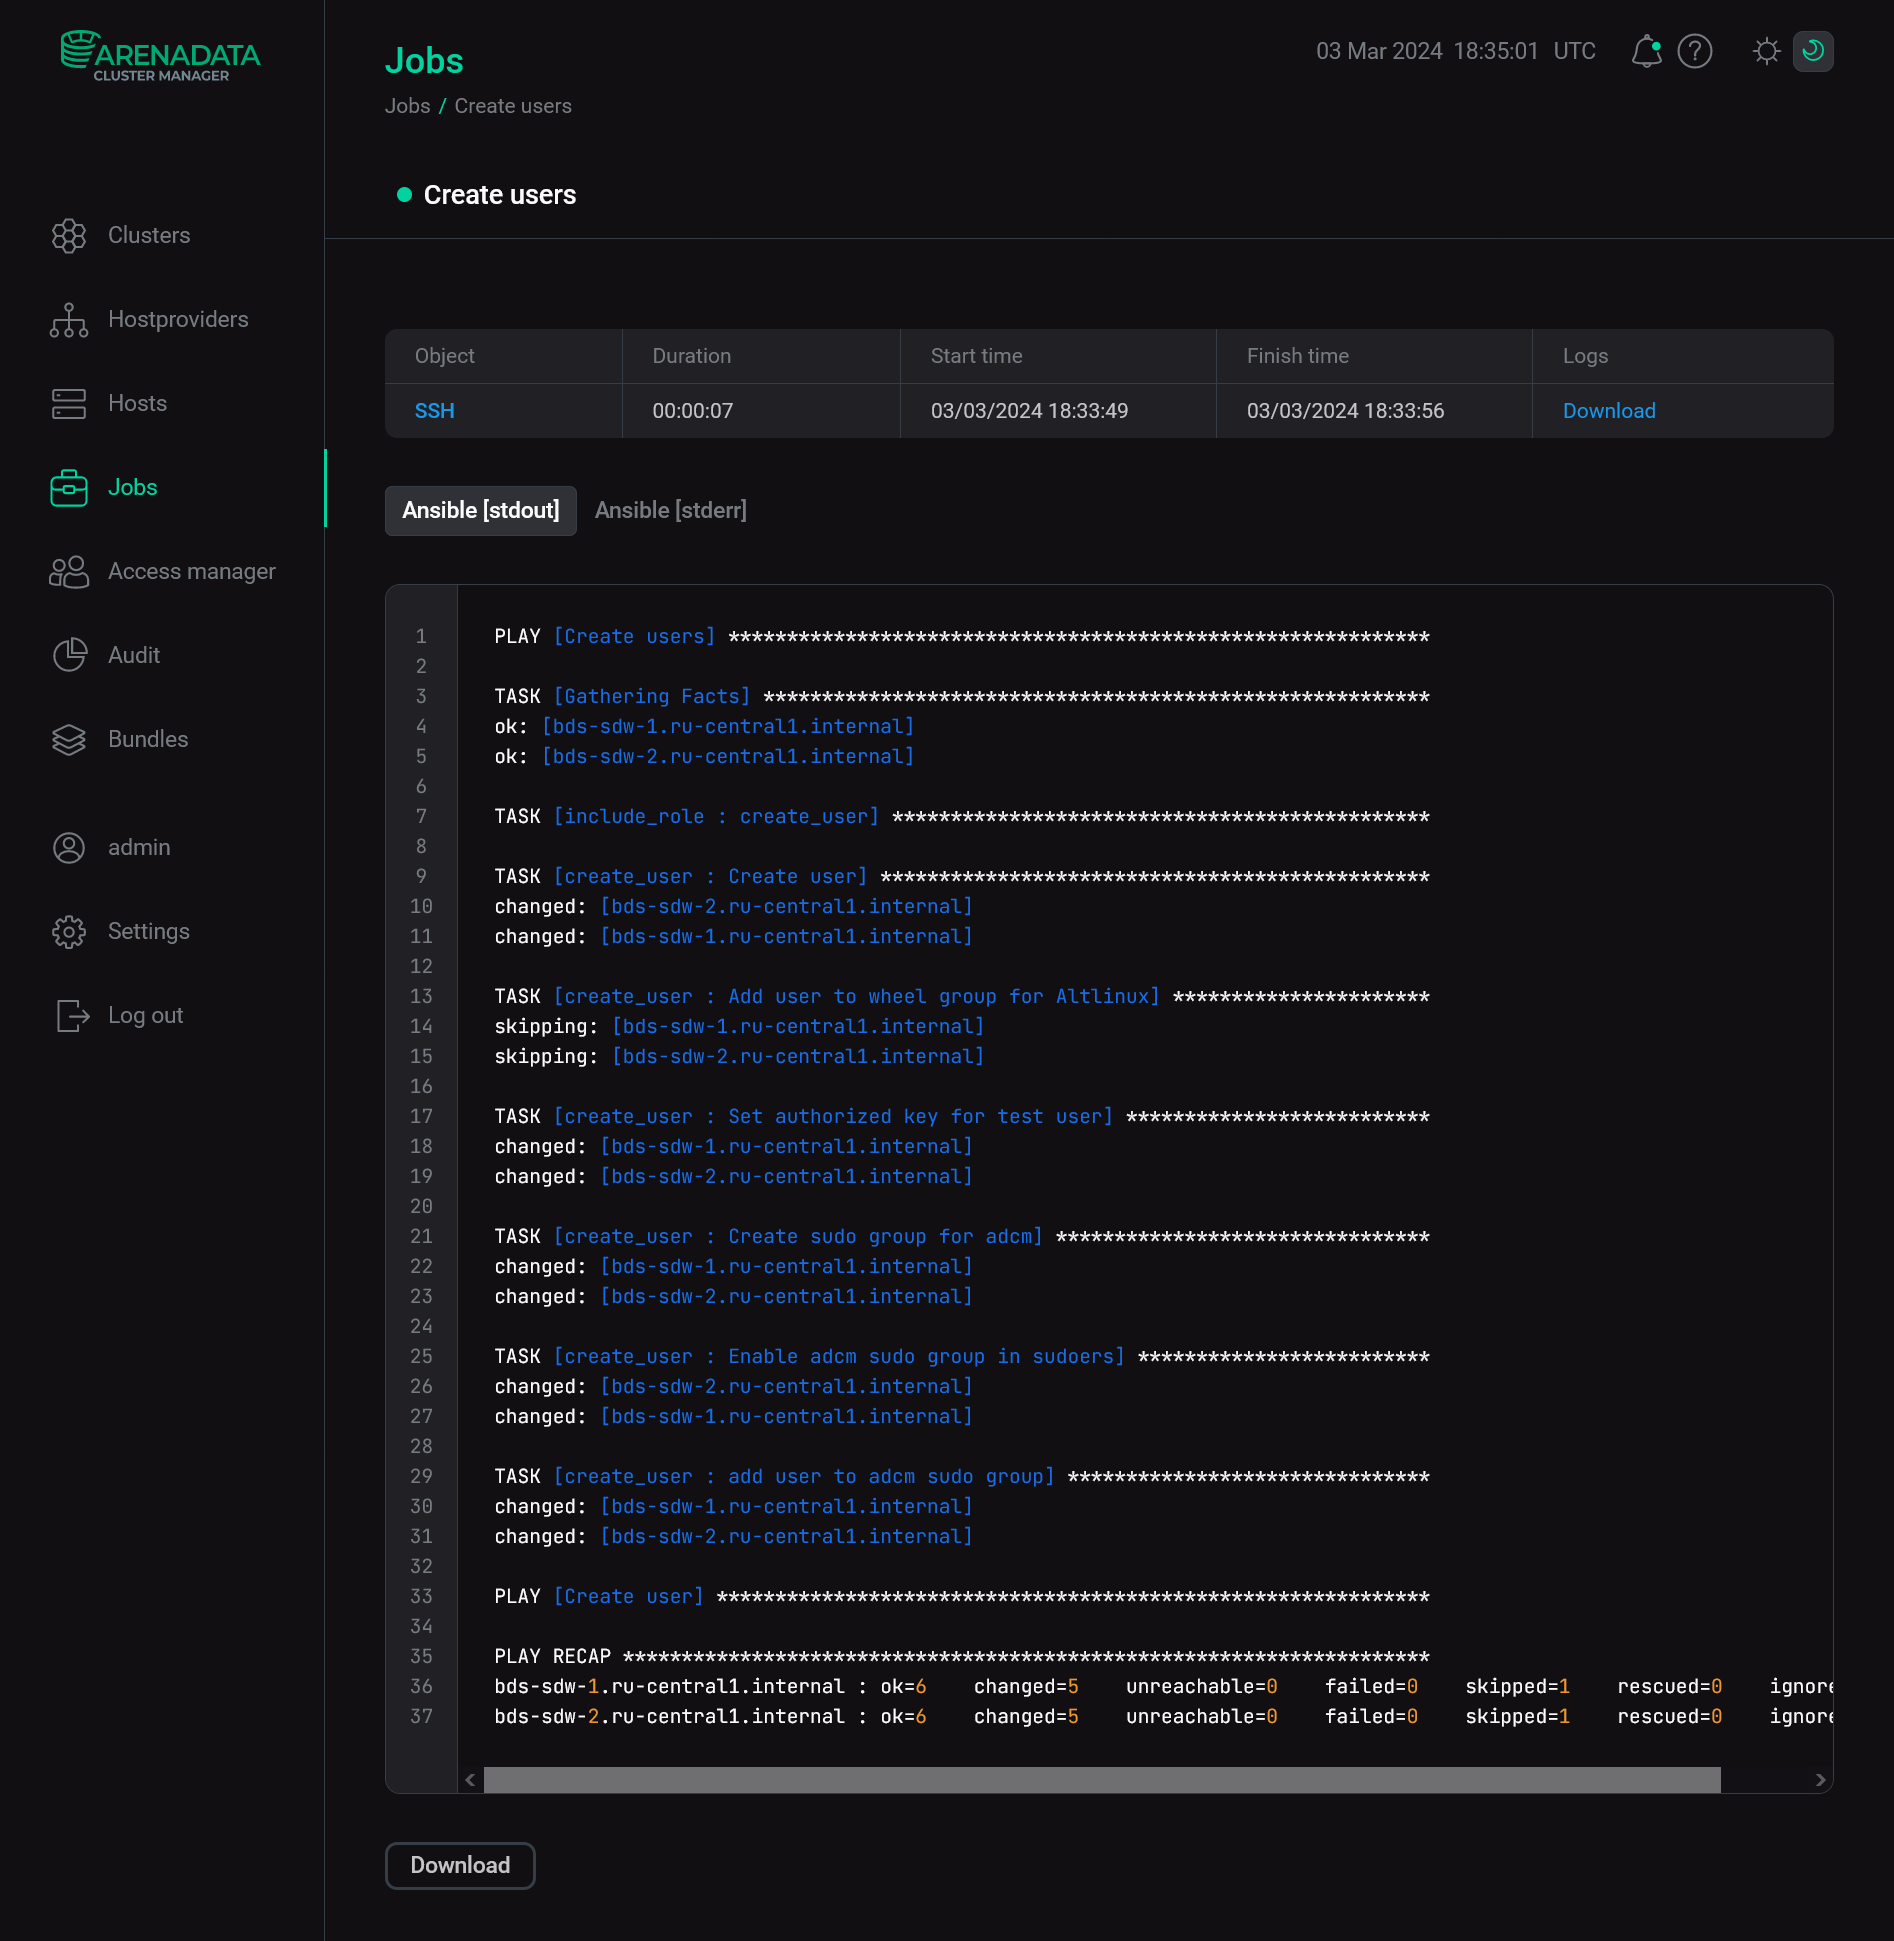
When an action starts, ADCM displays its execution process and result on the Jobs page. From this page, you can navigate to a page with details on an individual job (by clicking a job name) to see inner steps of that job execution and analyze errors, if any.
To stop a running action, in the row with the required action on the Jobs page, click the ![]()
![]() icon in the Actions column. In the dialog box, confirm the termination of the action by clicking Stop. As a result, the
icon in the Actions column. In the dialog box, confirm the termination of the action by clicking Stop. As a result, the aborted status is automatically assigned to the corresponding job.
All available hostprovider actions are listed below.
Create hosts
The Create hosts action adds information about several hosts to ADCM. All hosts should be created in a cloud or on-premises first. For each host, if an IP address can be identified, the SSH connection is checked and the statuschecker is installed. Thus, you do not need to run the Check connection and Install statuschecker actions for each created host.
|
IMPORTANT
|
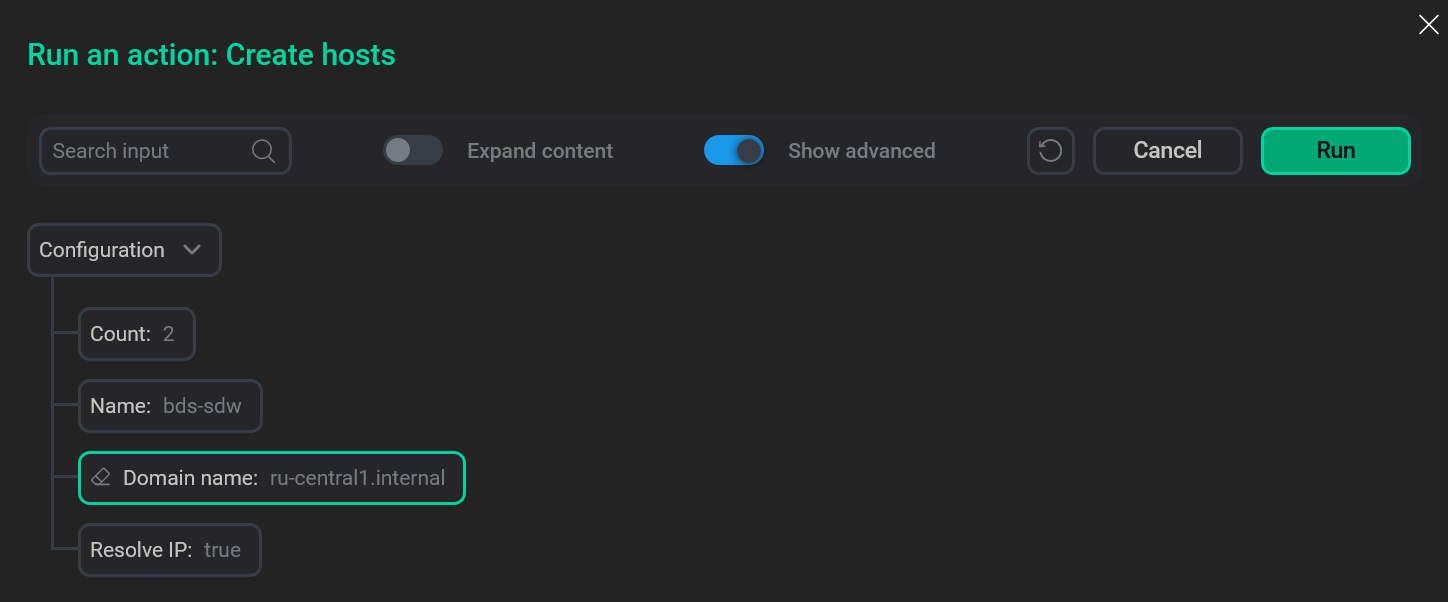
After you select the Create hosts action, a dialog box opens where you can set the following parameters:
-
Hostname mask — a mask of host names that should contain at least one
#character and a domain name. The length of the#character string defines the minimum host number length. The full host name is formed as<Name>-<# characters>.<Domain name>, where<# characters>— host sequence number padded with zeros on the left until reaching the required number of#characters, for example,001. -
Start number — a number starting from which the host names are generated (
1by default). -
Count — a number of hosts.
-
Resolve IP — a flag that indicates whether ADCM can access the DNS server that provides the domain. If there is no such access, set the field value to
falseand specify IP addresses in the settings of new hosts manually after the Create hosts action is completed. Then, apply the Check connection and Install statuschecker actions to each created host.
The figure below shows how to fill in the action parameters for two hosts that already exist in the Yandex Cloud and have the following FQDNs: bds-sdw-001.ru-central1.internal and bds-sdw-002.ru-central1.internal (resolving IP is possible).
To run the Create hosts action, click Run in the action form. Then, confirm the action in the standard confirmation dialog.
As a successful result, new hosts and their actions become available on the Hosts page. For each host, an IP address is defined automatically if possible (see Resolve IP above). Other parameters (Username, Port, Password/SSH private key) are filled in as well — based on the SSH hostprovider settings.
Create users
The Create users action adds new users to all hosts that were previously created via the SSH hostprovider. Names and public SSH keys of created users are extracted from the SSH keys field of the SSH hostprovider configuration options. Users will be able to access hosts using their private SSH keys.
After you select the action, the standard confirmation dialog opens. Click Run to confirm the action. No additional parameters are required.
|
IMPORTANT
|
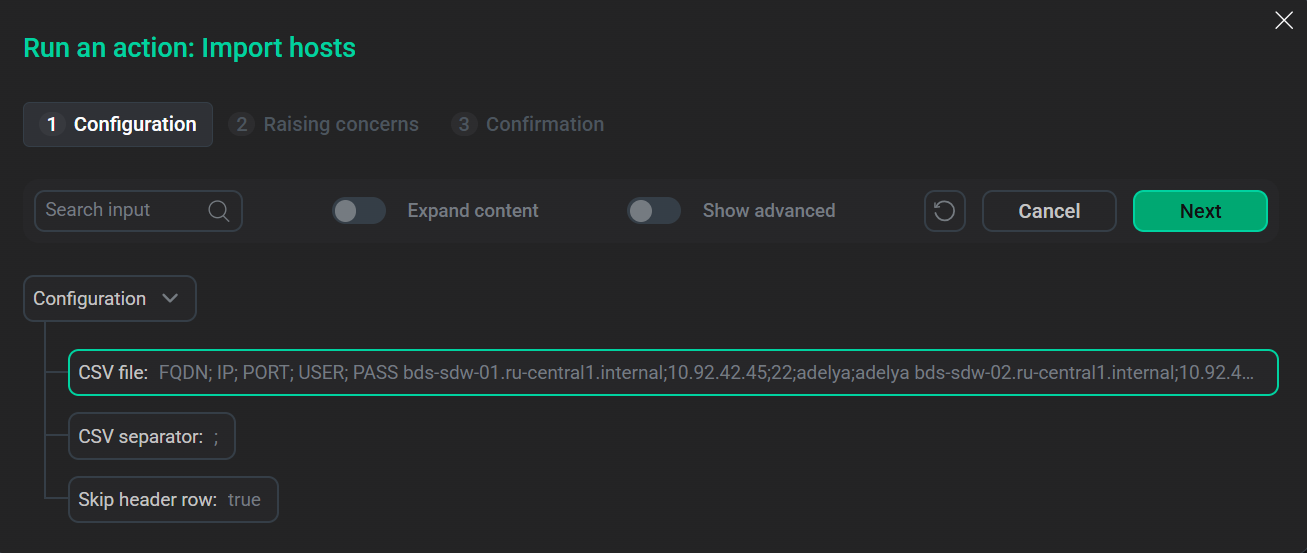
Import hosts
The Import hosts action adds information about several hosts based on information from a CSV file to ADCM. The file should contain values of the following parameters:
-
FQDN
-
IP address
-
Port
-
Username
-
Password
The main difference between the Import hosts and Create hosts actions is that there is no need to fill in the SSH hostprovider settings before selecting the Import hosts action.
All hosts should be created in a cloud or on-premises first. For each host, the SSH connection is checked and the statuschecker is installed. Thus, you do not need to run the Check connection and Install statuschecker actions for each imported host.
After you select the Import hosts action, a dialog box opens where you can set the following parameters:
-
CSV file — a CSV file with the host information. The example of a CSV file is given below.
-
CSV separator — a character used to separate values in a row of a CSV file. Possible values: semicolon (
;), comma (,), pipe (|), or tab. -
Skip header row — a flag that determines whether the first row of a CSV file should be skipped. The flag is used if a CSV file contains column headers.

The figure below shows how to fill in the action parameters for two hosts that already exist in the Yandex Cloud and have the following FQDNs: bds-sdw-01.ru-central1.internal and bds-sdw-02.ru-central1.internal.
To run the Import hosts action, click Run in the action form. Then, confirm the action in the standard confirmation dialog.
As a successful result, imported hosts and their actions become available on the Hosts page. For each host, an IP address and other parameters, such as Username, Port, and Password, are defined automatically based on the information from the CSV file.
Install statuschecker
The Install statuschecker action installs the statuschecker on all hosts that were previously created via the SSH hostprovider. This is a special daemon that periodically checks the status of services and components added to the cluster hosts via ADCM.
After you select the action, the standard confirmation dialog opens. Click Run to confirm the action. No additional parameters are required.
|
IMPORTANT
Before running the action, create and configure all hosts first — using the Create hosts action on the Hostproviders page or the Create host action on the Hosts page. |